3 major Lightroom FLAWS + the SOLUTIONS
Subscribe
Hello, Chris Parker here, and I want to share three major flaws in Lightroom that restrict your editing and the solutions.
So, before Lightroom, I was spending a week or two editing images in Adobe Camera Raw for the thousands of images that I created over the weekend for two, sometimes three weddings.
And once I was able to develop a workflow in Lightroom back in 2007, I was able to shorten the editing time from a week plus to one day. So, Lightroom literally changed my life by saving me a huge amount of editing time.
Since then, Adobe has added a lot of new editing tools that make our editing so much easier than it was back then. My favorite of all time is the Masking tools.
But, I find Lightroom still has three major flaws, both Classic and the cloud version, that make our editing so much more difficult than it should be. Plus, Adobe hasn’t given us the tools to save images destined for the trash can. So, I have my own opinion on a better solution for all three major flaws in Lightroom.
But I don’t want you to take my word for it. Instead, let’s review six images to compare the results side-by-side, and then I’ll share the secret editing tool that I use for solving these flaws in Lightroom.
GIGAPIXEL
One of the major flaws may not be that obvious, and that’s because today’s digital cameras usually provide the majority of us with a resolution that is perfect ninety percent of the time. But, if you buy or have an older digital camera, the resolution may not be up to today’s standards. Or, you may need to crop in really tight on a subject, and that reduces the resolution.
So, Lightroom doesn’t have a way to fix this. But we can open an image in Photoshop and upscale the file.
So, here’s the original, here’s the cropped version, and this has a resolution of… and here’s an upscaled version with a resolution of…
Now, it’s not perfect, but it should be fine in most cases. But look at this version. I upscaled this one even larger than the Photoshop version with a resolution of…. And I think this version is ten times better. I mean, look at all that detail that’s not visible in Photoshop’s version.
DENOISE
Now, you’re probably well aware of digital noise and how it can ruin an image if there’s too much of it. Luckily, Lightroom has a tool to remove digital noise. But I can’t recall this denoise module being updated in the last five, ten, or more years. It’s one hundred percent outdated.
Now, you may not be aware that it has flaws since it does a decent job removing digital noise. Let me show you…
However, let’s compare this Lightroom denoise edit with this one which again wasn’t done with Adobe software.
So, again, Lightroom’s edit doesn’t compare with the second edit. This one is a hundred times better, in my opinion, since there’s more detail in the overall image.
SHARPEN
So, let’s say you’ve done everything possible to create a sharp image. However, for some reason, you still end up with an image that isn’t as sharp as it can be. We’ve all been there, and I’ve done it myself recently with a photo of my daughter.
And this image may look familiar if you’re subscribed because I just released a tutorial on retouching skin, where I removed this piece of dry, flaky skin and the link to that is in the description below.
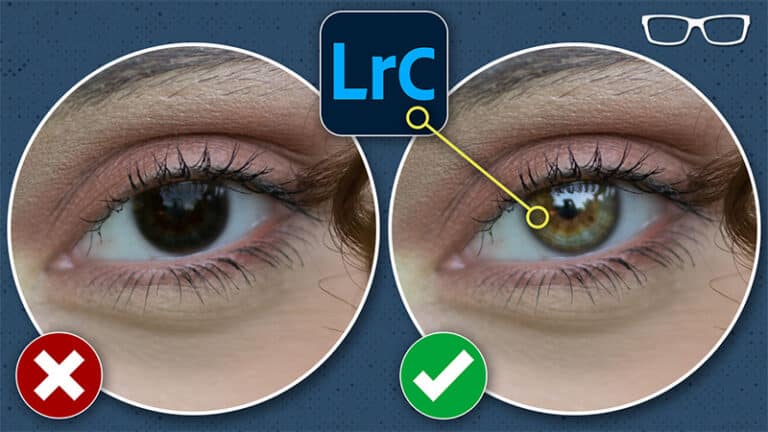
So, I failed to place the focus point on her eye, and I was using a shallow depth of field of f one point eight, and her eye and eyebrow is out of focus.
Now, we have sharpening in Lightroom. However, no matter how hard I try, there isn’t any way to save this image in Lightroom, and I was about to give up until I discovered the solution. And here’s the final edit. How cool is that? I love it!
To try this out on your own images, you can download a free trial in the description below and watch this video next to learn how to use this amazing editing software with Lightroom.


