Now that you’ve edited your photo completed your design project, illustration, or other artwork, it’s time to save the file.
Saving your files in Photoshop CC works differently vs. other software.
If you use Microsoft Word it has one file type: .docxIf
If you use Pages it too has one file type: .pages
Photoshop CC, on the other hand, has over twenty file types!
Here are just a few of the file types you can save within Photoshop:
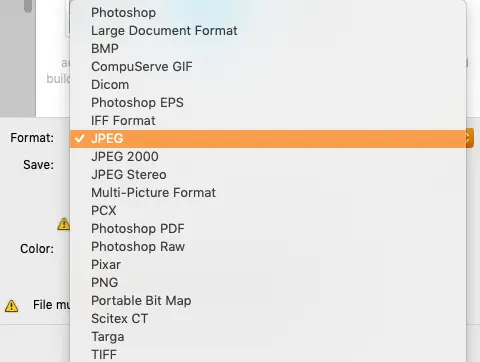
JPG | PSD | PNG | TIFF | GIF
Which format you select during the saving process will be determined by your needs for that file…
…is the file going to be used for online use?
Or do you intend on printing via an in-home printer or professionally? Did you use Photoshop layers?
Is the background of your document transparent (and it needs to stay that way)?
In this guide, you’ll learn all the different ways to save your files based on the final intended purpose of the file…
Once you’re done with this Photoshop saving guide, you’ll know which file format to use and when.
Next up, the basics of saving in Adobe Photoshop and common file types for Photoshop.
Table of Contents
Saving Basics
Let’s do a quick overview of the 4 most popular file formats that you’ll use in Photoshop CC.
Common File Formats
The three most used file formats are JPG, PNG, and GIF.
These 3 formats are industry standards and can be used in almost any computer, software, and mobile devices.
In fact, most cameras (and smartphones + tablets) will create JPG files when taking photos.
This makes these formats very versatile and easy to share with others.
JPG files are a popular format for images. Typical uses, for this file type, includes online viewing and for print.
PNG files are used to keep transparent backgrounds intact.
This makes them more useful for online use, in some cases, think logos.
GIF formats can also be used for online use. They’re mostly used for creating animations like memes or ad banners.
Saving in Photoshop with either the “Save” or “Save As” options. In the upcoming scenarios, we’ll cover when you can use “save as.”
The power of Photoshop lies in the ability to use layers for editing your photos, creating design projects, creating your paintings or illustrations.
In order to keep the layers intact, when saving, you’ll need to use Photoshops proprietary format: PSD.
This format is not as widely used as the 3 standard file formats. So, your ability to share this file will be limited. Most Adobe software can recognize and use this format.
However, you’ll find very few programs that can take full advantage of using this format (outside of the Adobe suite). The reason is due to the layers themselves.
There are 12 different types of layers, and not all software can utilize the layers if it’s not a feature of that software. For example, GIMP can recognize and open PSD files.
However, GIMP does not have the same features/tools like Photoshop, and the layers will not retain the information.
If the tool or feature used in Photoshop is not one GIMP provides, then you may end up with a completely different end result…
…for one, GIMP does not have Layer Styles. If the PSD file has a layer with Layer Styles, it will not be visible within GIMP.
If you want to share a PSD file with a colleague, family, or friends, they’ll need Photoshop (to ensure full compatibility). Otherwise, you’ll have to flatten the layers and save as a JPG.
To save with any of the above file formats, you’ll use “Save” or “Save As” from the menu.
Which one you choose will be based on whether or not you need to save as a new format or whether or not any changes were made.
Check out the “saving” scenarios below (the next section) to learn more about some different saving options.
To access the Export options, go to “File” and scroll down to Export. Click to enlarge.
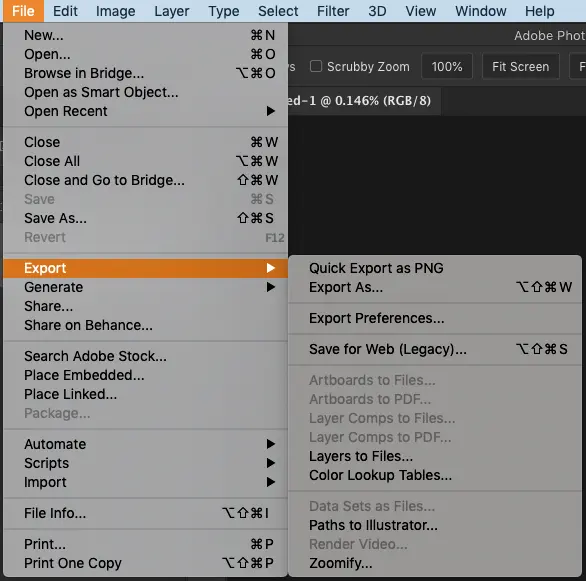
To access the Export options, go to “File” and scroll down to Export. Click to enlarge.
Exporting Options
Exporting your files is just another method for saving.
When exporting a file, in Photoshop, there are 4 different ways to do so. In addition, you need to select the correct format.Let’s go over each of the 4 categories to become familiar with them.
Then, we’ll look at 7 different scenarios to learn when to use which option.
Save for Web
This export tool, “Save for Web,” is designed specifically for saving images for, well, the web.
Anytime your file is intended for online use, I’d recommend using this option.
Why?
The “Save for Web” tool optimizes your file for posting online.
Optimizing your pictures for online use means that the images will load quicker for the end-user (viewer).
Which is especially important if you have a website for business.
The speed of your site is a critical element Google uses to rank your website and pages.
Have you ever gone to a website and waited and waited and waited for it to load?
Chances are, the images being downloaded to your browser are very large and weren’t optimized.
Oh, and they may have chosen the wrong resolution too.
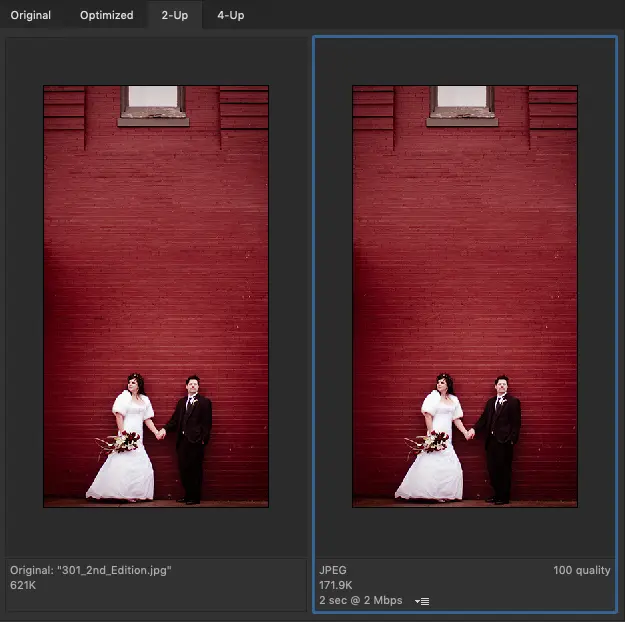
This can all be solved by using the “Save for Web” export option. Check out the image below.
Each file is the exact same photo and has the same dimensions.
However, compare the formats and the size of the files.
The two jpg files (first 2) are the same format. However, the smallest file size was created using “Save for Web” (2nd image).
Look how much larger the PSD file size is!
Could you imagine how long that would take to load in your browser?
Hint: A lot longer!
Quick Export + Export As
“Quick Export as PNG” will quickly save your file as a PNG file.
“Export As” will provide more options for saving your file.
Like, changing the size of the image, changing the size of the canvas, including or excluding metadata, and more.
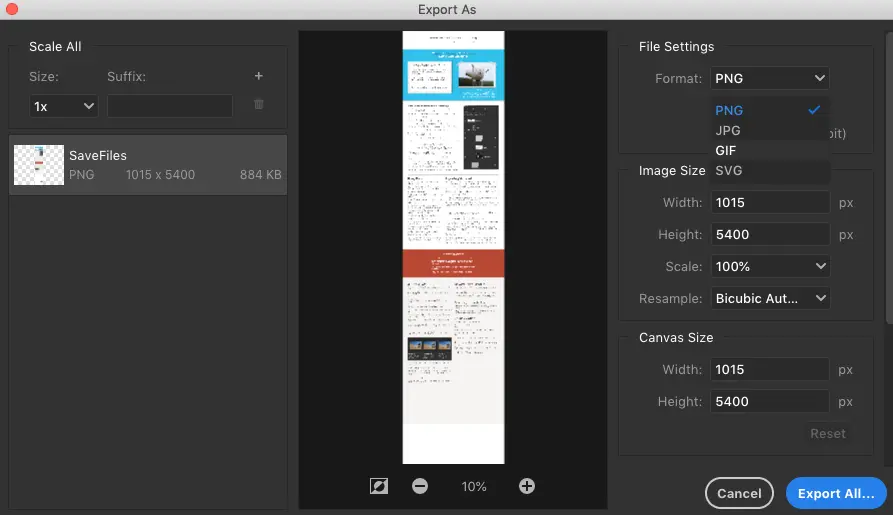
Click image to enlarge.
This is the “Export As” dialogue box. As you can see, it has more options for exporting vs. just straight to .png (like Quick Export as PNG).
Artboards + Layers
This save category is more likely to be used by graphic designers.
They allow you to export your Artboards to individual files. Or individual layers to separate files.
Other
Not sure how to name this category.
The first option, “Paths to Illustrator,” is used by graphic designers.
It will allow you to export any paths for use in Illustrator.
Next, Render to Video will allow you to render your video files.
Then, we have Zoomify. This will export your file for online use.
When completed, it will provide HTML5 code for use on your website.
Once added to your site, your viewers will be able to “zoom” into the photo with the available controls.
Checkout the Zoomify website to see it in action.

Save In Photoshop Example 1
Let’s say you have an image that you’d like to re-size for a wall print. And the original file is around 5×7 at 300dpi (1500 pixels x 2100 pixels).
However, you would like a large 30×40 (9,000 pixels by 12,000 pixels) canvas to hang over your fireplace.
First, you’ll need to re-size the photo to the size required (enlarge the original). After re-sizing, it’s time to save it so you can send it to the pro lab.
Chances are, your original image is using the JPG format. Which means you can use “Save” to save the file.
However, using this method will overwrite your original image! Instead, you should use “Save as.”
Step 01
Go up to your menu… File and select “Save As.”
There’s also a keyboard shortcut for this option:
- Mac: Shift + Cmd + S
- Win: Shift + Ctrl + S

Click image to enlarge.
Image 01: If you have a Photoshop version older than 2020, you’ll see this screen by default. Otherwise, you’ll see it when you click the button (from the screen view below): “Save on your computer.”
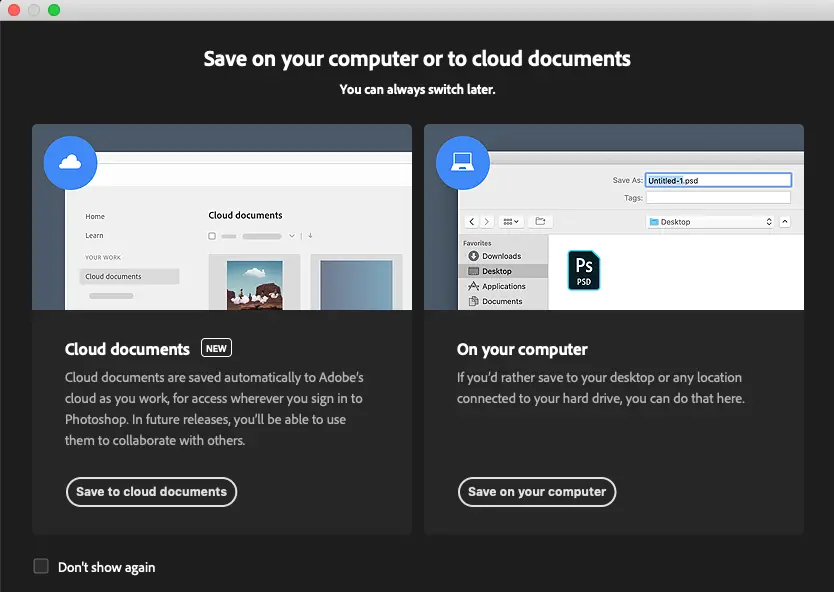
Image 02: After click save you’ll get this new save screen for Photoshop 2020 and later. Click image to enlarge.
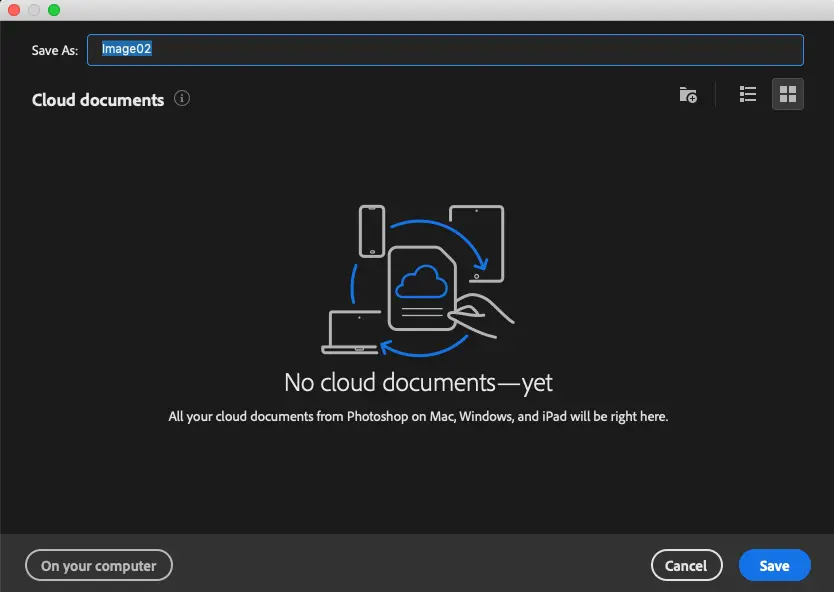
Image 03: When you click the button (from the image above): click Save to cloud documents… you’ll see this screen. If you’ve uploaded files to the cloud previously, you’ll see them here.
As you can see, I don’t use Adobe cloud. Click image to enlarge.
Step 02
After clicking “Save As” you may see one of the two save dialog windows to the left (Image 01 or Image 02). It will depend on your version of Photoshop.
In the Photoshop CC 2020 version, you now have the option to save to your computer or to the cloud.
Saving to the cloud will be done through Adobe’s cloud service. Which is included for all their plans.
However, how much space you have will be determined by which package you signed up for.
Image 01: this is the screen you’ll see if you choose “Save on your computer” or if you have an older version of Photoshop.
Image 03: if you choose to save to the cloud, you’ll see this save window.
Step 03
Tips for saving to your computer…
Since your original and the intended output are the same format (JPG), click save.
Also, make sure to choose a file name different from the original. Otherwise, you’ll end up overwriting the original.
If you wish to save in a different format, click on Format and choose the file type you need.
Click image to enlarge.
This flyer has a LOT of layers! To keep the layers intact, you’ll need to use Photoshop’s PSD format.
Oh, and this flyer template is free from Adobe Stock! Create a free account and search for free templates.
You’ll then be able to access the file via the Library panel. Click to enlarge.
Save In Photoshop Example 2
For this project, you’re creating a flyer that contains several layers. One for the background image, another for text, and maybe another for a banner shape.
Or maybe you did some photo editing and decided to use several adjustment layers.
Your original file was most likely a JPG file if you were working on a photo. If you created a new document for your design project, it wouldn’t have a format until you save it for the first time.
Either way, the method you’ll want to use to save it is: Save As
Here’s why.
Your file now has 2 or more layers, and to preserve them, you’ll need to use Photoshops proprietary format: PSD
Which can be applied when using Save As.
In the previous scenario, you weren’t changing the format. But, we still used Save As to preserve the original file.
So, this time we want to click on format so we can choose the PSD format.
Click image to enlarge.
I updated the flyer with new colors and text. Now, to save it, I just need to use file save. Or, if I want to save multiple versions of the flyer, I can use file save as to create a duplicate file with a new name.
The same concept applies if we’re editing a photo. If our first version included 2 different adjustment layers, you’d need to save it as a PSD.
Then, when we work on the image again, maybe we add 3 more adjustment layers. All you need to do is use “save” to overwrite the original file with the updates. Or “save as” to create another version.
Save In Photoshop Example 3
Let’s say you saved a file in the PSD format, and you come back tomorrow to work on it.
This time, you add some additional text layers or maybe some more adjustment layers. Either way, you need to save your work.Now, instead of Save As you can just use: Save.
There isn’t a need to preserve the original file or change formats. The file you’re working on is already in the format needed: PSD.
Unless, of course, you want to keep multiple versions of your work.
“Save” will just update your original file with the new layers you added (or any other work you did on the existing file).
This is fine since all layers are still intact, and you can always go back and delete layers if you made a mistake.
To use “Save”…
…go to File and choose “Save.”
The keyboard shortcuts…
- Mac: Cmd + S
- Windows: Control + S
- Mac: Cmd + S
- Windows: Ctrl + S
Click image to enlarge.
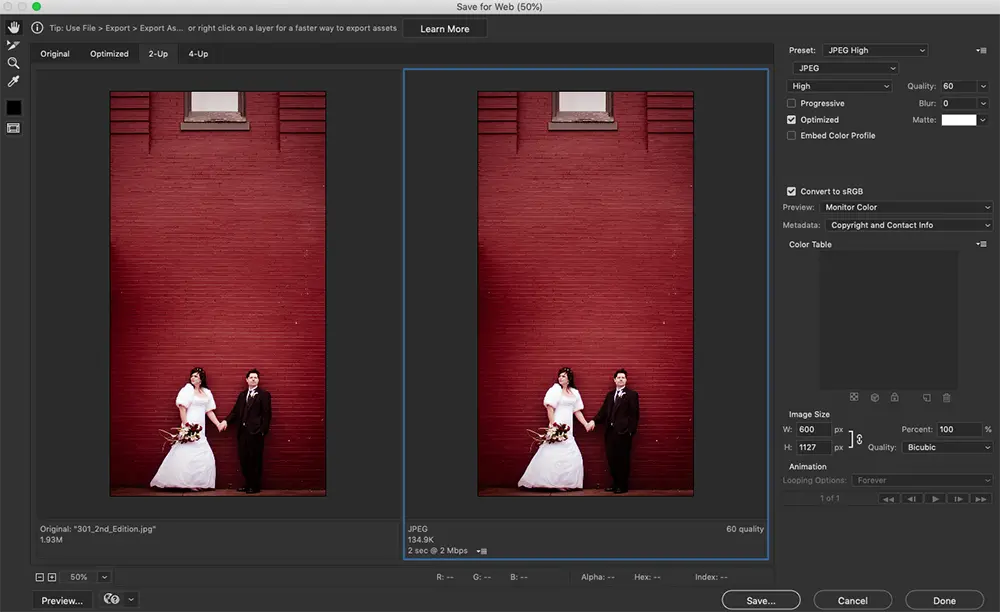
The “Save for Web” dialogue box. Click to enlarge.
Click image to enlarge.
The original file is 1.47MB @ 1500 pixels wide.
After re-sizing to fit this exact space, it shrunk to 346 pixels wide. Then, with “Save for Web,” the file size was reduced to 48KB. That’s 30 times smaller!
Oh, and I also used additional compression software to reduce the file even further… to 30KB. My preferred method of compression is through Imagify.
Save In Photoshop Example 4
You just got back from a family vacation, and you want to share your files with family and friends.
You plan on uploading them to Facebook and maybe creating a blog on your website.
Since your planning on placing the files online, you should use the JPG format.
However, in this scenario, we also want to optimize our files for internet use.
If we just use them as-is, they’ll be too large and will take forever to upload and view online.
The best tool for the job is: “Save for Web.”
Before saving for the web, I recommend changing the resolution of your file.
72dpi is sufficient for online use. Anything higher is overkill and will make your file size too large.
You may also want to re-size the file as well to help reduce the size as much as possible.
The exact size is dependent on the online destination of your image.
For example, this blog has a maximum width of 1020 pixels. So, I resize any photos that are going to be shown at full size at 102pixels wide.
Anything wider is too large and unnecessary.
How to Access Save for Web
Once your file is updated with the correct resolution, go up to your menu under File. Navigate to Export and select “Save for Web” (Legacy).
Legacy just means Photoshop is working on a replacement for this option.
Make sure to bookmark this page. It will be updated with any new revisions.
You should now see the “Save for Web” dialog box. It’s pretty huge and has a lot of stuff to choose from.
For now, let’s just cut to the chase and get our file optimized and saved for online use.
Step 01
First, what I recommend is choosing the “2-Up” tab. This will show a comparison of the original file next to your optimized file.
As you make adjustments to the settings, the image (preview) on the right will update. It will either look the same as or worse than the original.
The goal is to make the file size as small as possible without losing quality.
Second, you’ll need to select the file format. Since this is for online use and doesn’t have a transparent background, I selected the JPG format.
Third, for this demonstration, the quality setting was set to the highest, which is 100 (minimal compression).
Check out the file size of each which is listed just below the images. The first image has a file size of 621K…
…and, the second image has a size of 172K.
That’s a huge difference! This will make it faster for you to upload and viewers to download in their browser.
Now it’s time to adjust the settings to see if we can make the file size even smaller… without losing a noticeable amount of quality.
Click image to enlarge.
The 2-up tag was selected to review the original (on the left) with the compressed version (on the right).
Plus, for this scenario, I started with the highest quality setting of 100.

Click image to enlarge.
Using the “High” quality setting reduced the file size to 44K… without losing quality! According to Photoshop, the file will load twice as fast.
Going from 2 seconds to 1 sec (load time) may not seem like a lot. But, if you have a page heavy with images… it adds up to a lot!
Step 02
Next, we need to optimize before saving. Just under the file format selection, you’ll find another drop-down menu. Click on it for some more options.
Select each one and notice how the quality of the second image changes. The lower the quality, the smaller the file size.
Which one do you think looks best?
For my websites (the one you’re on now and this one), I’ll choose either High or Very High.
Maximum is pretty much exactly the same as the original. At least in regards to quality. But, it’s still being optimized for the internet.
Try it out on your own photos and compare the file sizes. If you begin to notice a loss in quality, choose a higher setting.
Step 03
After your happy with your selections, click the Save button in the bottom right of the window.
And that’s the basics for using “Save for Web.”

The PNG format is used for artwork that has a transparent background.
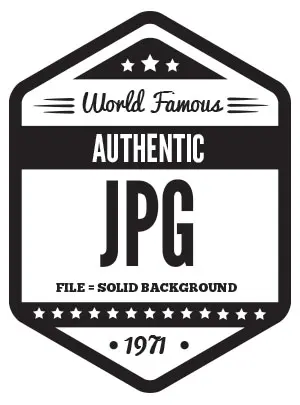
If your artwork has a transparent background, and you save it as a JPG file, the background will be solid vs. transparent.

An illustration with a transparent background saved as a PNG file.
Save In Photoshop Example 5
Recently, you had a professional logo created for your website. It has your name and a small graphic.
The background layer doesn’t have a solid color. Instead, it’s transparent.
If you were to save the file as a JPG file it would flatten it and add a solid color background (white: depending on your defaults).
Which is o.k. if you’re going to place the logo with the same color background.
If not, you’re going to have your logo inside of a square or rectangle (the shape of your document) against another color.
In order to keep the background transparent you’ll need to save the file as a PNG.
The top image, on the left, was saved as a PNG file and the one below it was saved as a JPG.
“Quick Export as PNG” to the rescue!
Go to File > Export and choose Quick Export as PNG.
No options to choose.
It goes straight to the Save As window and auto ads the PNG format to the end of your file.
Give it a new name if you wish and click Save.
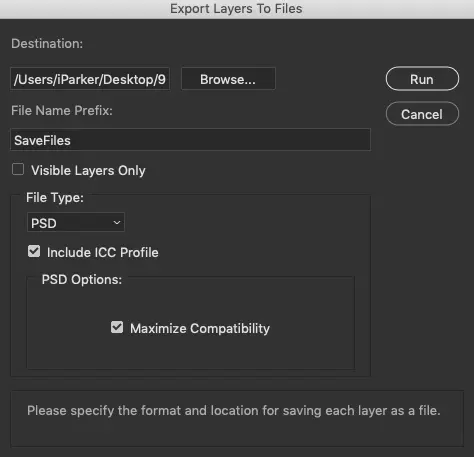
Save In Photoshop Example 6
You’re a digital artist. An Illustrator. You create different levels of your artwork on several layers (possibly hundreds or thousands of layers).
Now, you would like to separate each layer into individual files. You could turn off each layer and save each as a new file. One. At. A. Time.
Instead, use one of the Export options to do this automatically for you. Try it out.
- Download this file and open it in Photoshop.
- Now, go to File > Export and choose: Layers to Files.
- Choose your file destination. Click “Browse.”
- The “File Name Prefix” will be added to the original file name, followed by a sequential number.
- Choose your file type under “File Type.”
- Now, click Run. That’s it! Each of your layers is now a separate file.
What’s Next
Saving is an integral part of any artwork you create. That is if you want to be able to “save” your progress.
Bookmark this page so you can reference when to use which options when.
Looking for Photoshop alternatives?