Master Lightroom Denoise AI
Subscribe
Finally, Lightroom has introduced a Denoise tool with AI technology built in.
Lightroom Denoise AI
So this is the complete guide on using the Denoise AI in Lightroom, including batch processing, unlimited photos, and one click.
Now for this tutorial, I’m going to be using Lightroom Classic.
However, if we go into Lightroom here, we can see a Denoise AI button in the detail panel, just like in Lightroom Classic.
So the information I will share will be relevant for both versions of Lightroom.
In the last few months, I’ve been testing out the Denoise AI in Lightroom as a Beta tester, and since its release, I found that it works on every type of image, from portraits to landscapes, wildlife, and North.
Pro Tips
And I’m going to give you some pro tips along the way.
We will review a few images quickly and then use the Denoise AI tool.
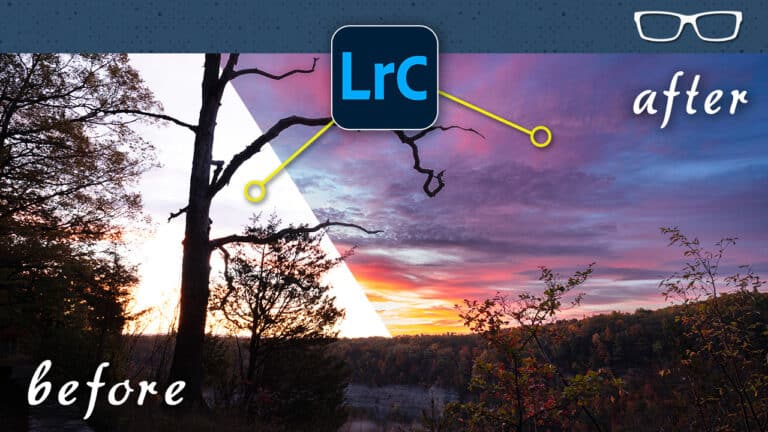
So we will look at this landscape photo I captured at Letchworth State Park.
This was during sunset, and I shot this at an ISO of 400.
So typically, you want to remove digital noise when it’s apparent. If we zoom into the sky, we can see a little bit of noise, not much.
There’s going to be a lot more noise.
The higher the ISO setting that you use, that will typically occur in low-light situations or when you are shooting, say, wildlife.
You want to ensure that the wildlife is sharp, with no motion blur, and you might be using a lens with a small aperture, like 5.6 or f/8, which will require a higher iso.
So many times for wildlife, when shooting birds, I’m shooting at one 500th of a second to one 1000 up to 3,200 and f/8F eight.
So that requires a very high iso. But for images like landscapes and portraits, I typically shoot between 100 to 400 and occasionally 800 to 1600, depending on the lighting situation.
Can we use Denoise AI on images like this without much noise?
Well, that’s entirely up to you because if we look at the final edit, I did here with Denoise AI.
I will press the tab key here to get rid of those panels, and I press the letter “C” after selecting these two images to show them side by side.
And as you can see on the right, we have our enhanced image here that was run through Denoise AI, and it did remove the noise and is a little bit sharper as well.
How cool is that? I love it. So yes, you can use Denoise
AI for landscapes and portraits. Let’s take a look at this portrait image here.
So just because you’re shooting at a low ISO doesn’t mean there isn’t noise, and you may want to remove that.
That’s entirely up to you. Sometimes I’d like to have a grain in the image to add a different type of feel or mood to the image.
This particular portrait was shot at ISO 800, and I did not take this photo, but I just want to show you. Let’s go ahead and zoom in here.
There is some grain in the background and on the face, and we can remove that digital noise.
But we have to be careful when removing noise or portraits because if you’re too aggressive with the amount of noise reduction, you can smooth out the skin, which will look unnatural.
Now, I did want to share with you my portraits and weddings that I’ve done to show you how to apply the Denoise AI to those.
File Types
But for all of the client photos I’ve taken from 2016 back to 2001, I converted those files from RAW to DNG. That was just part of my workflow back then.
And unfortunately, we cannot use DNG files in the Denoise AI tool.
We also can’t use JPEG files, so we only can use RAW files. So just keep that in mind.
If you convert to DNG or use JPEGs, you must develop a different type of workflow if you want to use Denoise AI.
Let’s look at this last image of this chicken deed I captured late in the day.
It was cloudy, that’s the finished one.
But if I zoom in, you’re going to see a ton of noise, and that’s because if I zoom back out here, we can see this was shot at ISO 16,000.
So that’s why there is so much grain in the image.
And again, like I mentioned, one-thousandths of a second at f/8.
So I had to use a higher ISO setting to ensure no motion blur or camera shade because it was a little cold that day.
The lens was huge, and I didn’t have a tripod or a monopod.
So can we remove that much noise in the noise AI and still have a decent-quality image?
Photoshop AI Removal Tool
Now, real quick, you might have noticed in this other image that I had selected first we have all these branches right here and this big one in the back. Well, I removed that in Photoshop.
Photoshop has a new AI removal tool allowed me to remove that in about 30 seconds or less. I am trying to remember. It was really quick.
It’s the best removal tool I’ve ever used, and I’ll share more information about that at the end.
Let’s go ahead and take a look at the Denoise AI tool.
Remove Noise
Now we’ll navigate to the detail panel where the Denoise AI tool resides via this button.
We also have our legacy noise reduction options here if you ever want to use those.
It’s not something that I’m ever going to use again because the Denoise AI does a fantastic job.
You can select more than one image at a time and then process those files in bulk via this button.
So let’s go ahead and click on that. We’ll get this new enhanced preview window here, and you’ll see “enhance three images.”
Once you click that, Lightroom will do its magic and apply that noise removal to all three images.
But I will share a keyboard shortcut with you in a second where you can bypass that window.
Let’s first look at this image and review all the options we have here.
So once this window here updates with the image, you’ll see the enhancement with the noise removal applied right in here.
Now, if you want to see the before, you’ll click and hold your mouse button, and now it’s showing all the digital noise.
Once you’re released, it will show you the enhanced. This is in a really good spot of the image to view that noise. I like to look at the eyes and faces when doing noise reduction.
So we can click and drag to that area, or if you click on this little icon at the bottom, it will zoom out, and then you can click anywhere on the image to zoom into that location.
Now, we don’t have any other zoom levels. It’s a one size fits all, so you only get this zoom level, nothing else. So you can either back out or zoom in.
All right, that works out fine most of the time. And again, here’s the before and the after.
So you can see at the 79 I currently have it set at. It’s doing a good job.
It might be hard to see via the video, but I need more detail in this area, especially when I go to the maximum of 100.
There will be a few details in the darker areas that disappear.
So you want to be careful about how aggressive you are with the amount, especially for faces.
So let’s go back into this portrait here, and let’s take a look at this image here.
Let’s go ahead and get into the face.
And if we do 100, again, it’s probably hard to see via the video because of the compression of the video, but her skin is starting to smooth out just a little bit, which is not bad compared to the legacy options we had in the past.
just keep that in mind when you’re doing portraits. You don’t want to be too aggressive.
So for this particular image, I would probably do around 70 to 80 to retain as much detail as possible.
All right, let’s go over the other options we have inside of the Denoise AI tool.
And up at the top here, again, we have our amount and can go down to zero.
Leave a little noise if you want to retain as much detail as possible.
The default, the first time you use it, is 50.
For this particular image, I would go right around 90. Now just below that, we have RAW details.
So RAW details will enhance the details of the RAW file, and it’s selected by default.
Just under that, we have ”Super Resolution.”
I have a video tutorial that explains what super-resolution is and how to use it. It’s an upscale tool inside Lightroom Classic.
You don’t need a third-party tool to upscale your images.
There are some limitations, but it does an excellent job of upscaling your images and sharpening them simultaneously.
So check out that video tutorial in the description below. I placed a link inside of there. Now it is grayed out.
We can’t apply super-resolution if we’re using Denoise, and here’s why this file or this edit will be saved as a new DNG file, as you can see up here.
So that’s one reason we can’t use DNG because it can’t select a DNG and then convert it to another DNG.
So a DNG file is another type of RAW file format. Again, I have a video tutorial on that in the description below.
So super-resolution also requires converting from RAW to DNG, so we can’t do both simultaneously.
So it’s either one or the other.
And then below that, we have a message explaining that if you use the Content-Aware Remove tool to retouch your image or apply some masking, you won’t see those edits in this preview window.
However, they will be transferred to the DNG file once you click enhance.
So we have an estimated time here of 25 seconds to do the noise removal and to convert it to a DNG file. And then what I’d like to do is I’d like to create a stack.
You can turn that off if you don’t want to do that.
But that will place that DNG file next to the original RAW file and group them in a virtual folder.
And it just keeps everything clean and organized for your library.
So let’s go ahead and enhance this image.
All right, so once Lightroom converts to DNG, it will stack that file with the original RAW file and any other files.
And right here, it says one of three. If we click on that, it’s going to collapse all
Those images are down in one click again, and it will expand.
Batch-Process Denoise AI
Now let me show you how to batch process three or 3000 images. All you have to do is select all the files.
I will hold down my commander control key and select the other two RAW files.
Now to bypass that enhance preview window, you’re going to hold down your alt or option key, and then you’ll click on this button again.
But now we get another message here or another window—the same message as before.
Content-Aware Remove, and Masking will be updated automatically.
We can also bypass this little message by clicking on, don’t show again.
And then Lightroom will go through and process all those images. However, there’s something else you need to know.
The last amount setting you used will be applied to each image.
So, in this case, the last amount I used was 90. That’s too aggressive for this portrait and this landscape.
So I recommend selecting images similar to or close to a specific ISO setting.
So like 800, 1000, 1250, maybe 1600, something like that. So let me show you how to search for specific images in an ISO range. We will come up here to the library module again, and let’s go in and select my Point Peele folder here.
And if you’re not seeing this little filter menu up here, press the forward slash key to show or hide it.
Now, from here, you’re going to click on metadata, and you’re going to get these four little columns here, and you want to click here and select ISO speed.
So now it will list all the images in this folder based on iso.
So I have three images at ISO 25,600.
If I want to apply an amount of 90 for those images, I can click on 25,600 to show those three images.
And then, if I hold down my shift key and click on 16,000, it will add those images.
And I may add a few more at that amount.
Now I can select all with commander control plus the letter “A,” go back into the develop module by pressing the letter “D.”
Then I can pull down alter option and batch process all those images simultaneously.
All right, so real quick, one more thing. Let’s go ahead and take a look at this image again.
And if you want to learn how I retouched this image in Photoshop, check out this video tutorial next.
Or, if you want to continue elevating your Lightroom skills, check out this Lightroom quick tip playlist.