Lightroom Texture, Clarity and Dehaze: What's the difference?
Subscribe
Texture, Clarity, and Dehaze in lightroom… what are they, what are the differences between them, and more importantly, how should you use them to edit your images?
Let’s discover all of those answers right now.
PRESENCE
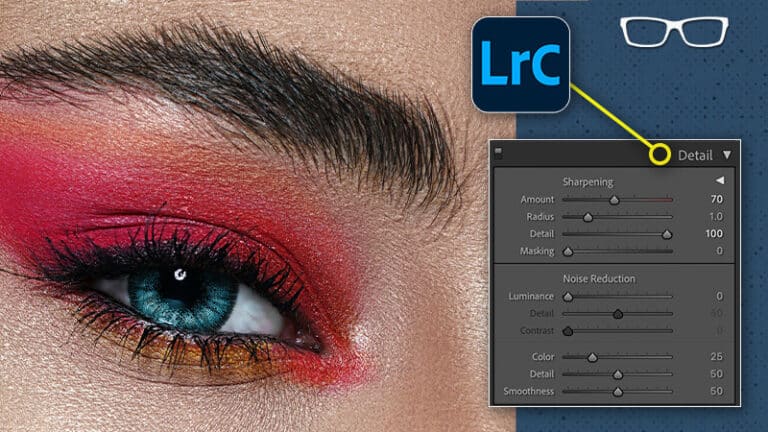
Alright, you’ll find Texture, Clarity, and Dehaze grouped together in the Basics panel of Lightroom classic or in the Effects section of Lightroom and Lightroom Mobile. And just so you know, they all work exactly the same regardless of the version of Lightroom that you use.
And they’re grouped together because they have some similarities, and their primary purpose is to reduce or create depth and detail in your photos depending on how you apply them.
So, adjusting the sliders to the right will create depth and will enhance detail; to the left, it has the opposite effect.
And the reason why you need three editing tools to refine the detail in your image is that each affects your image slightly differently, so let’s review how they work.
TEXTURE
Of the three, Texture is going to be the most subtle. And that’s due to the detail that it targets in your image, which is medium-sized details.
So, when you increase or decrease Texture, it’s not affecting the fine, teeny tiny details. So, this is perfect for portraits when you want to create a softer mood or want to, let’s say, soften the skin.
I also use it for boosting the details in Landscape and wildlife images too. But, how much I apply is slightly different for each subject. For portraits, I’ll keep it around plus or minus five to ten.
For everything else, I might boost it a little more. It all depends on the image and the amount of detail and depth I want to add or remove.
CLARITY
Ok, so Clarity alters the detail in your image differently compared to Texture. So, it targets or affects the contrast along the edges of the details in the mid-tone area of the tonal range.
Ok, so, that’s a mouthful. And if you’re new to photography and or editing, it simply means that it’s targeting one out of five tonal ranges or brightness levels in your image.
So, real quick, if you navigate to your histogram and hover your mouse on the far left side, it will highlight that tonal range, and underneath, it says Blacks, that’s the first of five tonal ranges in your image.
Next to that, we have Shadows, and then in the middle of all the tonal ranges are the Mid-tones, which is where Clarity is targeting the details, and then after that, you have your Highlights and Whites.
So, when you apply Clarity, it’s going to, in most cases, have a bigger effect on your image compared to Texture.
And overall, if you increase it, the details in the mid-tones get enhanced, or the contrast in that tonal range is boosted, which will make your image pop and appear sharper. And decreasing clarity will make your image look softer.
PORTRAITS
For portraits, I tend to use this less since it can create an unnatural look if you apply it too much. But, if you want a gritty or grungy type of look, then Clarity can provide that creative option as you reach the maxim intensity, and it might be more useful on other types of subjects.
Now, here’s a cool trick for portraits. Let’s say you have some clothing detail or something else in the image you’d like to add some Clarity to, but you don’t want it to affect the skin of your subject.
Well, in that case, you can use your adjustment brush to target that area of your image, and then your Clarity adjustment will be applied only to that part of your image. How cool is that? I love it.
Now, for wildlife and Landscapes, I tend to use it more based on my editing style, and again, it’s a personal preference, and you’ll have to decide how much Clarity to apply based on your editing style.
DEHAZE
So, Dehaze targets a slightly larger tonal range than Clarity. So, the mid-tones and a little bit of the shadows and highlights. Just enough so you don’t blow out the highlights or muddy the shadows.
The dehaze tools’ primary purpose is to eliminate or minimize fog, mist, or haze in your image. Or you can add a little bit of Haze if you’re looking for a new creative option.