Essential Photoshop Preferences
for Beginners
- Post by Parker: 30 Years experience!
- No Comments
Here it is. The moment you’ve been waiting for your whole life… …Photoshop preferences settings!
Umm.. no? Ok, maybe you haven’t been waiting for this at all.
But, it’s still important to make sure that Photoshop is set up for maximum performance, customize the interface for your workflow, and more. Let’s get started…
Table of Contents

Photo by Frans Van Heerden. Giraffes are cool. But, they have nothing to do with Photoshop preferences.
Photoshop Preferences Settings
We’re going to cover the essential options you should have set up before diving into Photoshop.
This will include some essential settings that all Photoshop beginners should know about.
What’s the big deal?
Well, Photoshop preferences are where you’ll find options that control the performance and appearance of Photoshop. Both of which will allow you to improve your productivity as you work.
Some of the options are self-explanatory, and some are more advanced.
That being said, we’re not going to cover every single option in great detail. Otherwise, you’d be here all day.
We’ll just focus on the primary settings you should be aware of. The good news is, once you set up your Photoshop preferences, you won’t have to make any changes. Unless there’s a major update.
Also, keep in mind any options you setup today can always be changed at a later date.
You may find, with experience, that you prefer one option over another. Or you may want to just reset everything back to the defaults. Which you will learn how to do too.
For this article, I’m using the latest version of Photoshop, at the time of this writing, which is Photoshop CC 2019.
I’ll come back and update this article with any new Photoshop preferences changes or updates as they become available (if there not updated yet, please post a comment below).
Now that we have the introduction out of the way… let’s get started…
18 Preference Options as of
Photoshop CC 2019.
How To Access Photoshop Preferences
First, we need to open the Photoshop preferences dialog window. You can either access via your menu bar or via a keyboard shortcut. Oh, and the menu option is different for Mac vs. Win.
Mac: Go to the Photoshop menu in the menu bar. Locate Preferences > General.
Keyboard shortcut: Command +K
Windows: Go to Edit (in the menu bar) locate “Preferences” (at the bottom of the list) and select “General.”
Keyboard shortcut: Control + K
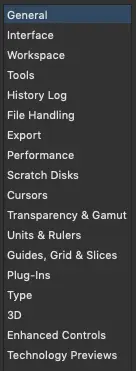
You should now see the Preferences window. Take a look at the left panel. At this time, I have 18 different categories! That’s a lot of options. Wouldn’t you agree?
General Preferences
Now what?
Well, it’s time to decide which options we want. Adobe has provided some default options for us.
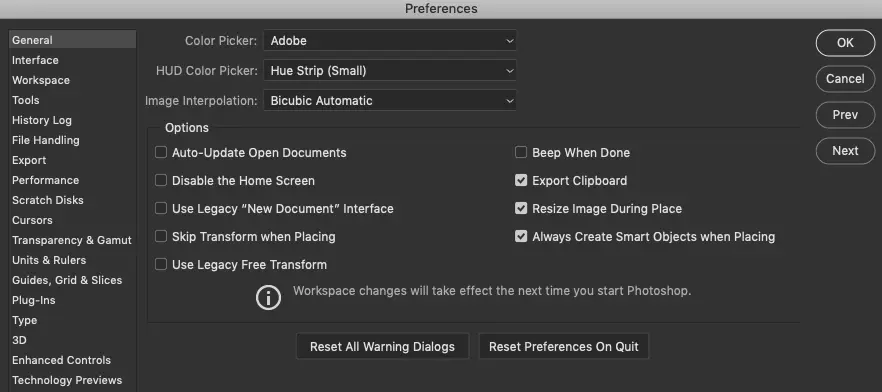

Photo by Dominika Roseclay Yes, we’re covering the export clipboard in this section. But no, we are not referring to this type of clipboard.

Photo by Horacio Rojas. “Like, dude… are we almost done?” Ummm, no. But once we are Photoshop will be running optimally for you!
The top 3 menu items are sufficient for beginners (and me). Nothing to change there until you become more experienced and decide you need to change one or more of them.
Options
In the “Options” section, you’ll find a series of options you can select (or de-select) to customize some of the Photoshop features.
Not everyone likes the “Home Screen.”
If that’s you, just click on the little box next to Home Screen, and that will disable that feature. You’ll need to restart Photoshop to finish disabling it.
Next, let’s take a look at Export Clipboard.
Export Clipboard
Export Clipboard may affect the overall performance of your computer. Here’s how it can slow down the overall performance…
When you copy images or layers in Photoshop, the copied items are placed into Photoshop’s clipboard.
The clipboard also resides in your computer’s memory (RAM). However, the RAM on your computer is shared between Photoshop and your operating system.
Although you can adjust how much RAM Photoshop uses (coming up soon), it’s usually less than the total of your overall computer.
If the file (or layer) is enormous, then chances are you may not have enough RAM. Which may slow down the overall performance.
What’s the purpose of Export Clipboard? Well, when you copy a layer from Photoshop, you can then paste it into another app. Like Illustrator or InDesign.
Enable Or Disable?
Now, the question is, should you enable or disable Export Clipboard. My recommendation is to keep it enabled. If you find your computer is getting sluggish, then disable.
It all comes down to how much RAM you have available for Photoshop and your overall system. The more, the better.
Although, if you don’t plan on copying from Photoshop to another app, then no worries. Just leave it enabled.
Other Options
What about all the other options? Personally, I keep everything set at the defaults.
If you want to know what a particular option is and what it does, just hover your mouse over it. Wait a few seconds, and Photoshop will show a pop-up message with info about that option.
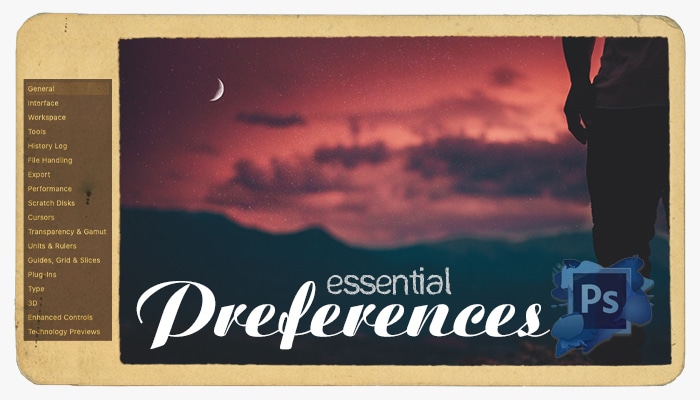
Interface Preferences
Appearance
These next settings are definitely worth taking a look at. The Interface options allow you to change the appearance of Photoshop.
First up is the Color Theme. By default, a lighter theme is selected.
However, I prefer a much darker color theme. For me, I selected the first option.
Just click through each color swatch and decide which one you prefer. Why do I prefer the dark theme?
Well, for me, as I’m working in Photoshop, I find that my eyes are better able to focus on the document vs. a lighter color background.
Plus, when editing, the darker color is more neutral and doesn’t interfere with color correcting.
That’s just me, though. You’ll have to decide what works best for you.
Next to the color swatches, you’ll find a Highlight Color option. This will change the highlight color of your selected layer.
By default, the color is grey. As you can see (the image on the left), the selected layer has a grey highlight.
If we change the Highlight Color to blue, then the selected layer will have a blue highlight.
Just below the 4 main color themes, you’ll find options to define your interface colors further.
Make some adjustments to each, to learn how they’ll affect your interface.
Presentation
From here, you can select your native language for the UI (user interface).
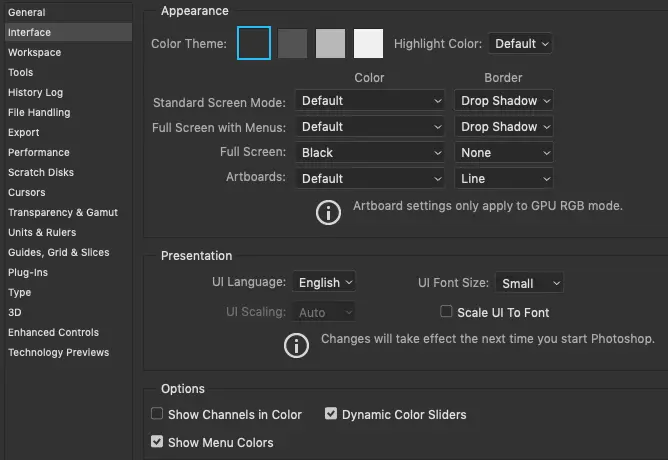
Photo by Dominika Roseclay Yes, we’re covering the export clipboard in this section. But no, we are not referring to this type of clipboard.
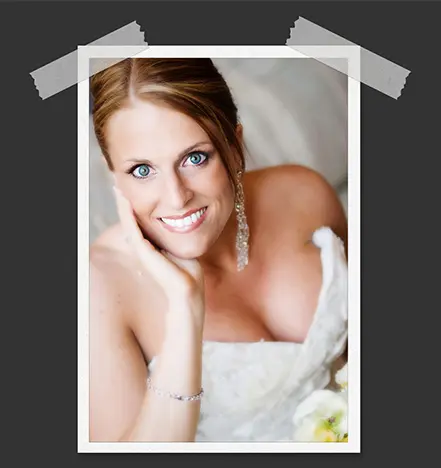
Photo project with the dark theme. The neutral, dark color doesn’t compete for our eyes’ attention. Oh, and the photo was captured by Parker Photographic!
Plus, you can also adjust the size of the Font in the UI. If you make a change, you’ll need to restart Photoshop for the changes to take effect.
Personally, I like the “Large” option.
One, I like to have my monitor set to the highest quality (resolution) setting, which makes the overall font sizes even smaller.
Two, because of this, my old eyes have a hard time reading the small text. So… I like them Large. Although I wish there was a gigantic option!
If you’re having a hard time reading the teen-tiny text, try making them larger. Re-start Photoshop and see the difference.
The other options (just below) I leave at the defaults. Experiment with them if you wish.
Workspace Preferences
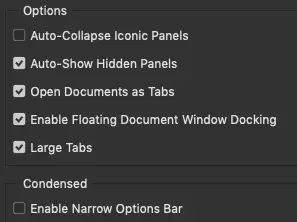
Here, we have some additional options to control how we interact with the workspace. All but one option is selected by default. Personally, I like to have them all enabled.
Auto-Collapse Iconic Panels
By default, this option is disabled. How it works…
If you have a side panel open (like the image to the left), if I click anywhere outside of the panel, it will stay open.
If you want to have the panel auto-collapse (hide) when clicking anywhere on the interface, enable this option.
I prefer to have it enabled.
Tool Preferences
14 different options for setting up your tool preferences. We’re not going to cover them all! Just the ones I think are important at this time. Remember to just hover over an option to find out more about it.
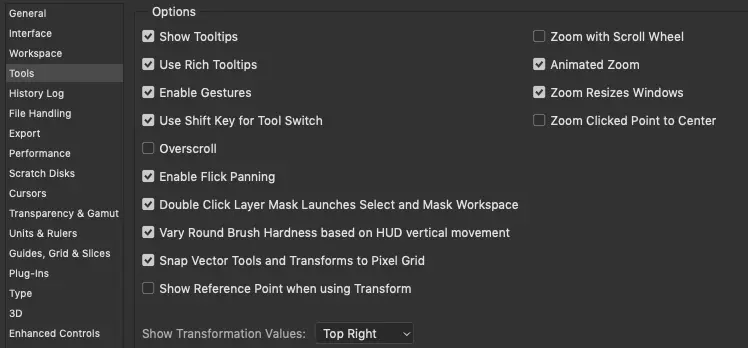
Show Tooltips
The very first option will be more useful to Photoshop beginners. What it does, when enabled, is it gives you the name of the tool and the keyboard shortcut to select it.
To see it, you’ll need to hover your mouse over a tool icon (or over a “preference” option, as mentioned earlier). Which is perfect when you’re not familiar with all the tools.
However, over time, you’ll learn which tools are which and may find the pop-up distracting.
When that time comes, come back to the Tool Preferences and disable this option.
Use Rich Tooltips
This option provides more information about a specific tool vs. just having Show Tooltips enabled.
Instead of just the name and keyboard shortcut (on a bright yellow background), a pop-up will show a complete description of the tool and a mini-video of it in use.
Try it out for yourself…
Hover your mouse over a tool icon and wait a couple of seconds. A pop-up window will show all the info about that specific tool.
Pretty cool! Until it’s not!
Use Shift Key for Tool Switch
This is an important tool option that you should know about. For better productivity, I’d leave it enabled. Here’s why…
Let’s take a look at our Tool Bar. Which is on the left side of your Photoshop interface. This is a list of all the tools you have to help you fulfill your creative vision.
However, some of them are hidden!
The tools are grouped together with similar tools. How do you show the hidden tools? I’m glad you asked.
Take a closer look at each of the tool icons. What do you see that is different?
Well, some (most) of them have a white triangle located in the bottom right… next to the tool icon.
If you click on the triangle AND hold your mouse button down, a pop-up window will show additional tools!
It’s o.k., to release your mouse button now. The new window will stay open until you choose a new tool or click anywhere outside of it.
Now, here’s why the “Use Shift Key for Tool Switch” is important…
I clicked on the Healing Brush tools (image to the left). There are a total of 5 different Healing Brush tools.
Take a look at the right of each tool name. Those are the keyboard shortcuts for selecting that specific tool.
One problem. They’re the same for all 5!
If you like (or learn to like) keyboard shortcuts then, you could select the Spot Healing Brush Tool with the letter “J.”
However, if you really wanted the Patch Tool no matter how many times you press “J,” it won’t select it.
Which is where the “Shift” key comes into play.
This time, hold down your Shift key, and press J… do it 5 times.
Each time you press J (with Shift held down the whole time), it will shuffle through and select the next tool.
When using keyboard shortcuts, you won’t need to click on the tool to access the pop-up.
Instead, keep the “Use Shift Key for Tool Switch” enabled and use your Shift key in addition to the tools keyboard shortcut.

Animated brush tooltip. Try it. Hover over the brush tool.
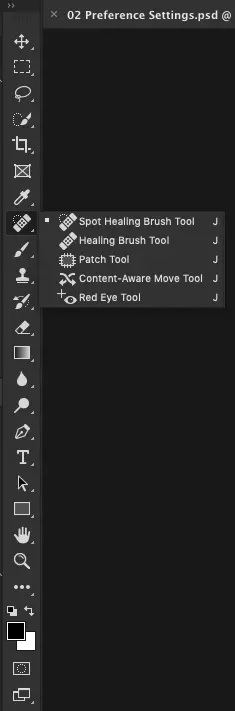
Toolbar with the Healing Brush tools visible.
If you have “rich tooltips” enabled, you’ll need to click on the arrow button and hold down your mouse a few seconds for the new pop-out window.
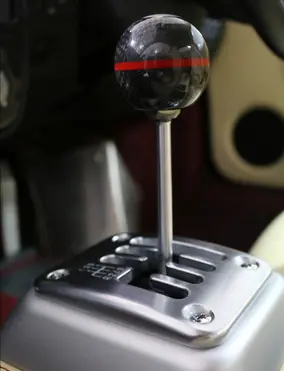
Photo by Mat Brown. Shifting gears is more fun and faster than auto! So it is using keyboards shortcuts.
Don’t forget to use your shift key with the appropriate tool keyboard shortcut.

History Log Preferences
By default, this option is disabled. What does it do? Let’s find out… As you’re editing a photo, you may take a lot of steps.
In the end, your final image is a masterpiece! Then, you come back tomorrow to edit a similar photo and want it to look the same.
One problem. You can’t remember what tools you used to edit the photo! Enable the “History Log,” & Photoshop will record the tools (and the order in which they were applied) in a text-based file.
Now, you can use the log as a reference for future edits!
File Handling Preferences
Next up are the File Handling preferences. A couple of essential things we should cover here.
File Saving Options
First, we have Image Previews.
If you want the ability to see a thumbnail (preview) of a file in your operating system folder, make sure you have “Always Save” selected.
If set to “Never Save,” then a preview of your file will not be created and you won’t see the preview in Finder (for Mac) or File Explorer (for PC).
Another important option is the “Automatically Save Recovery Information Every:.”
This option will determine how often Photoshop will create (or save) a copy of your file. This doesn’t affect your original file.
Let’s say you’re working on a project. 10 minutes… then, 20 minutes go by. You forget to save your work. Your power goes out!
No worries. As long as you have this enabled, Photoshop is going to autoload (when you restart) the last “recovery file” it saved for you!
However, what if you were 19 minutes into the project?
Well, the default setting is set to 10 minutes. Which means Photoshop only saved the first 10 minutes of your work.
You’ll have to re-do your last 9 minutes that weren’t saved.
Either decrease the amount from 10 to something lower or get in the habit of saving every couple of minutes (or more). Use your keyboard shortcut to save, save, and save some more…
- Mac: Command + S
- PC: Control + S
File Compatibility
At this time, the default options are sufficient. These options are a bit more advanced and will require further research to determine which options are best for your needs.
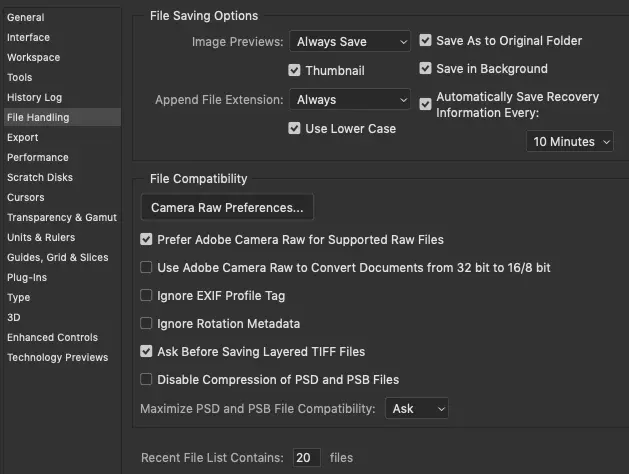
Click image to enlarge.

Photo by Ali Arapoğlu It doesn’t take much for the power to go out: lightning, fire, explosion, etc.. Get into the habit of saving every couple of minutes by using the keyboard shortcut.

Export Preferences
The “Export Preferences” gives you control over the Quick Export tool.
Plus, it includes the information of your new exported file.
First, you have the option of choosing your file types. PNG is set by default.
If you never use the PNG file format, choose one of the other options.
If you’re going to use the Quick Export tool for images that are posted online, you may want to remove the Metadata from your files.
Like, your home address, phone number, etc.. if that’s the kind of info you add to your files.
However, if you’re a wedding photographer or portrait photographer or a graphic designer, you may want to have specific Metadata added to your files.
Like: copyright information!
Or even contact info. If so, make sure you select “Copyright and Contact Info” under the Metadata option.

Photo by Parker Photographic. It’s time to improve the performance of Photoshop. Want to see more? Click the image to enlarge.
Performance Preferences
This section includes options for improving the overall performance of Photoshop.
Let’s explore the Memory Usage options and how to set them up for the best performance.
Memory Usage
Available Memory shows how much RAM your system has installed.
Photoshop is a memory hog, and it eats up RAM like there is no tomorrow. So, the more memory you can assign to Photoshop, the better.
By default, Adobe has set the amount of memory Photoshop can use at 70%. This means, if you have 30GB of RAM (for your overall system), Photoshop will have access to 21GB.

RAM is the key to a fast Photoshop experience.
Tip: Whatever Adobe says is the minimum requirement… double it. Triple it for even better performance.
In my case, I have 29,237MB (30GB), and I’m letting Photoshop have access to 20,466MB (20.5GB).
Depending on my needs, I can increase this for better performance.
Or, if I’m using several programs at once, I may want to lower the amount of RAM for Photoshop.
This way, when I have Illustrator and Lightroom open at the same time, I can distribute the RAM among the different software.
That being said, Photoshop doesn’t actually use the RAM until it needs it.
As you work on a project, Photoshop only uses as much RAM is needed based on the size of that project.
As you add more layers, the size of the document grows, and Photoshop will require more RAM.
If you’re finding your computer becoming sluggish, you can come back to the Performance Preference and change as needed.
If you find yourself maxing out the amount RAM, for Photoshop, and still find your computer sluggish… guess what?
It’s time to add more RAM!
How to change the amount of RAM in “Preferences”
Option 1, type in the amount of RAM in the box next to “Let Photoshop Use.” Or increase/decrease with the bar (slide left/right) just below.
Graphics Processor Settings
By default, Photoshop will detect whether or not you have a
graphics processor that can boost performance. If so, it will automatically be enabled.
However, some Photoshop users have reported that overall performance suffered when this option was enabled.
If this happens to you, disable the box next to “Use Graphics Processor.”
This will stop Photoshop from enabling it in the future.
History & Cache
The defaults for “Optimize Cache Levels” is perfect for most users.
You may want to consider increasing the number of History States from the default of 50.
The higher the History States, the more information will be saved in the History panel.
For example, as you’re working on a project, the History panel will record every step you take!
This allows you to go back in time if you made a mistake and wish to re-start from a specific point.
One problem, though. The higher the History States, the more memory (RAM) Photoshop will use.
Personally, I have mine set to 500. Although I rarely reach that number.
It’s just nice to have in case I do.
If you find Photoshop becomes sluggish, you may want to set the History States to a lower amount.

Photo by FOX. Utilize your external drives to improve the performance of Photoshop! In Photoshop, they’re referred to as a scratch disk.
Scratch Disk Preferences
This is another opportunity to improve the performance of Photoshop.
Scratch Disks
What is a Scratch Disk?
A Scratch Disk is a part of your computer’s hard drive that Photoshop uses for additional memory.
Let’s say you don’t have a lot of RAM for Photoshop, and as you’re working, Photoshop uses up all it’s allotted RAM…
…Photoshop will become very sluggish. What Photoshop does next is it will look for a Scratch Disk, which it can then use as extra memory.
So, if you’re low on RAM and can’t add more at this time, you can use any additional hard drives (with some empty space) as a Scratch Disk.
Currently, I have 4 hard drives attached, and Photoshop recognizes each one.
Next to the name of the drive, it will show how much Free Space each has.
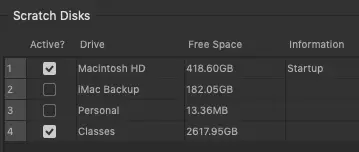
Here are the 4 hard drives available to be used as a scratch disk, on my iMac.
At this time, I only have 2 of the 4 drives selected to be used as a Scratch Disk.
The first drive is the drive used for my operating system and will provide the most performance boost… since
Photoshop is installed on it.
And the fact that it’s also an SSD drive improves performance too.
The second drive has a decent amount of empty space. However, I use this drive as my daily backup.
I’d rather not let Photoshop continually access this drive.
The more you use a drive, the more it becomes degraded.
Over time, all hard drives fail based on how much it’s used and other factors.
The third drive is very low on space and may not offer any additional performance boost.
The fourth drive has a lot of free space.
Although it’s connected via a USB3, it still may provide some performance boost.
If possible, use your system drive and an SSD drive for the best performance.
The Other 9
There are 9 more preferences to cover!
However, they are not as crucial as some of the ones covered so far.
I recommend going through each one and finding out what the options are all about.
This way, you can better determine if you need to change anything.
How To Reset Photoshop Preferences
Did you just make a bunch of changes and just wish to restart with the Photoshop default preferences?
No problem. It’s actually quite easy.
Or maybe you’re experiencing issues with Photoshop in general?
Maybe Photoshop is not working as expected, a tool or two seems buggy, or perhaps you can’t open Photoshop?
In that case, you’ll need to delete your preference files and start with a new one.
WARNING
This will delete more than just preference settings!
This will also reset your color settings, custom keyboard shortcuts, and custom workspaces.
Be sure to save everything before resetting the Photoshop preferences. Learn more here.
If you just need a quick basic resetting of the Photoshop preferences, go to…
Preferences > General
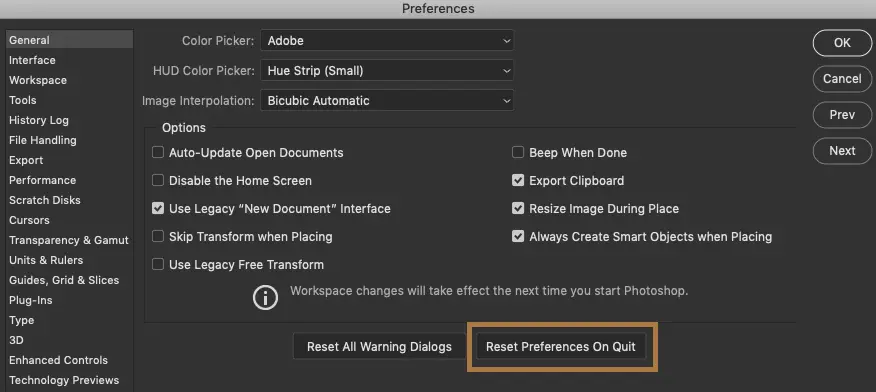
Click image to enlarge.
Click on the “Reset Preferences on Quit.” Quit Photoshop and restart.
All the default settings are now back as they were when you first installed Photoshop.
Keep in mind, this will reset all your preference settings: general, interface, performance, scratch disks, etc.
Warning Dialogs
Another thing you may wish to reset is the Warning Dialogs.
Any warning messages that pop-up can be turned off, so they are never shown again.
If at some point you turned off 1 or more of these warnings, you can get them back by going to…
Preferences > General
Click the “Reset All Warning Dialogs” button to re-activate the warnings.
What Now?
Well, it’s time to check out the next chapter in our Photoshop for Beginners Guide…. coming soon.
If you have any questions, please post a comment below!
Oh, and if you don’t mind: please rate this article (click on the stars – once you set it
you can’t change – pick the star that best represents how much you love this article!), and share via the Facebook and/or Pinterest (via the options to the left).