What is Aperture Priority Mode? Plus its Creative Powers!
Cover photo by Marco Lima
Aperture priority is a favorite of mine, as well as many other photographers.
Why?
Well, you’re going to find out in this complete guide. But first, let me share a quick story and a personal secret with you…
I picked up my first semi-pro camera all the way back in 1989. In the ’90s, I shot portraits professionally. Then, in 2001 I started my wedding photography business and covered over 500 weddings through 2015. Most of that time, I shot in manual mode.
Now, I find myself using aperture priority mode and recommend it for beginners and pros alike! But, to get the most out of this mode, you should know the good and the ugly side of using it.
If you’re looking to learn what aperture priority mode is, it’s creative powers, limitations, and more you are in the right place!
Are you ready to discover this magical camera setting? Cool… let’s get started!
Table of Contents
the “Aperture” in Priority Mode?
Before we get into the nitty-gritty of this mode, it will help to understand what an aperture is.
What is an aperture?
In essence, the aperture is a hole in your lens that can be adjusted to allow more or less light to be captured by your sensor. A larger hole or aperture lets more light in, and a smaller hole lets less in.
If you’re shooting at night, you may need to “open” the aperture to allow more light to enter… in other words, a larger hole. On a bright sunny day, you might need to “close” or make the hole smaller to capture less light.
These are general guidelines, and there are more things to consider before choosing one aperture over another.
Which we’ll cover very soon.

the Creative Side To Apertures
The creative power of apertures is the ability to control the depth of field. Or how much of the image is in focus. You can choose a large aperture, like f/2, that will blur out the background.
Or a smaller one, like f/16, to keep it sharp if that’s your preference. The artistic choice is yours to make based on your creative vision.
Why would you want to blur the background? Great question.
If you’re shooting a subject with a busy background, you can separate the two by blurring the distraction. This allows your subject to stand out and be the focus of the image.
If you photograph the image to include a busy background, your eyes will have a hard time focusing on one or the other. Overall the image is not as powerful vs. selectively blurring.
Pro Tip:
You may have noticed that I referred to f/16 as a small aperture and f/2.8 as a large aperture.
There seems to be something strange going on since “16” is larger than “2.8”.
Or is it?
Take a closer look at the “number”… f/8. It’s a fraction.
“f” = the lens focal length divided by “X.” Therefore, f/2.8 is larger than f/16!
To better understand apertures, and the “math,” check out my What Is Aperture guide.
What is Depth-of-Field?
The depth of field is a term to describe the sharpness between subjects, the foreground, and the background.
A shallow depth of field, that blurs part of the image, is popular among “people” photographers. Landscape photographers tend to prefer a sharp image from the foreground to the background. Or a larger depth of field.

The subject is in sharp focus while the background has been blurred out. This adds separation between the two.
What Is Aperture Priority Mode?
This mode allows you to set the aperture, and then your camera chooses the shutter speed automatically.
The goal of this mode is to use a depth of field, via the aperture, based on your creative vision for the shot. Then, the camera will determine the correct shutter speed for a well-balanced exposure.
This gives you the creative freedom to dial in the amount of depth of field you want for your photos. Since you don’t have to worry about dialing in the shutter speed, it’s quicker (sometimes) to use vs. manual mode.
The Downside To This Setting
As much as I love this setting, it does have some drawbacks.
Here are two things to consider when using it.
Not 100% Accurate Exposures
Your camera is only a computer, and it will not pick the right shutter speed for a well-balanced exposure, 100% of the time.
This can be due to how it’s calculating the light in a scene based on the metering mode you’ve selected.
If you notice your images are over or underexposed, you have a couple of options…
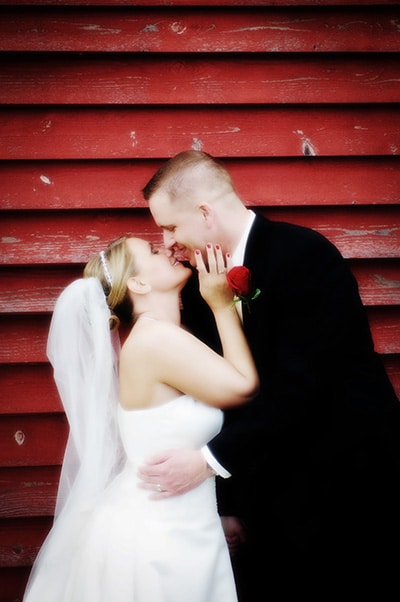
There are three different brightness levels in this image; white, black, and red. Your light meter is going to have a hard time getting the right exposure for all three. You may end up losing detail in the shadows, highlights, or both.
The solution is to shoot in RAW. Most of the time you should be able to recover some detail… as long as it’s not too over or underexposed.
Change the metering mode from Matrix (Evaluative Metering) to Spot or vice versa.
Increase or decrease the Exposure Compensation accordingly.
Low-Light
If you’re shooting in a low light situation, the camera will choose a slower shutter speed to allow more light to be captured.
However, two issues can arise with slow shutter speeds.
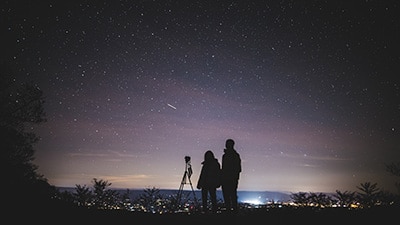
Astrophotography requires a shutter speed of a few seconds and possibly longer. A tripod is a must.
ONE.
A slow shutter speed can create a blurry image when hand-holding your camera. This is due to not being able to hold the camera steady enough at the slower shutter speed. The result is what is known as camera shake, and it creates a blurry photo.
The solution is to use a tripod. Or to use objects that can help you stay steady. For example, you could use a column to rest your body against or use a table to place the camera on.
Two.
A slower shutter speed may not be able to freeze the action in a scene. This creates a blur around that action. So, you’ll need to decide if you want to freeze the action or blur the motion.
If the end result requires freezing the action, you’ll need to increase the amount of light. Either use a larger aperture or, if needed, increase the ISO.
Both will give you a faster shutter speed required for freezing the action.
Getting Started With Aperture Priority
Before you start working with this mode, there’s another setting you need to set up first!
Set your ISO?
Before you start taking photos, you’ll need to also set your ISO. In general, when it’s very bright, like on a sunny day, you’ll want to use the lowest ISO setting available. This could be ISO 100 or 200. As the intensity of the light diminishes, you may need to increase the ISO.
If you’re unsure what ISO setting to use, have no fear. Some DSLR cameras and mirrorless come with an “auto ISO” setting too! Check your camera manual to see if it does. If so, set it and forget it (for now). If not, use the general guidelines above or, better yet, learn “what is ISO” and how to use it.
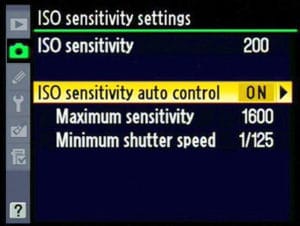
Auto ISO also gives you the option to set the maximum “sensitivity” and the minimum shutter speed.
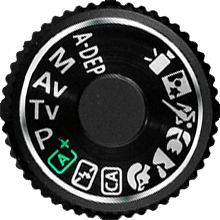
For Canon users, you can set the aperture priority mode by selecting the “Av” option via a dial, button, or within your camera menu.

For Nikon users, you can set the mode by selecting the “A” option via a dial, button, or within your camera menu.
Getting Into Aperture Priority Mode
You can place your camera in aperture priority by selecting the appropriate setting via the mode dial or button. If you’re a Nikon shooter, the setting is designated by an “A,” and for Canon shooters, it’s “Av.”
Next, you have to make a decision. Do you want the entire scene in focus, or do you want to blur part of the scene?
Full focus – use a smaller hole like f/16 or f/22.
Selective focus – use a larger hole like f/2.8.
Select the Aperture
Changing the aperture is easy on most cameras. You’ll either find a dial in front of or behind where the shutter release button is. Using this wheel allows you to increase or decrease as needed. Now… shoot away!
Why Should You Use Aperture Priority Mode?
If you want the full creative control that manual gives you but find it too confusing, this option is the perfect trade-off. This mode still gives you creative control over the depth of field without having to worry about the speed of the shutter.
Do Professionals Use Aperture Priority?
Yes! The “A” (or Av for you Canon shooters) on your camera is not for amateur, and “P” is not for professional! A(v) is for Aperture Priority, and “P” is for, well, another day.
As a 30-year pro photographer myself, I love using this mode. Especially when I’m out for a casual walk or on vacation.
The last thing I want to do is manually set everything up. It’s so much easier to set to “A” and let the camera determine the correct speed for me.
Aperture Priority FAQs
Now What?
Now that you know what “A” (or “Av”) is and how to use it, it’s time to put your new knowledge in practice!
On your next photoshoot, take several photos of the same scene, with different aperture settings. Then, when you’re done, compare the images side-by-side and compare the settings.
This will give you an excellent insight into the speed chosen based on your aperture. Plus, you’ll see the creative differences (depth of field) between different apertures.
Next, check out the shutter speed priority mode.
Here are some more articles to help you create exceptional photos:
What is Aperture in photography?
What is ISO in photography?
What is Shutter Speed in photography?
What is White Balance?
Check out the 7 key ingredients for light in photography to master light in photography.