


Is it taking too long to edit? Is your Lightroom catalog a screaming mess?
Stop struggling. Follow my 5 step system and develop a Lightroom workflow once and for all.
Use the Smart Workflow Funnel to track your progress… from getting organized to editing.
Plus, develop presets to help you edit from start to finish.
Editing your photos in Lightroom… you either love it or hate it. Either way, you should have a workflow for fast consistent results.
Why spend more time in front of your computer than you have too? In this pro tutorial, I’ll share a simple, 5 step process of developing a Lightroom workflow.
This is more than just about editing. Which you will still develop a workflow for. Plus, you’ll learn the steps needed to get your images organized. Imagine finding an exact photo among 10’s of thousands in seconds!
It can be done… if you’re organized.
Learn how to create a workflow that will give you more time to do the things you love… shooting more, spending time with family and friends, alone time…
…or whatever it is you want more time for.
A step-by-step guide for creating your own Lightroom workflow. Includes action-based worksheets and checklists to help you create your own personal workflow.
Take the road less traveled and develop your own Lightroom workflow.
the backup plan
{
configure Lightroom
{
Setting up Lightroom to work for you (efficiently) is the foundation to a fast and productive workflow.
Library Module Workflow
{
Getting this right will help you stay organized. Imagine finding a single photo among 100’s of thousands within seconds. Just 1 of the things you’ll be able to do, to speed up your workflow, when you complete this section.
Plus, you’ll learn how to rank your images on the first page of Google. Which means more traffic to your site.
Develop Module Workflow
{
A step-by-step workflow system designed just for you. Includes 3 possible workflows based on your experience.
Learn exactly where to start your editing and why. Then, you’ll learn the recommended sequence for editing with the different panels.
Export Workflow
{
Steps for creating an Export Workflow to speed up the process of getting your images out of Lightroom.
01
A few things you’ll learn for this part of your workflow…
The 3 different types of data and why each should have it’s own backup.
How to do a risk analysis to determine where you are now.
Hardware to streamline your backup workflow.
Software that will automatically backup your photos on-location and in the cloud.
Why Lightroom’s backup options could mean disaster if you skip 1 important step.

Are your photos important to you? Do you love taking pictures?
If so, I imagine those photos are priceless to you and/or your clients. Yes? Yes! Then, creating a Data Management Workflow (back-up plan) is the most important step for any photographer.
If you skip this, you risk losing ALL your photos. Here’s why… There are 2 types of hard drives and/or computers ~ Those that have failed and those that have not (yet).
It’s going to happen. YOUR hard drive will fail at some point in your lifetime.. Your hard drive is made up of moving parts.
These parts have a limited life cycle (just like any equipment with moving parts; camera’s, video camera’s, etc..).
When they wear out… BOOM! Your hard drive fails. When it does, say bye-bye to all your photos.
If that’s not scary enough…
hard drive failure is not the only way you could lose all your photos.
Here are some more ways you could lose those precious files; Data corruption, someone steals your laptop/desktop, fire, earthquake, hurricane, and much more.
Oh and what about human error?
Ever accidentally delete a file you shouldn’t have?
The key to keeping your images forever is having at least 3 copies of every photo; 1 copy on-site, another copy off-site and yet another copy in the Cloud.
It doesn’t matter if photography is a hobby or if you’re a pro. Your images are priceless. Back them up!
No worries. Although it sounds complicated it’s very easy. I promise.
You’ll learn exactly what you need to do to create your fail-proof backup system… step-by-step.
“Thanks to Chris, I feel I am in much more command of Lightroom compared to before. I’d certainly recommend this to anyone trying to get more control over the Lightroom beast.”
02
A few things you’ll learn for this part of your workflow…
How many Lightroom catalogs you should have
What a Lightroom catalog is
What happens if Lightroom says your catalog is corrupt
How to find photos/folders if Lightroom says they are missing
Setup Preferences for improved efficiency
Why Color Management is important
Steps for setting up your Color Management workflow
Why you must color calibrate your monitor
Color calibrate your camera
Missing photos, in Lightroom, will slow you down. I’ll show you why this happens and how to avoid it.
Are you ready to dig-in and get started on your new Lightroom workflow?
With your files safely backed-up you’re now ready to build the foundation of your Lightroom workflow.
If you’re like me, the first time you fired up Lightroom you wanted to know 2 things;
a. how to get your photos into Lightroom and…
b. how to start editing.
Which brings us to one of the most mis-understood things about Lightroom; the Catalog. It’s almost as mysterious as the Bermuda Triangle…
Why do I have to “import”?
Great question. You’ll find out why.
How many Catalogs do you need? 1 catalog, 3 catalog, 4?
It all depends on your personal needs. You’ll learn how many is right for you.
Actually, what is a Catalog?
Hint: It’s a database. You learn more about this and why it’s important for your sanity.
Why does Lightroom say my photos are missing (or my folder)?
Oh, boy… this can be sooo frustrating! If their missing, then you will not be able to work on your images. You’ll learn where they are and how to avoid this from happening again.
What do I do if Lightroom says my Catalog is corrupt?
Well, I warned you in Step 1 (it could happen to you – Google it). If you skipped Step 1 then pray that Lightroom can fix it. If un-fixable, revert back to Step 1 and do nothing else until you finish.
Now that you’ve mastered the Lightroom Catalog it’s time to for the most exciting part of setting up your workflow…
Preferences & Catalog settings!!
Just kidding.
This is just plain boring. I know, I’d rather be editing and being creative too. However, get this setup now and you’ll be well on your way to a faster workflow. It won’t take long. Pinky-swear.
When you finish this section, you’ll know exactly which options you should select for your workflow.
One more thing you must do before you EVER work in Lightroom again…
Color Management.
I know, another hot & sexy topic!
But, get it wrong and you’re going to waste a lot of time AND money. How much is your time worth to you?
You’ll learn my recommended monitor and tools for managing color…. step-by-step.
Oh, and one last thing…
…learn additional pro tips used in my workflow.
Like; how to save 1 hour for every 8 hours worked!
“The content of the course is perfectly structured and expertly delivered. The flow of the content builds knowledge and skills in a logical fashion.”
03
A few things you’ll learn for this part of your workflow…
How to cull, rate and label your photos like a pro
How to add multiple keywords with a click of a button
How to create a preset to protect your images from thieves
How to create another preset to edit your images during import – automatically!
How to create a Watched folder that will auto import your images
How to edit in the Library Module
How to utilize Collections for specific projects – huge time saver
How to get your images ranked on the first page of Google
Plus, 2 types of edits EVERY photo should get and how to apply during import
The fun begins. Getting organized is key to your sanity!
Life is short. Time is money. Time flies. So, work smarter…
How do you want to spend your time? In front of a computer doing things the hard way? I doubt it.
You have two options…
Option 1: Do things as you are now and spend countless, unnecessary time in front of your computer
Option 2: Implement the strategies provided in Step 3 and have more time for everything else.

Tagging with Ratings, Labels & Keywords is key to being organized.
Imagine over 100,000 photos in your Lightroom Catalog and you need to find just 1 specific photo.
How long is it going to take you? 15 minutes? More?
What if you could find it within SECONDS?
You can, once you’ve begun implementing your Library Module Workflow.
That’s just part of what will happen when you complete your Library Module Workflow.
You’ll also learn how I rank my images on the first page of Google (proof is in the pudding – Parker Photographic). Then, you can do the same. Which means more traffic to your website!
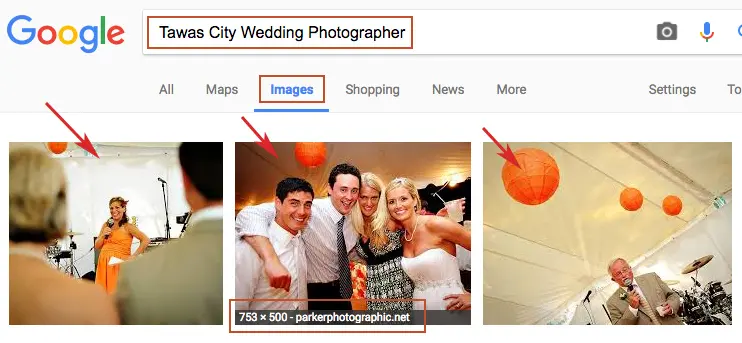
Adding keywords can help you rank on the first page of Google. Click to enlarge
At this point, you probably already know how to import?
Either way, you’ll learn exactly which options you should be using during the import process. Knowing the secrets will help increase your productivity.
If that wasn’t enough, you’ll learn 4 Lightroom presets that will streamline your workflow… directly within the Library Module!
You’ll even learn how to edit in the Library Module, create a Watched folder to auto import your files, utilize Collections and much more!
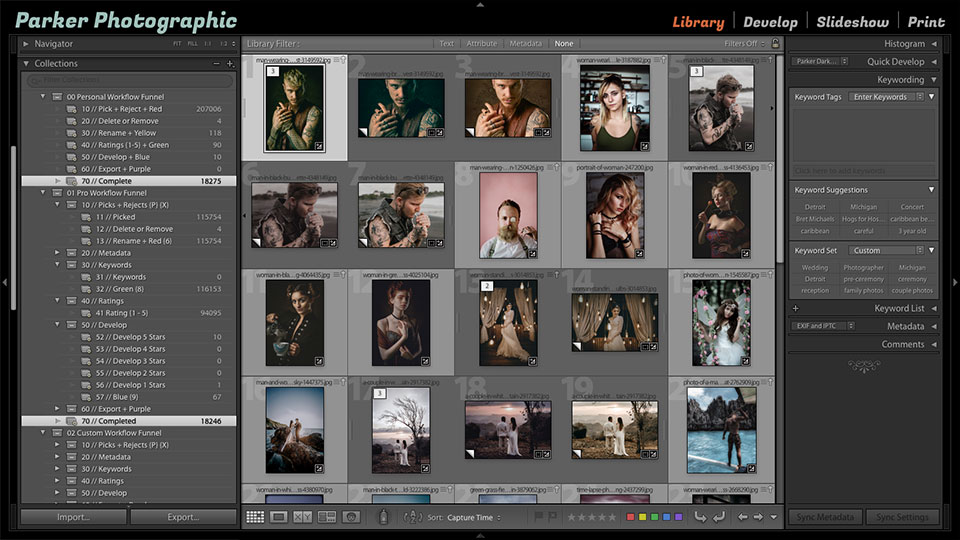
Click to enlarge and review the workflow funnel. 3 different funnels are visible. Two of the three are expanded and the “complete” (bottom of funnel) sections are highlighted.
Included with this workflow class is our exclusive Smart Workflow Funnel. It will help you stay on track as you organize and edit your photos.
After import, your images will start at the top of the funnel. As you add keywords, ratings, flags, labels, etc.. those files will begin to move through the funnel.
Once you’ve completed all your workflow tasks they’ll be moved into the “complete” section. Peace of mind comes when you know your job is done!
“Very clear, Informative and professionally explained.”
04
A few things you’ll learn for this part of your workflow…
The step-by-step workflow I use for my photography studio
A total of 3 different editing workflows from which to create your own
What each panel does and when to use it in your editing process
2 types of edits that EVERY photo should receive and how to apply during import
Exactly where to start your editing and why
The one tool I use for dramatic skies
How to remove objects directly in Lightroom
The tool I use for removing blemishes
My preferred method for adding contrast
How much Clarity you should use and why
The difference between Vibrance & Saturation
How to convert to B&W like a pro
What the Camera Calibration panel is used for and why it’s important
Tools I use for creating vintage photos
How to fix lens distortion with one click
How to fix perspective issues
How to quickly and easily fix crooked photos, with 2 clicks
How not to over edit with Lightroom’s (some are hidden) built-in-warnings
How to adjust the individual RGB channels for complete creative control
Fulfill your creative vision with the HSL panel by targeting specific colors
Get even more creative by adding color to your Highlights and/or Shadows
How to get rid of that pesky Noise
Add some grain and/or vignette for a vintage look
How to batch edit 50 photos (or however many you want) in 10 seconds
There’s one panel I bet you’re not using now and should be. If you want to work faster and more accurately that is.
Let the creativity begin!
O.k., this is the moment you’ve been waiting for, for a lifetime… How to edit faster in Lightroom! You’ll learn the exact Lightroom workflow I use to edit 500 photos per hour.
It’s time to get your life back and do the things you love to do… like shoot more, spend more time with family or however you’d like to spend all the extra time you’ll have from creating your own Lightroom editing workflow.
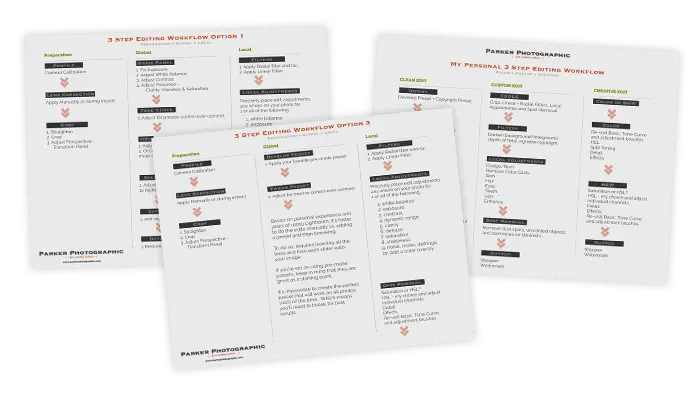
3 unique workflows to choose from. Choose one for your workflow and then customize for YOU! Click to enlarge.
Grab a cup of coffee and sit-back. There’s a lot to learn in Step 4. Here we go…
First, you’ll learn 3 possible Lightroom Workflow formulas. Each is designed based on your particular needs…
Formula 1; Designed for experienced Lightroom users and/or pro photographers. This is the exact system that I’ve used for my photography studio.
Formula 2; This workflow is perfect for new photographers and users of Lightroom.
Formula 3; Perfect for those that already have an editing style. Use this formula to streamline your workflow.
Your editing should start with “pre-processing” and you’ll learn about the 2 types of edits that ALL of your photos should receive during this stage. Plus, you’ll learn how to auto apply them during import!
Have you ever noticed that your images look different, on the back of your camera, vs. what you see in Lightroom?
It could be due to not having a Color Management system in place.. which you’ll learn about in Step 4. Hint: the Camera Calibration panel is part of it and you’ll learn all about how to use it properly.
Did you know that all lenses add a certain level of distortion to your photos? You’ll learn how to fix it with one click.
Crooked doorways, leaning buildings, etc.. got you down? No worries. You’ll learn how to quickly adjust perspective issues.
Not sure about you… but, my tripod doesn’t always make the trip. Which results in crooked landscapes. You’ll learn the exact tool I use to auto straighten with 2 clicks.
Now that you’re pre-processing workflow is complete it’s time to start editing!
But, where do you begin? Sooo many panels to choose from. So, you start fixing the easy stuff; exposure, WB, maybe add a little clarity, boost the saturation…
…then, you fiddle with this slider and that one, and bounce around from panel to panel… before you know it, 15 minutes has gone by. Worse yet, you do not like the edit.
Sigh…
There’s a better, smarter, faster way…
And you’ll learn exactly which panel you should start with and why.
Not sure what all the panels will do? No worries. You’ll learn exactly what they are for and how to use them to fulfill your creative vision.
Once upon-a-time Photoshop was THE tool for re-touching your photos. NOT anymore! You’ll
learn about the tools I use to re-touch directly in Lightroom. Like; re-moving objects, fixing blemishes and much more.
Plus, this same tool will allow you to precisely place your edits exactly where you want them.
Love the WB balance in your photo… but, the skin tones of your subjects are un-natural looking?
I’ll show you exactly how to adjust your WB (or any other type of edit; clarity, contrast, saturation, and much more) for natural looking skin.
Learn about the one secret panel that I use on every photo and hardly anyone else uses. Using this secret panel will allow you to edit faster and NOT over edit.
If you’ve been around Lightroom long enough, you’re probably aware of the number 1 used tool in Lightroom; Develop Presets.
Throughout this e-book, you’ll learn about many more types of presets. But, you’re going to discover that Develop presets have a dirty little secret… learn the truth.
You’ll find out when and when not to use these types of presets, how to get the most out of them and much more.
Oh, I’m going to give you 40 FREE Lightroom presets too. All of which can be used to streamline your workflow.
Whew, that’s a lot of learning.
Once you complete Step 4, you’ll have a fast and productive workflow for editing your photos faster than you thought possible.
Which now brings us to the final step of your Lightroom workflow…
“Easy to follow and with lots of valuable information.”
05
A few things you’ll learn for this part of your workflow…
How to create an export preset
Recommended settings for Social Media
Recommended file settings
How to remove Metadata from your files for privacy!
Time to share your photos with the world!
You’ve imported, tagged and edited your photos. Now it’s time to share them with the world! Which requires getting your photos out of Lightroom.
Welcome to the Exporting Workflow. Before exporting your files, you’ll need to tell Lightroom a few things about your final destination first.
Whether you’re exporting for Facebook, Instagram, in-home printer, pro lab, etc.., they all require different settings for best results. You’ll learn how to create export presets to help streamline this part of your workflow.

You’ll have to get your photos out of Lightroom to share them.
When you purchase the Lightroom Workflow Made Easy class, you’ll also get 2 additional bonuses.
The first bonus is 10 worksheets to guide you through creating your Lightroom Workflow. The second bonus includes 40 of my most popular Lightroom presets.
01

3 Risk Analysis Worksheets:
Use these as the starting point for your Data Management Workflow. You’ll know exactly where the weak points are in your current (if you have one at all) backup plan.
Once you know where you are you can then begin creating a fail-proof plan.
Your Workflow Checklist:
Use this to keep track of all the steps required to complete your Lightroom Workflow.
Shopping List Worksheet:
This worksheet will help you create a list of hardware/software you may need for your data management workflow.
Data Management Worksheet:
A simple worksheet for writing out your Data Management workflow.
Getting it down on paper is key to ensuring you’ll follow through and implement.
Lightroom Catalog Worksheet:
How many Lightroom Catalogs do you need/want?
With this worksheet you can keep track of where you’re going to store all your catalogs (if you choose to have more than 1)
File & Folder Worksheet:
A consistent Folder & File Naming Structure, is key to a streamlined workflow.
Keep it simple. Use this worksheet to determine how you’ll setup your file/folder structure.
Then, you’ll refer back to it when it’s time to create your naming preset.
Tagging Worksheet:
Tagging is an important step of your Library Module Workflow. Use this worksheet to determine how you’ll use each of the different types of tags.
Keyword Worksheet:
Easily finding photos in Lightroom is a breeze when you apply keywords to your images.
Use this worksheet to begin the process of listing the most common types of keywords you’ll need.
Then, you’ll refer back to this page when you create your Keyword Presets.
02
25 Develop Presets:
A set of 25 of our most popular Lightroom presets.
15 Brush Presets:
A set of 15 of our most popular brush presets
The full no-fluff, 82-page e-book that shows you everything you need for a fast and productive Lightroom Workflow.
Receive 10 worksheets and checklists to help you create your Lightroom Workflow.
Includes 40 of my most popular Lightroom presets to help you streamline your editing.
The e-Book (and worksheets) comes in PDF format and can be viewed on PC or MAC. Plus, you can view on your iPad too. Once downloaded, you can view the tutorials offline and print out the worksheets. This is not a monthly subscription. These are yours to keep forever!
The Lightroom presets will be downloaded, to your computer, in 2 separate folders. You’ll learn how to install them (requires 2 different locations) in the Develop Module Workflow section.
What’s included with this Lightroom workflow Pro tutorial?
This Lightroom workflow Pro tutorial includes everything you need to know to create your post-production workflow in Lightroom.
You’ll also find file resources to use along with the class… to help you create your own Lightroom workflow.
I’m a beginner, will this Lightroom workflow class work for me?
Absolutely! I’ve designed this Lightroom workflow class for anyone who has absolutely NO prior knowledge about Lightroom. I will take you from the very basics and show you all you need to know create your very own efficient Lightroom workflow… in 5 easy steps.Is this included in the Pro subscription?
Yes! This is one of many Pro tutorials available to subscribers.
Click here to find out more and get started learning new Lightroom skills.
What’s the difference between Pro & Free Tutorials?
Our free tutorials focus on a single skill or technique.
Our Pro tutorials cover additional techniques, more detail and depth about the subject.
Plus, Pro subscribers receive premium support to questions and more. Oh, and the Pro tutorials also include additional resources vs. free tutorials.
What version of Lightroom is Required?
This Pro Lightroom tutorial was created in Lightroom CC Classic.
You can also follow along with Lightroom 6. However, there are some new tools/features in Lightroom CC Classic that are not in Lightroom 6.
Can I keep any free resources available for download with this course?
Yes! All Pro tutorial resources are yours for life. However, all images provided are for training purposes only.
You cannot share, sell or use any images for your portfolio. All images are copyrighted by Parker Photographic.
If I have questions about this Lightroom class where can I ask them?
You’ll have access to a “classroom” where you can ask questions.
I’m a pro photographer. Will I still get something out of it?
Absolutely!
I’ve loaded this course with some of my best and most advanced tips, tools and hacks for radically improving your Lightroom workflow.
Even if you’re a seasoned pro, I guarantee there’s something in here you’ve never seen before.
Why is this Lightroom workflow class better than the YouTube tutorials I’ve tried?
You’ll have access to a “classroom” where you can ask questions.I provide my 30 years of experience as a pro photographer (and as a user of Lightroom for the past 12 years) to help you achieve your creative vision.
As a pro subscriber, not only do you get every pro class, but you also get me as your mentor.
Get Started
Downloads
Copyright 2021 Parker Photographic. All rights reserved. Designed by, well, me!