AVOID this White Balance MISTAKE
Subscribe
Choosing the wrong White Balance in camera is destroying your photos.
But it’s an easy fix once you know which White Balance option to use, plus, I’m going share the secret trick to seeing the mistake you’re making and how to fix it during the editing process.
That is… if it’s possible to fix… because sometimes it’s not.
the White Balance MISTAKE
Now, when I first switched to digital, with this Fuji S two, I made the same mistakes because back in the film days, we didn’t have to worry about which White Balance to choose…
…because with film, the White Balance is determined by which film you use and if needed, you could have used a yellow or blue filter to balance the light.
Now if you remember those days, let me know in the comments. So, when I switched to digital I had no clue about the White Balance.
So what is it?
Well, White Balance in digital photography is about balancing the color of light to match what you see in person.
Now, sometimes this requires removing a color cast so that the whites and blacks in your image are pure white and or pure black.
But there’s something else that pro photographers know about White Balance that can help you create amazing images and I’ll share more info about that at the end.
So if you choose the wrong White Balance option, while shooting, the colors in your image will not match what you saw at the time of capture.
And sometimes it’s easier to spot the White Balance mistake more so than others.
Now this one is obviously too blue, right?
But in this image it’s not as obvious until I fix the White Balance.
And then when I compare them side by side, you can definitely see that the original was a little bit too blue.
So when you’re new to photography and editing, it’s very hard to see your mistake with an untrained eye.
However, I see experienced photographers make this mistake as well.
So how can you ensure that you have the correct White Balance?
Well, with the proper editing tool, it’s easy to see and fix.
And later on, once you know which White Balance option to use while shooting, you won’t have to fix it during the editing process. Or will you? Hmm more on that coming up soon.
Alright, so although I’m demonstrating this with Lightroom, most editing software has a White Balance selector or eyedropper tool.
And this is the trick to seeing whether or not your colors are balanced.
How to set the White Balance
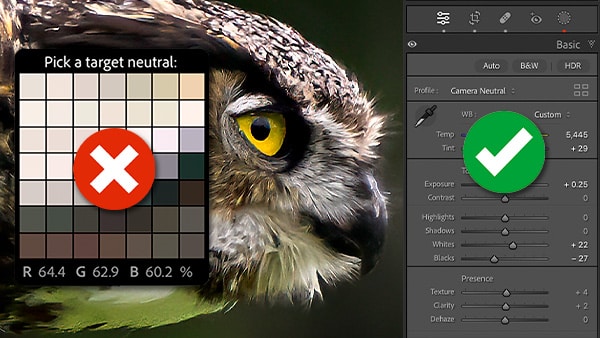
Ok, so, once you select this tool at the top, it says “Pick a neutral target.”
In other words, pick a part of the image that should be pure white or pure black.
And then when you click on it, you should have a White Balanced image.
Now before I do that, check out the values at the bottom.
So we have R, G, and B or red, green and blue with a percentage next to each, which represents how much of that color is in that area.
So pretty much everywhere that I hover over in the image, the blue value has the highest percentage.
So blue dominates and that’s why there’s a blue color cast.
Alright, so if you’re unsure if your image is properly White Balanced, use the EyeDropper tool to check the values and neutralize the dominant color by clicking on something that should be pure white or pure black.
But removing that color cast for this image is a mistake. Why is that?
When NOT to “Balance”
Well, when I created this image, we were staying at a friend’s house in Florida and two houses down there was this empty lot where these burrowing owls had a protected habitat.
And at the time there were several juvenile owls and I decided to wake up the next morning at sunrise to take advantage of the best light of the day, which is known as golden hour.
Now during golden hour, whether at sunrise or sunset, the color of light is spectacular, it’s warmer and has more yellows and oranges and reds, and those colors create an obvious color cast.
So anytime you shoot during golden hour or even blue hour, which occurs after the sun dips below the horizon, you shouldn’t be neutralizing the colors.
Instead, you should choose the perfect White Balance setting to render the color of light for that lighting situation.
But there’s one problem, there isn’t a White Balance preset for golden hour or even blue hour.
Also, if you’re not getting these options, that’s because you shot your images in jpeg and if you chose the wrong White Balance at the time you created your image, you’re going to have a very, very difficult time fixing it regardless of your software, which is why I always recommend shooting in RAW.
Ok, so these other options are to be used in specific lighting situations and they’re designed to give you a “proper” White Balance for that situation.
For example, use daylight when shooting on a bright sunny day.
This one is for cloudy days. If you’re shooting in the shade, use this one.
If the light is tungsten or fluorescent, use one of those. And then we have flash.
So these are the same settings that are in your camera and you might already be using them, but that doesn’t mean they’re the perfect White Balance option for that particular lighting situation.
Wrong White Balance Applied
So here’s two images that I shot on a sunny day with the same White Balance preset… Daylight.
But even though I chose the White Balance preset for that situation, the color of light isn’t balanced properly for either one.
Alright, so let’s start with this image first. And to the untrained eye, the White Balance may look good, however, I know based on the time of day that I shot this, which I think was in the afternoon, it was actually right around one o’clock.
At that time of day, the light should be more white than blue.
And we can confirm the color is too blue by measuring something that should be pure white, like this cloud. And the grays should be pure gray too.
And as I suspected the EyeDropper tool confirms that blue is the dominant color.
So to neutralize the colors and make the whites and greys more pure, I’m just gonna click in this area and then the White Balance or the temperature will be adjusted accordingly.
Okay, let’s go ahead and zoom out. And now let’s take a look at the before and the after. So it might be still hard to see on your monitor. So I’m gonna go ahead and zoom in here.
And I can definitely see that the original image, with the daylight preset, is much more saturated and more blue than the adjusted White Balance on the right here.
And if we take a look at the structure of the bridge itself, you can definitely see that this part of the bridge is much bluer versus the edited version.
Now this next image is a little trickier, even though I’ve selected Daylight, we have two different types of lighting situations going on in this image.
Part of the image is in Daylight and the other is in the Shade. Again, this image I believe was shot in the middle of the day, and it looks like just before noon.
So, the color of light at that time of day is closer to white versus blue. And anything in the shade is going to have more blue.
But I want to balance the light that is in the dominant part of the image, in this case where the sun is shining in the image.
Now we can confirm that the image is too blue by finding a white or black part of the image to measure and see if we need to actually fix it or not.
Now in the last image, I used the clouds to find that blue.
But take a look at the clouds of this image compared to this image.
So the clouds in this one are much darker and thicker than the clouds in this image. They’re more translucent.
So in that case, the blue of the sky is going to transmit through these clouds more so than the other ones.
So these clouds don’t necessarily have to be pure white since we can expect them to be a little bit blue.
So I don’t want measure the color intensity from here. Instead, let’s measure the moon since it should have pure shades of gray.
And, the White Balance tool shows the blue color cast, and let’s click here to fix it.
And if we take a look at the before and after, we can definitely see that the original image was to blue.
So that brings us to the million dollar question.
Which White Balance options should you use if you still have to go in and manually adjust it after the fact?
Well, when it comes to white balancing your image, there’s more to it than just the “balance” part of… White Balance.
There’s something the pros know about White Balance that can help you create amazing images.
To find out what that is, watch this video next.