Master 80% of photography basics in 10 minutes from a pro
Subscribe
When I learn something new, I like being taught like a five-year-old.
One of my students said it best… You’re Awesome. I’m a teacher and I love how you articulate slowly and make it simple to understand.
And Daniel said, “You explained complicated concepts in a clear and easy-to-understand way.”
When you finish this video, you’ll understand the foundation of creating amazing images.
What is ISO
Back in 1989, I was introduced to ISO after I asked the person behind the counter for a roll of film. He responded, “Which brand and, more importantly, what ISO do you need.”
I had no idea what he was talking about, so he asked me if I was shooting indoors or outdoors and how bright the light would be… and off I went with ISO one hundred.
But at the time, I didn’t understand how ISO played a role in the quality of my images.
So, before we get into why I was using ISO one hundred, let’s cover some ISO basics critical to your image’s quality.
So, ninety-nine percent of the videos you’ll watch about ISO say the following…
“Your camera sensor is sensitive to light, and the higher the ISO, the more sensitive your camera sensor is to light.”
Wrong.
In theory, yes. Especially in the days of film, when the gelatin on the film was exposed to light, an image was burned into it.
And you can’t stuff the film back into the canister after it’s been exposed and re-use it.
However, your camera sensor is NOT sensitive to light and can be re-used.
Instead, your camera’s electronics will amplify the light as you increase the ISO.
So, if you’re shooting in a low-light situation, boosting the ISO will make that light brighter.
Sounds perfect, doesn’t it? But, there’s one major problem when shooting with a higher ISO.
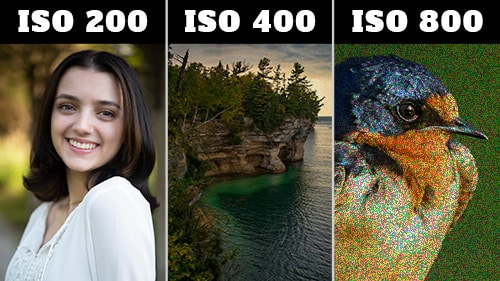
Due to the amplification, digital noise is created in the process, and the more noise you have, the softer your image will be.
The quality and size of your camera’s sensor also affect how much digital noise is created.
This image was created with my first digital camera twenty-two years ago, shot at ISO eight hundred.
Let’s compare it to this next image, also shot at ISO eight hundred, created with my Nikon z eight.
The z eight, due to the bigger and better camera sensor, produces a cleaner, sharper image.
Ok, the clerk recommended ISO one hundred instead of something higher due to the photo shoot being done on a bright sunny day.
If shooting in the shade, you might need something higher, like two hundred or four hundred.
At sunset, you might need ISO four hundred or eight hundred.
When indoors, the intensity of the light is much less, so you’ll need something like eight hundred or sixteen hundred.
If you want to create sharp images… with little to no noise, use the lowest ISO setting possible.
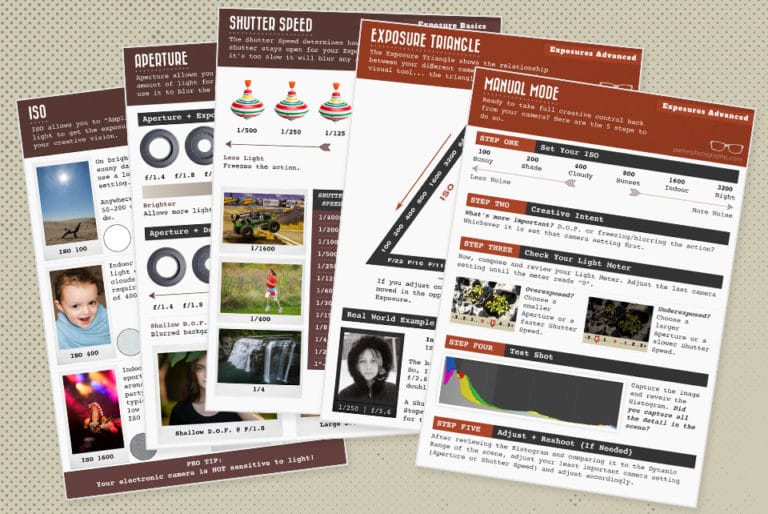
To help you remember this, download this free ISO cheat sheet in the description below.
What is SHUTTER SPEED
The next camera setting can also ensure you have a sharp image too. But it also has creative powers by either blurring or freezing the action.
This is done by choosing the Shutter Speed based on your creative vision.
So, the Shutter Speed is the time measured in seconds or fractions of a second that your shutter is open.
A slow Shutter Speed, like one-fifteenth of a second, one second, or slower, like twenty seconds, can blur the action.
The result when shooting waterfalls is the soft, milky water effect it creates.
If you want to freeze the water or any moving subject, a faster shutter speed will be required.
The tricky part is knowing which shutter speed to use for your subject.
A static subject doesn’t require a fast shutter since they’re not moving much.
But you’ll need a faster shutter speed if you’re shooting something in motion.
Generally, the faster the subject, the faster the Shutter Speed time is needed.
If you want to blur the action, the slower the subject, the slower the time needed.
Check out the Shutter Speed cheat sheet below for more examples of which shutter speed to use for different subjects and situations.
What is APERTURE
When I started photography three decades ago, Aperture was the most confusing camera setting until I learned what I’m about to share.
So, what is an Aperture? Well, an Aperture is a hole. You can see this hole in your lens.
As you adjust the aperture ring, the blades that create the hole expand or contract to make the hole or the aperture larger or smaller.
The size of these holes are referenced with numbers like F two point eight, F four, and F five point six, to name a few.
This is where it starts to get a little confusing. You may have noticed that the larger openings correspond with a smaller number.
So, in photography, one point eight is larger than twenty-two.
Why is that? Well, there’s some math involved, which we’ll cover in a different tutorial.
For now, all you need is the free Aperture Cheat Sheet included below for reference.
So, your Aperture of choice has two primary purposes. One, it can let more or less light pass through the lens into your camera.
I’ll share a real-world example of why this is important in a moment. First, let’s explore the creative side of your Aperture choice.
What is Dept of Field
If you’ve ever wondered how the pros get that soft, blurry background in their images, it’s done by controlling the Depth of Field.
The most well-known way to do this is through your choice of Aperture.
There’s actually three more ways to control the Depth of Field, and I’ll save those for another video.
So, the Depth of Field refers to how much of your image is in focus in front of and behind the spot you focused on.
The smaller the Aperture number, the smaller the depth of field; the larger the number, the larger the depth of field.
When using a teeny tiny Aperture like F one point four, you have to ensure your focus point is precise to maximize the sharpness of your subject.
For example, the eyes are the gateway to the soul, and if you place the focus point on the nose instead of the eye, then due to the Shallow depth of field, the eyes will be out of focus.
For this series of images, I placed the focus point on the owl, and as I adjusted the Aperture, the Depth of Field got smaller, and the background became blurrier.
So, to put it all together, let’s review two real-world examples.
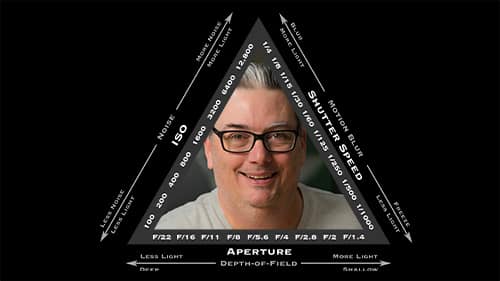
When I’m ready to photograph something, the first step is determining which ISO to use.
So, you can start with the ISO recommendation according to the Cheat Sheet. Keep in mind you may need to adjust it based on your next two choices.
The first is the Aperture, and I’ll choose the one that gives me the depth of field I need for my creative vision.
If I want a blurry background for, let’s say, a single portrait, I’ll start with a large Aperture, like two point eight.
But if I have multiple people in the shot, I’ll go with a smaller Aperture, like F four or F five point six, to ensure everyone is in focus.
After that, I’ll choose the Shutter Speed that will allow me to blur or freeze the action.
Image is Too Bright?
But what do you do if your image is too bright? One option is to lower the ISO if it’s not at one hundred yet.
Remember, the ISO amplifies the light’s intensity, and lowering it will reduce the brightness of your image.
The other option is to increase the speed of your Shutter. The faster the Shutter closes, the less light that reaches your sensor.
The third option is to change your aperture to a larger F number, which also reduces the amount of light.
Image is Too Dark?
What do you do if your image is too dark? Well, it’s the opposite of what we covered previously.
A higher ISO makes the light brighter.
A smaller Aperture, like F two point eight, adds more light, and a slower Shutter Speed, like two seconds vs one, increases the amount of light.
Whether your image is too bright or too dark, consider your creative choices when adjusting the Aperture and Shutter Speed due to the Depth of Field and whether or not you want to blur or freeze your subject.
Although you have learned the foundation for creating good images, you must master the four keys to creating amazing images.
To discover all four, watch this video next.