Everything You Need to Know About
Apertures To Create Amazing Images
Subscribe
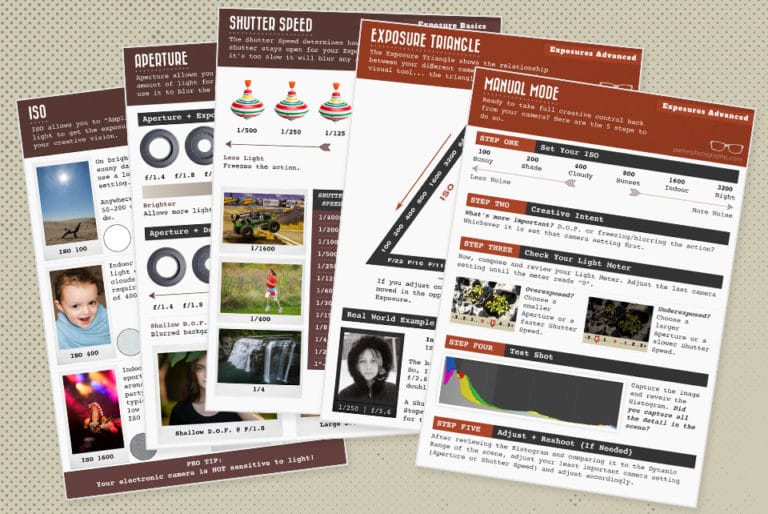
In the previous tutorial, you took two images at different aperture settings, and the result was the object in the back was blurry when you shot it with the largest aperture versus the smallest aperture.

In photography, this is referred to as the depth of field, which refers to the amount of your image in focus.

Therefore, a small field depth has less focus than a larger one.

To help you remember this, a small aperture number like f/2.8 represents a small depth of field, and a large number like f/16 means a large depth of field.

You may have realized a weird phenomenon: a small aperture number like f/2.8 has a vast hole compared to an aperture of f/22.

So why is that?

Well, you're going to find out right here, right now.

As we discussed earlier in a previous tutorial, an aperture number in photography is referred to as an “F” number, and the numbers are listed, like f/1.4, f/2.8, f/4, and so on.

Depending on your camera, it may or may not include a forward slash.

If things weren't confusing enough already, someone had to add a letter and a forward slash to our aperture numbers, but there is a reason why, and it will explain why f/22 is smaller than f/2.8.

So, the F in the F number stands for focal length.

Let's take the focal length of this lens, which is 50, and replace the letter “F” with 50.

So now we have this aperture number: 50/2.8. What is that starting to look like?

Yes, math, no worries. Math is not a requirement to create incredible photos.

Stick with me for another 17 seconds; this will all make sense.

Alright, so if we divide 50 by 2.8, that equals 17.86, then if we take 50 and divide it by 22, that equals 2.27. So, which one is a smaller number?

That's right, 2.27.

So, in photography, f/22 is a smaller hole or aperture versus f/2.8.

Now, the question is how to use your knowledge to be more creative.

Let's look at more images to reinforce what you've learned.

So, for this image, I wanted a photo of our sun, and it was a cold, windy day, and it was hard enough as it was to convince him to pose for some pictures.

So, traveling to another location was out of the question.

So our backyard would have to do, and we have this big red shed and an old rickety fence close behind.

So, the one thing I didn't want for this photo was to be included in the shot or at least minimize them.

What aperture would I need to achieve this?

Yes, a large aperture, and I used f/2.8 to blur the background.

Sometimes, when shooting landscape photos, you may prefer to have a significant depth of field or more of the foreground, background, and focus.

 And for that, what aperture would you need?

That's correct, a small aperture.

So, for this image, I used f/11 to create a significant depth of field to get the foreground background and focus, which helps tell the story of this couple's wedding day.

Now, for our next demonstration, we will go outside in my backyard so I can demonstrate other factors that will affect how much of the image is in focus or not.

And I volunteered my daughter to help us out.

Now, I'll use aperture priority mode, and we'll have the camera set to auto-iso.

This way, I can choose my aperture and let the camera decide on the iso and shutter speed.

So, let's head on outside.

We'll take several photos to demonstrate depth of field and how you can control depth of field with different factors.

So, I will shoot the first two images at f/1.4, the largest aperture for this lens, and then a second photo at f/16, the smallest aperture for this lens.

Then, we'll compare those two images to see how those aperture settings affect the depth of field.

So I'm going to go ahead and shoot it f/16 first, and I'm going to have her hold out the flower so I can focus on the flower, which will demonstrate the depth of field when I focus on the flower versus her.

I'm going to focus on the flower and take the first image.

Now, I will change to f/1.4 and take a second image. All right, let's compare those images now.

And the first one is going to be the one shot at f/16.

We can also see that there's a considerable depth of field and that many of the elements in the scene are in focus.

Now, let's compare that to f/1.4, and we can see that the flower of the stem in her hand is in focus, but the rest of the scene is not. So she's blurry in this image, as the elements in the back, the fence, and the house in the back are blurrier than the subject, and the further the elements from her, the more they become blurred out.

All right, so remember what we talked about before.

A small aperture number will result in a small depth of field or less of the image being in focus.

When you have a large aperture number like f/16 or f/22, you will have a larger depth of field, and more of the image will be in focus.

Now, I want to demonstrate another way you can control the depth of field.

And I will step back about 15 feet here and take two more images at f/1.4 and then another at f/16.

So, I'm going to go ahead and shoot at f/16 first. Okay, I'm going to switch to f/1.4 now.

All right, let's take a look at these images now. And the first one is at f/16.

Like before, we have a large depth of field, but check out what happens when you shoot at f/1.4 and you're further from the subject.

This time, she's in much sharper focus than before, so she's not as blurry, but the background, even though it's more in focus, is still blurry.

So distance is another way of controlling your depth of field. So the closer you are to the subject that you're focusing on, the shallower or, the smaller the depth of field or the less of the image that will be in focus, and the greater the distance between you and your camera and the subject you're focusing on, the greater the depth of field or the larger the depth of field or the more of the image that will be in focus.

Now, another thing that you can do is if you are photographing somebody and you have a busy background like this, and you want to blur out the background.

Still, you need to get the amount of blur you want. What you can do is move your subject away from the background, and then that will blur out that background even more.

So we're both going to move up here about 30 feet and take another photo.

Alright, we're now about 30 to 40 feet further from the position we were before, and I will shoot at f/1.4 again.

Let's look at this image and compare it to the last one.

As you can see, we have a relatively large depth of field, but compared to the last image, the background is much more blurred out than before.

So again, distance helps affect or control the amount of the image in focus.

Now, another thing that you can do to control the amount of depth of field if you can't move your subject away from the background because maybe you're photographing a tiger at the zoo or you're on safari, and for obvious reasons, you can't get closer to that tiger, or you can't ask that tiger to move away from the background, what you can do instead is change your lens from shorter to longer.

So, I will change my focal length here from 50 to 200 and shoot another photo to compare to the image we just took.

I have my 70-200 lens, and I will shoot at the most extended length, 200.

Now, my largest aperture for this lens is f/2.8, so I can't shoot at f/1.4.

So technically, it's a smaller aperture versus the one we shot previously with the shorter focal length.

So I'm going to have her hold up that flower again.

I'm going to focus on that flower and take another image.

Let's go ahead and compare this image now to the one we did previously.

So, as you can see, the flower of the stem and her hand are in focus, but she is no longer in focus like it was in the last image at f/1.4.

And definitely, the background is more out of focus than it was previously.

So, another option for controlling your depth of field is using a longer lens.

 We've reviewed a lot of information in this tutorial, and there's much to remember.

I want to jump back into the studio and share a secret to help you quickly and easily remember everything you've learned in this tutorial.

So, let's go ahead and head back inside.

Now that you know the creative aspects of the apertures, how they affect depth of field, and how distance affects the depth of field, it's time to apply your knowledge.

Since knowledge is not power, action is, and that's because the best way to learn photography is to shoot and shoot some more.

So remember, adjust your aperture based on the depth of the field you prefer, and adjust the ISO if needed.

Next up is discovering how to use the shutter priority mode and how to use the shutter speed creatively.

So, if you are ready to elevate your photographic skills even more, click here to get started.