Nikon z8 Auto Focus Review
Subscribe
I’ve been field-testing the Nikon z8 for nine of the 11 autofocus modes for the last few weeks.
And like with the Nikon z8 battery test, I wanted to challenge the focusing modes to see how they performed in different situations.
And at the end of this video, I will provide my recommendations and how to overcome some of the limitations I encountered.
So if you are ready, let’s do it.
Nikon z8 Dynamic Area Focus Modes
The first three autofocus modes that I tested were the dynamic area focus modes, and they work primarily by targeting focus within this little box right here.>
Now, your subject goes outside of it. In that case, the Nikon z8 will continue tracking and focusing via these eight points right here, which are the outer boundary of the focus area.
But as you can see, as the Red-winged blackbird goes outside that boundary, it loses focus.
So now I’m switching to another size, the medium, and the third is large.
Each one will target a larger area, so you don’t have to be as precise as a smaller dynamic area.
That being said, I still didn’t find the dynamic area focus modes ideal for my type of shooting.
So here’s a bullfrog where I applied the dynamic area focusing too, and it’s having a real hard time focusing on the subject, even though I’m trying to tell Nikon where it is.
As I move the camera into this position, it recognizes this grassy area. It doesn’t realize that the subject is still within that area, and I lose focus.
Nikon z8 3D Auto Focus Modes
And the one I like to use, the focus mode I like using is the 3D focus mode.
So with the 3D focus mode, you must help Nikon find the subject within your frame.
So you have to take the focus point, place it on the subject, and hold down your shutter release button halfway.
Then that lets Nikon know, okay, this is the subject. It will do an excellent job of keeping track of that subject as you recompose the image in the camera or as the subject moves.
Now it could be better because sometimes it will lose focus if it comes across something disrupting its view of the subject.
So here we go.
We can see that I’ve placed the focus point right here, this little white box here, and then it automagically finds the eye of the bullfrog, represented by this little green square right here.
Nikon z8 Wide-Area Focus Modes
Here I have another focus mode that I tested out with this bullfrog as well, and it’s called the wide area focus mode.
And there are four of these to choose from. With the vast area, you get four different boxes or rectangles where the target of that focus is within this red boundary.
So we have smaller and larger boundaries to choose from out of these four. This is wide L or wide large.
So again, because subject detection is activated for this focus mode, it also includes eye tracking.
And as soon as we get outside that subject or the subject gets outside that box, it loses focus.
Here are some ducks I found in some intense grass. We have one right here. It’s tough to see. This one is more visible.
I tested out the dynamic area in the situation. I was able to focus on this duct here, and that’s because this grassy area right here is on the same plane, and that’s why I was able to get it in focus.
Now I’ve switched to 3D to see how well the 3D tracking would do in this type of situation where we have a lot of this tall grass obscuring the ducks.
You’ll notice that it’s doing a pretty good job of focusing on the ducks as he dips in and out of the grass as well as this one here in the back; it’s trying to focus on the eye, it recognizes it, but it’s not able to focus on it fast enough as the duck moves around.
So, I wasn’t able to focus on it at that point.
However, I could still get a very tack-sharp image under these conditions with the 3D autofocus mode.
Barn Swallow
Here’s a Barn Swallow that I found one day at our local marsh, and he hung out with me for a good 10 to 15 minutes, which was pretty awesome because I could navigate through all the different focus modes to test them out.
In this situation, it’s easier than the others I’ve shown you because the background is pretty relaxed.
Nothing in the foreground obscures the Swallows’ view of the Nikon focus system.
So it did an excellent job of keeping track of the eye of the swallow.
As you’ll see, this is wide and large, and I moved around back and forth, and you can see how the focus disappears or gets lost once it’s outside of that box.
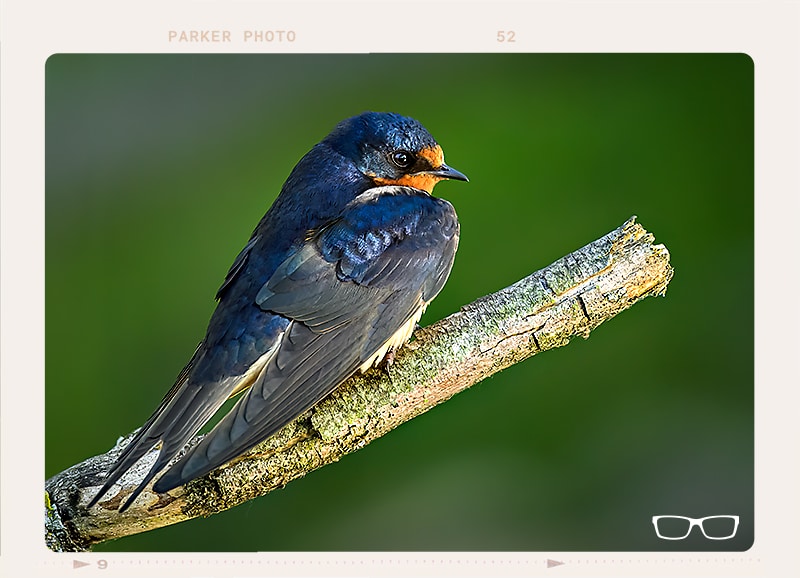
And I’m coming back in. Now, I noticed that the swallow was utterly lost to the focus system because I focused on these branches in the background.
It doesn’t recognize that there’s an actual bird or a swallow right here. It can’t see that shape.
What I had to do was I had to manually focus on bringing it into a little bit of focus before the Nikon system could recognize it as an animal.
But once it did, it locked onto that eye and began tracking the eye as I moved around.
Here’s another wide area mode that you can test out.
It’s more of a long triangle, and it does an excellent job as long as you keep that subject width, that boxed area.
Because it’s not as tall, it could be better for this situation. I prefer this particular mode for birds and flight, and I’ll show you that at the end.
Now I’ve switched to wide small to keep that focus right on the head of the swallow.
This is ideal if you have a busy area around your subject, like trees, branches, leaves, etc.
Because if a gusty wind comes in, the movement of those leaves may distract the focusing system and cause it to lose focus.
In that case, you may want to switch to wide small to concentrate on the head, but you must be more precise in keeping that swallow within that box.
Now I’ve switched to wide area c2, which gives us a vertical focusing box.
Now for this particular setup, it could be better.
I would prefer the horizontal box instead, but if I was shooting a tall animal like, let’s say, a giraffe or maybe a great blue heron that was standing in a marsh, and may want to switch over to this vertical format instead.
All right, now I’m switching over to auto area focus mode.
And with the auto area, you’re giving 100% control to your Nikon z8.
So your z8 will use the entire area or frame to search, find, and focus on your subject.
So right now, I’m throwing off the focus area since it had already been tracked via 3D tracking.
And you can see it instantly finds the eyes once it recognizes that that is an animal.
So it’s just as quick if not quicker than 3D tracking because I don’t have to help Nikon in this case.
It automagically finds the subject and the eye instantaneously in this situation.
And I say in, and I emphasize in because, as I mentioned before, that was a clean setup.
There was nothing in front of the subject like these leaves and branches are in front of this Prothonotary Warbler, and I’m still using auto area focus mode.
And you can see it’s targeting these leaves in the foreground and trying to find the subject within it, and it can’t.
So what auto area mode does is it targets the elements in front of everything else.
And if it recognizes that it’s not a subject, it will have difficulty finding it until you help it out.
In this case, what I had to do was I had to adjust the monopod higher so it would then recognize more of the bird.
And once it did, as you can see, it started finding and focusing on the ary warbler and its eye; even though it was moving erratically, it could lock on occasionally to the eye.
Now let’s go back here real quick because this is important. After all, the person sanitary warbler here is on the same plane as this thick here. There’s really nothing else in front of it.
It has to start looking for the subject somewhere.
And if I zoom in here, we can see that all these little focus points are trying to find the subject over here, even though it’s over here on the right.
So again, if you have any elements that are conflicting or competing with your subject, you will have difficulty finding them initially.
But unlike the previous one where the leaves were in front, there’s nothing in front of the warbler, just on the sides.
And therefore, it was able to quickly find the warbler in this case and target the eye occasionally. Now this guy is moving a lot really fast, and he’s pruning himself.
So it’s going back and forth between focusing on the body and the eye.
Overall, it does a pretty good or an excellent job.
All right, now this is interesting.
This is the Prothonotary Warblers nest.
There are some offspring in here, and you can see I have the focus point right here, and it’s recognizing this hole as the subject.
Now, as soon as he flies in, it recognizes that there’s a more significant object or subject, and it begins focusing on the warbler from this point.
So even though I moved away and came back, it could lock onto that position again. Now it’s starting to track the body and will lock onto the eye.
Let’s see what happens here.
And it’s still, right there last second, it couldn’t get the eye.
I believe I got a shot of this, which is right here.
So even though it didn’t lock onto the eye itself, it still did a pretty good job of giving me a very sharp image.
All right, now I’m checking out some birds in flight. I believe these were some vultures over the marsh.
Here I am in wide C1 with this long rectangle. I like this focus mode for birds and flight gliding slowly or moving fast but far away so I can keep them within the box.
If they were closer and moving faster, I would want a larger area to focus on.
So as the vulture glides around or glides around, you can see it’s staying on target, even though I made a huge mistake, and that’s because I had done some portrait photos the day before.
I had switched to the people subject detection mode, which you can see right here.
Even though I’m tracking a bird with people detection, it’s still doing well.
FOUR TIPS
Here are four tips to help you get the most out of your Nikon z8 focus modes.
So let’s return to that test I did with the ary warbler just before it arrived at its nest.
As I mentioned, the focus system latched onto the round hole in the tree.
So I’d like to know if the focus system recognizes the hole as a bird or is searching for a somewhat round shape.
When it sees it, it thinks it’s an animal and begins focusing on that shape, or is it more complex than that? I have no idea.
Now, if you do, let us know in the comments.
I bring this up because if the foreground elements obscure the subject, that round shape is disrupted.
It no longer looks like a round shape, so it can no longer detect that subject and loses focus on it, and the leaves obstruct that round shape of the warbler.
But by changing my position, I revealed more of the shape of the warbler, and now it’s being recognized. So keep that in mind.
If you have a lot of elements between you and the subject, the focus will not be able to focus on it.
I also found that background elements can sometimes confuse the focus system.
This Goldfinch was perched on a branch, and the foreground was clean, but the background had a lot of leaves in it, and everything was going fine at first.
And I was using auto area focus mode, which was locked onto the eye and tracked the eye as it focused.
But a gust of wind came through, and all the leaves started to move violently all over the place.
It confused the autofocus system and lost the subject in the process.
It wasn’t until the wind died down that it could focus on the goldfinch again.
I don’t have a video of this. I didn’t have it then, but this is the image I captured during that sequence.
Regarding birds in flight, it’s best to have some contrast between your background and your subject.
The focus system will lose your subject in the background if they have similar colors or brightness levels.
This last tip is counterintuitive when choosing an autofocus mode.
I mentioned previously that sometimes you’ll need to help the focusing system find the subject if it’s hugely out of focus. You will need to use manual focus to help it find the subject.
Check out this Nikon z8 playlist for additional tests I’ve done with the z8, menu setting recommendations, and much more.





2 Responses
Hi Chris:
I’ve been viewing a lot of your videos lately, both on Nikon Z8 and on Topaz Photolab. I have a question about how to use the AF-C autofocus on the Z8: Should you continue to push the AF-On button (I use back button af, AF-C) continuously even as it tracks the subject, or do you wait for the AF to lock on with the white box, and then release it as it tracks? I mostly use either Wide-L and Auto Area, both with auto subject detect. I wasn’t sure if you should continue to hold down the button as you are shooting, or if the camera locks on, takes over. I guess once the white box is gone it has lost focus and you need to help the camera find it again. I’m coming from Fuji and landscapes, wildlife is new to me. Thank you!
Hi Michael, Unfortunately, I don’t have any easy answer for you. I’ve never used Back Button Focus. So, I can’t comment on that at this time. I’m going to start using it this Spring to see if it’s better, for me at least.