Three things I wish Lightroom could do...
Subscribe
Check this out. I have a self-portrait of myself here on a boardwalk.
My camera was extremely dirty, or I should say the camera sensor was really dirty.
There are a lot of dust spots, and we can remove those dust spots with anyone of these healing tools.
I’m going to use Content Aware, I’m going to click right here, and it’s going to magically disappear.
Pretty awesome, right?
Well, I now have to go through each one of these dust spots one at a time. It’s going to take forever to remove all those dust spots.
So I will go ahead and remove these and show you a better, faster way.
All right, so I’m going to click on the erase module here, and I’m going to click on remove dust spots.
And it should magically remove all those dust spots in one click.
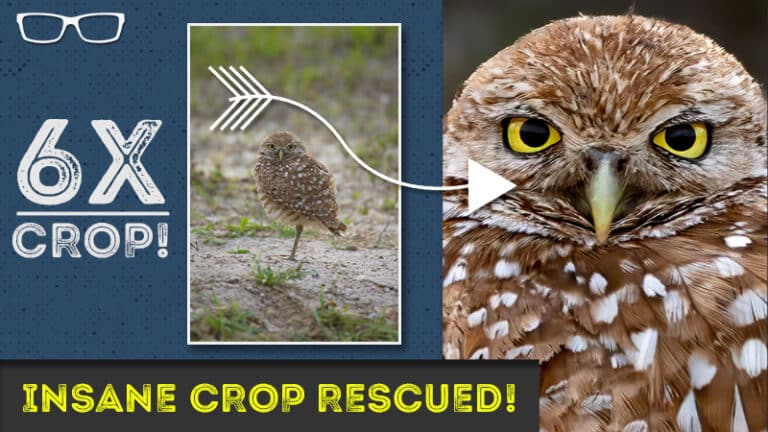
And it actually did check this out.
Not only did it remove the dust spots in one click, but it also recognized that these were birds. How awesome is that?
So if it’s a hundred times faster than what we can do in Lightroom.
All right, so number two is a little bit more complex. We have some power lines here that I would like to remove.
And again, we can use our content-aware tool to go in and remove those power lines, one at a time. It’s going to take forever to remove all of these power lines.
However, if we go back into the erase module here, we see a Remove Power Lines button.
And once again, it should magically remove all those power lines in one click.
Boom, all the power lines are gone.
That is awesome. Wouldn’t you agree?
Alright, so number three is magically delicious as well. So check this out.
I have an image that I shot during sunrise at Letchworth State Park, and the sun is starting to peek over this little itty-bitty mountain right here.
And there are some clouds in the gorge and a river down here.
This is the Genesee River, but we can’t see it because the sunlight is not shining in that area, so it’s underexposed.
So now I need to come into Lightroom and adjust several sliders to reveal the details in the shadows.
So the first thing I will do is adjust the tonal values here.
So I’m going to increase the exposure just a little bit.
I will increase the shadows to reveal the details in that part of the tonal range.
And now you can see the other side of the mountain with the trees, the cliff, the clouds, the Genesee River, and the gorge here.
The foreground is much brighter, but the image is flat overall.
So I’m going to adjust the whites just a little bit and the blacks a little bit as well.
That adds some contrast to the image, but it’s still too flat.
Also, the highlights are a little bit overexposed or too bright.
So I will adjust the highlights slider to the left to tone down those highlights.
Next, I want to add a little bit of contrast in the tone curve by adjusting the tone curve to create what is known as an S-curve.
All right, now I have a much better image, but it took several sliders and an additional tool, the tone curve, to get this edit.
But check this out.
With the power of AI technology, we can go into the enhanced module here and adjust the accent to the right.
It will magically do what all those other sliders did in one slider.
How awesome is that?
I can’t believe how powerful this AI slider is in allowing us to edit an image in three seconds versus one minute, three minutes, or whatever the case may be in Lightroom.
Now, how did I do this?
Well, check this out. I’m going to go back into Lightroom here. I’m going to right-click and select edit in.
Now, this is a third-party plugin that allows us to expand the AI tools that we have in Lightroom to achieve our creative vision better and faster.
I’m going to edit in Luminar Neo. And if we go into the edit tab here, we can see we have our enhanced AI tool here and the erase tool here.
And under Enhance, we can instantly edit that image, which is a hundred times faster than what we did in Lightroom Classic.
Plus, we can also target just the sky and enhance the sky.
So look at that. With one slider, we now have deeper, richer blues and more contrast in the sky.
There’s no masking involved. Now, that’s not all. There are other AI tools in here as well.
And if you want to try out Luminar Neo for yourself, check out the link in the description below for a free trial to try this out on your own images.
You can get that free trial and check it out, but if you decide to get Luminar Neo, you can buy a full lifetime license.
There’s no subscription fee required.
To learn more about Luminar Neo, check out this free Luminar course.