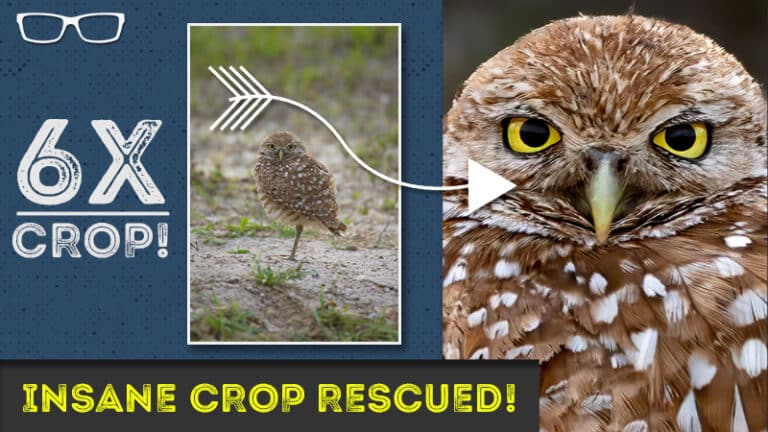
INSANE 6x crop Rescued with Topaz Photo AI
Subscribe
👉️👉️👉️ FREE TRIAL Topaz Photo AI: https://bit.ly/3Xn9pmo
Today I want to show you how I rescued an image because I wasn’t able to capture it in the field, I had to use some auto AI magic in order to get the shot that I wanted.
Burrowing Owls
So here are some of the burrowing owls I shot recently on a trip to Florida.
And although I got a lot of great images, I didn’t really get one that I wanted in particular, and it had to do with this image right here.
FINAL EDIT WITH LIGHTROOM CLASSIC
So here is the original image, straight out of the camera, and my final edit.
Now, what I wanted to do is I wanted to do a very, very tight crop just on the face to show off those eyes.
They’re very intense.
Now, if we go ahead and zoom in here, I can kind of show you what I wanted with something like this, but a vertical shot.
Cropping in Lightroom
Now, I did that by re-cropping the image in Lightroom.
The only problem is if we zoom in a little bit more here, you can see that the image is very soft. There’s not a lot of detail in the feathers, and there’s digital noise.
So I tried to fix this in Lightroom, which I did with this particular file here.
Denoise in Lightroom
This is the DNG file, and the noise is gone, and it’s sharper.
The only problem is I can’t do anything with this particular file because if you take a look at the crop, that is an extreme crop.
That’s insane.
But that’s what I had envisioned when I was taking this particular photo.
the Problem
The problem was I was shooting with a 200-500mm lens, zoomed out all the way to 500mm, and I was using a mirrorless camera, a Nikon Z six, and I had it in crop mode.
So even with that, that gave me a reach of 750mm.
I also had a teleconverter that I actually left behind on this day when I went to do the shoot. But even with that, that would’ve given me around 1,050mm.
And that still wouldn’t have been enough to get this particular image right here, this composition, because the owl was too far away, and I couldn’t get closer to it without disturbing it and stressing it out and getting fined and thrown in jail as well.
So that’s not something that I wanted to do. It wasn’t an option for me. I was shooting this from a street.
These owls are nested or create their nest in between residential homes, and you can only get so close to them.
So what I had to do then was use the magic of AI technology to give me the shot that I wanted.
FILE RESOLUTION
Now with this file, if we take a look at the size of the file because I can’t really do anything with this file because look at the resolution after the crop, 500 by 750 for the width and the height.
That’s insane!
I can’t do anything with it. I can’t post it on social media because it’s too small, and I’m definitely not going to get a printout of it.
Now, if we take a look at this image here, the TIFF file here that I have, we can see that the resolution is 3000×4500.
So it’s six times larger than the original image. Now, is that going to create a problem as far as pixelization?
Is there going to be more softness issues?
Is it going to be blurrier than the final DNG file? Well, let’s take a look at both files side by side.
IMAGE COMPARISON
So on the right side here, we have our DNG file from Lightroom that was created after I applied Denoise AI, and I also did some sharpening as well.
Now, the image on the left is a TIFF file, and what I have to do is I actually have to zoom out here so we can actually get it to the same size as the image on the right.
So right about there, maybe a little bit smaller, and that looks about the same size, but check out the detail in that edited version. We have a lot more detail in the feathers.
We can see the individual feathers but can’t see that with the Lightroom version.
The eyes are sharper, they’re more intense, and the beak is sharper.
There’s less digital noise and fewer artifacts.
So I got the image that I wanted without having to spend $20,000 on a super telephoto lens and a 2x teleconverter.
So we don’t need expensive equipment to get the images that we want.
Sometimes we just need to invest a little bit of money in AI software in order to get what we want.
So how did I do this?
TOPAZ PHOTO AI
Well, let’s go into the original raw file, which is right here.
And I’m going to right-click and select edit in Topaz Photo AI.
So this is a hundred times less expensive versus that $20,000 super-telephoto lens.
I’m going to create a TIFF file.
And if you’ve never used Topaz Photo AI, I’m going to show you how to fix the image to get what you had envisioned, as well as how to edit the image in Photoshop to bring back better detail for your wildlife images.
Let me show you what I mean real quick.
So if we take a look at the before here, the noise reduction we’re going to apply kind of blurs out some of the feathers here, but with the magic of Photoshop’s AI removal tool, we’re able to bring back those feathers.
I’m going to show you how to do that in just a second.
First, we’re going to go into Topaz Photo AI and take a look at how we can edit this image quickly and easily to help us achieve our creative vision.
Upscale
So automatically, it’s applied 4x for the upscale, I actually want to do 6x, so I’m going to click on Max. And now that gives us 3000 by 4,500 for the resolution.
So now, at that size, not only can I post it on social media, but I can also do any print size that I want, like; 11×14, 16×20, or 20×30.
And I should have no problem getting excellent images printed at those sizes.
All right, so once it applies the upscale, it’s also enhancing the resolution to begin bringing back detail in the image and reducing noise a little bit.
Noise Removal
But I want to reduce the noise a lot more because it’s still quite visible in the feathers, the eye, and a little bit in the background.
So I’m going to turn on Remove Noise, and it’s going to apply Normal v2.
So unlike in Lightroom, in Topaz Photo AI, we have four versions of digital noise removal, as well as a strength and a detail slider to bring back that detail and increase or decrease the strength of that noise reduction.
So just like that, it took me longer to explain it than it was able to fix the image. So here is the before and the after.
How cool is that? I love it.
So a lot more detail in the feathers, and that digital noise is gone.
But as I mentioned right up here, the noise was pretty strong in this area, and it removed the feathers.
So I’m going to go ahead and apply save to Adobe Lightroom Classic, and then I’m going to open it up in Photoshop.
You can get Topaz Photo AI at a discount right now and get a free trial via the link in the description below.
So now we’re going to go into Lightroom here, and I’m going to right-click on this new TIFF file, and I’m going to edit in Adobe Photoshop.
Retouching in Photoshop
So let’s go into Photoshop here.
And we have our new file, and I’m going to go ahead and zoom in a little bit so you can see that a little better.
And what I’m going to do is I want to work non-destructively. I want to put these edits on their own layer.
So I’m going to click on this new layer icon here. I’m going to come over here to my healing tools.
I’m going to right-click and select the remove tool, which has AI technology built into it.
And then I’m going to drag along the top of the Owl.
And boom, there it is.
How cool is that? I love it. So we brought those feather details back in that area, and now I have the completed image that I had envisioned.
If you want to try out Topaz Photo AI for yourself, click here for a free trial.
And to learn more about Topaz Photo AI, check out this playlist.