

Have You Ever Downloaded Lightroom Presets, Applied & Thought – These Presets Suck!?!?
- Post by Parker: 30 Years experience!
- 4 Comments
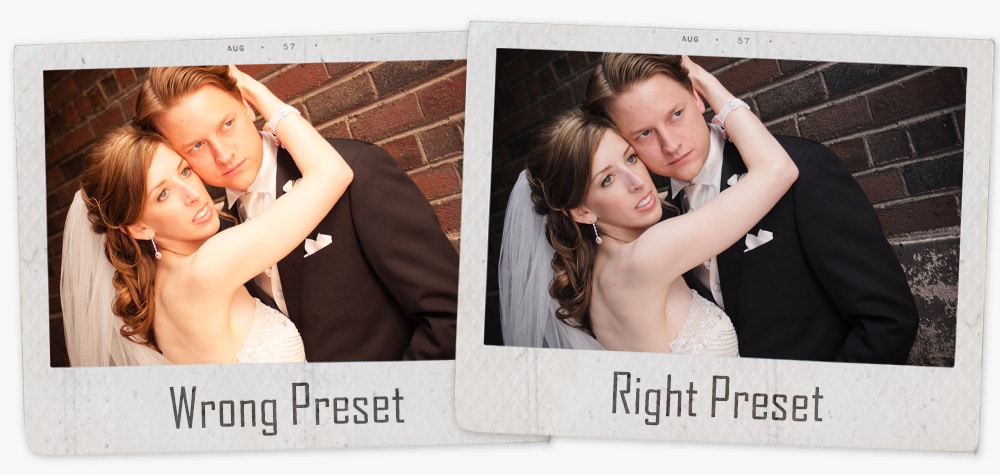

Table of Contents
So, you run across a website, Facebook, Pinterest or Instagram page, etc… with these gorgeous photos.
I mean these photos are juicy, mouth-watering, jaw-dropping fantastic!
“Wow”! you say… “I wish my photos looked like that”!
You investigate further to figure out how he/she created those amazing photos.
Then, you discover this talented artist has Lightroom Develop presets (or Photoshop Actions) from their personal collection…
You gotta have’m…
…and you add to the cart and checkout.
Lightroom presets delivered. Installed.
And you’re ready to transform your images.
So, you start to try them out…
First Lightroom preset… nope, that one sucks…
Second… nope, it sucks too…
Third… OMG, nope…
“Hmmm, these Lightroom presets look like crap on my photos”, you say!
“Why am I not getting the same results as the other photographer”, you ask yourself?
Besides, they said, “with one click you too can have amazing photos” and they have testimonials to back up their claim.
“Hogwash!”, you say emphatically.
Their (or our) pre-made Lightroom presets are just not working for you.
Plus, you can’t get a refund and you’re not happy.
Well, check out what 2 photographers had to say about the exact same Lightroom preset collection…
Same Presets.
Different Results?
How can 2 photographers experience completely different results (read on to find the answer and see some photo examples)?
It’s the same set of Lightroom presets!
So, it can’t be the Lightroom presets they purchased since Angela thinks they are “Amazing” (and so do thousands of other photographers).
If it’s not the presets, then why does Linda hate them?
First, let’s start with the basics…
Lightroom develop presets are nothing more than specific settings for a specific photo.
Those develop settings are saved and can then be re-applied to another photo.
Saved settings can include edits from any of the following panels or tools…
- Basic (WB, Dynamic Range, Presence)
- Tone Curve
- HSL
- Split Toning
- Detail
- Lens Corrections
- Effects
- Camera Calibration
- Graduated filters
Those saved settings, in the Lightroom preset that you’re using, will then be applied to your image.
But, that doesn’t mean you’re going to be happy with the result.
There are a lot of things that can affect the edit, other than the settings being applied.
For example, the following (but not limited to) can play a role with how your preset looks when applied.

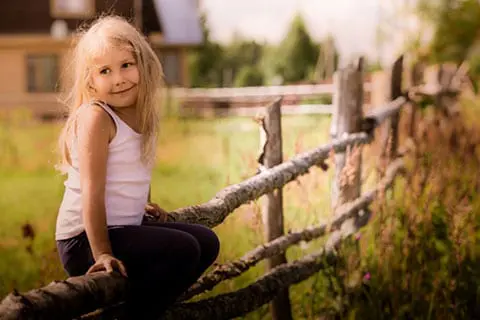
Click image to enlarge. The preset was designed for this type of photo: daylight.
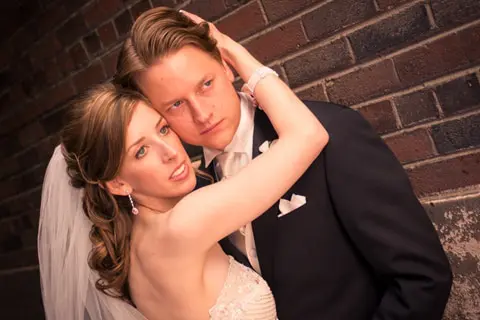
Click image to enlarge. Same preset as above. Which is NOT designed for this type of photo: cloudy.
01 ~ Time of Day
The temperature of the light is going to be different based on time of day. And whether it’s a cloudy or sunny day.
Here are two photos shot at different times of day (and different lighting situations) with the same Lightroom preset applied; Autumn Orange.
This preset was designed for photos either shot at sunset or photos with (orange) fall colors.
The preset does NOT work for the bottom image!
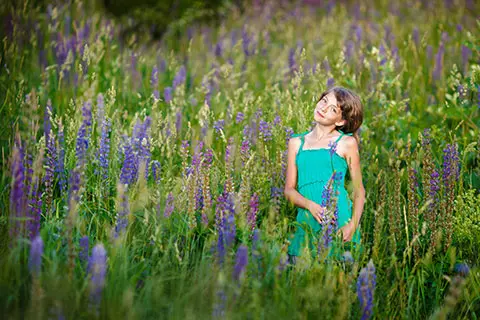
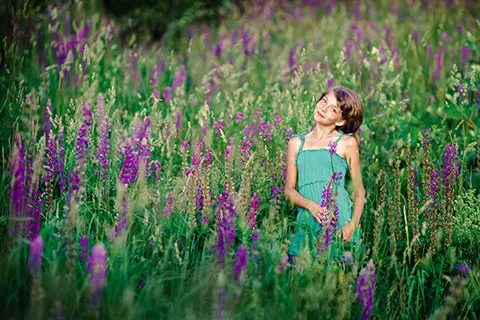
02 ~ Location + Targeted Colors
For example a field of flowers vs. an urban landscape.
A preset designed for a specific location, color enhancement, etc.. may not work on another photo that is completely different.
The following photos were edited with the Boysenberry preset from our Spring Collection.
This preset enhances purples and blues.
It was originally designed for outdoor photos with a field of purple flowers.
Works well on some other photos too.
As long as it has purple and/or blues.
On the second photo, you can see very little was changed due to the lack of purples, blues, and the location.


03 ~ Graduated Filters
Some of the Lightroom presets, from our Spring, Summer or Fall collections, utilize Graduated Filters.
A Graduated filter applies a specific type of edit in a specific location.
If it overlaps with your subjects or is placed in a different location vs. the composition of your photo, then you may not be happy with the results.
Again, you’ll need to tweak and/or move the Graduated filter to work with your composition.
Here is a perfect example.
The Graduated filter applied comes from our Fall Collection.
It’s designed to add a spotlight around your subject and places a strong vignette around them.
This preset was created for the exact location of the subjects in the first photo.
If your composition is different (even slightly) you will not like the results…


Photos Are Like Snowflakes
No 2 photos are exactly alike (unless you are in a controlled environment and have the exact same lighting, exposure, subject, etc..).
You can see this in the histogram of your photos.
The histogram is like a snowflake and represents a visual graph of your photos luminosity (tonal range) and colors (RGB).
There are 4.2 billion+ possibilities – on an 8-bit image for JPG files and RAW files are usually 16 bit (and the values more than double)…
256 values for your
Dynamic Range
x 256 values for your
Red channel
x 256 values for your
Green channel
x 256 values for your
Blue channel
equals…
Did You Know?
Depending on the preset being used, chances are good your White and Black points will be set incorrectly – for your photo.
A good tonal range will have detail in both the Shadows and Highlights.
But, some presets are designed to either clip or lower the detail in the Shadows and Highlights.
It’s important to understand what the preset was designed for.
Then, you’ll have a better idea of where to start to correctly tweak for your photo.
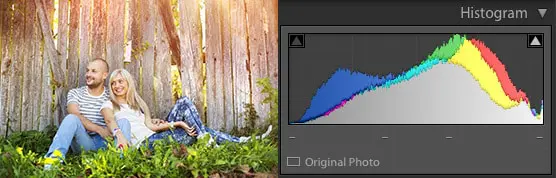
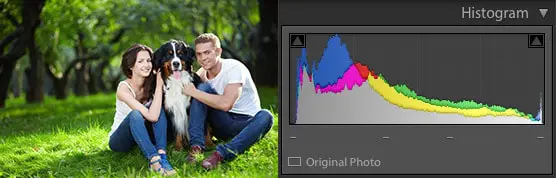
Here we have 2 photos with their histogram.
Each original histogram is different for each photo.
After applying the preset, the histograms are more similar than before.
However, that doesn’t mean the preset is actually going to work for one photo vs. another.
This preset, from our Matte collection, was designed to give your photos a Matte finish.
This is accomplished by adjusting the White and Black points where less detail is visible in the Shadows and Highlights.
You can see this in the histogram after the preset was applied.

Tip #1
So, one Lightroom Develop preset cannot accommodate that many different scenarios and instantly (with the one-click and done approach) be perfect for YOUR photo.
Plus, each of us has different tastes, preferences, styles, etc.. and what I like you may not
Which is why it’s imperative to tweak any Lightroom presets for YOUR particular preference.
Tip #2
Remember, pre-made presets were created for a particular photo.
If you’re looking at a set of presets to buy and you like the sample images, then your images should be similar in the way of lighting, subject matter (people vs. landscape, as an example), colors, and more.
Tip #3
Yes, you like how the preset looks on my photo (before you download for free or buy) or that “other” photographers Lightroom presets.
But that doesn’t mean you’re going to like it on yours after one-click.
In fact, I’m willing to bet you’ll need to tweak the Lightroom preset 99% of the time!
Tip #4
It, doesn’t matter where you get your pre-made Lightroom presets from (even presets you make yourself – due to the variables listed in this article).
They will not work 100% of the time on all photos. It’s impossible.
Tip #5
Does, that mean we should never use another pre-made preset or make our own? No.
It just means you can not expect perfection after one-click.
Yes, you’ll need to take a little time to tweak for your particular photo.
Which is still quicker than doing that creative edit from scratch.
Tip #6
If, you find you’re making the same basic tweaks, every time you use a specific preset, then save those settings as a new preset (or overwrite the original)!
You are now creating presets that will work for your photographic style, location, lighting, etc.. and this will improve your productivity.
Tip #7
Develop presets, when applied, are global edits.
Often times, depending on the preset, you may find skin tones become over saturated or maybe they turn a funky green, orange, purple, etc.. color.
If you’re happy with the overall preset and just want to fix the skin… Use an adjustment brush to de-saturate the skin tones.
Scenario 1
Let’s look at one possible scenario, after downloading and applying your new pre-made presets…
Since Angela has a similar photographic style (lighting, subject, camera profile, etc..) and her photos match what the presets were designed for (in this case – outdoor photos in an open field) she is extremely happy with the results.
But, it also helps that Angela has mastered Lightroom, has been using it for a while and understands that sometimes a preset will still need to be tweaked.
And I know this because Angela has taken our Lightroom Made Easy course.
Scenario 2
Now let’s take a look at a second scenario…
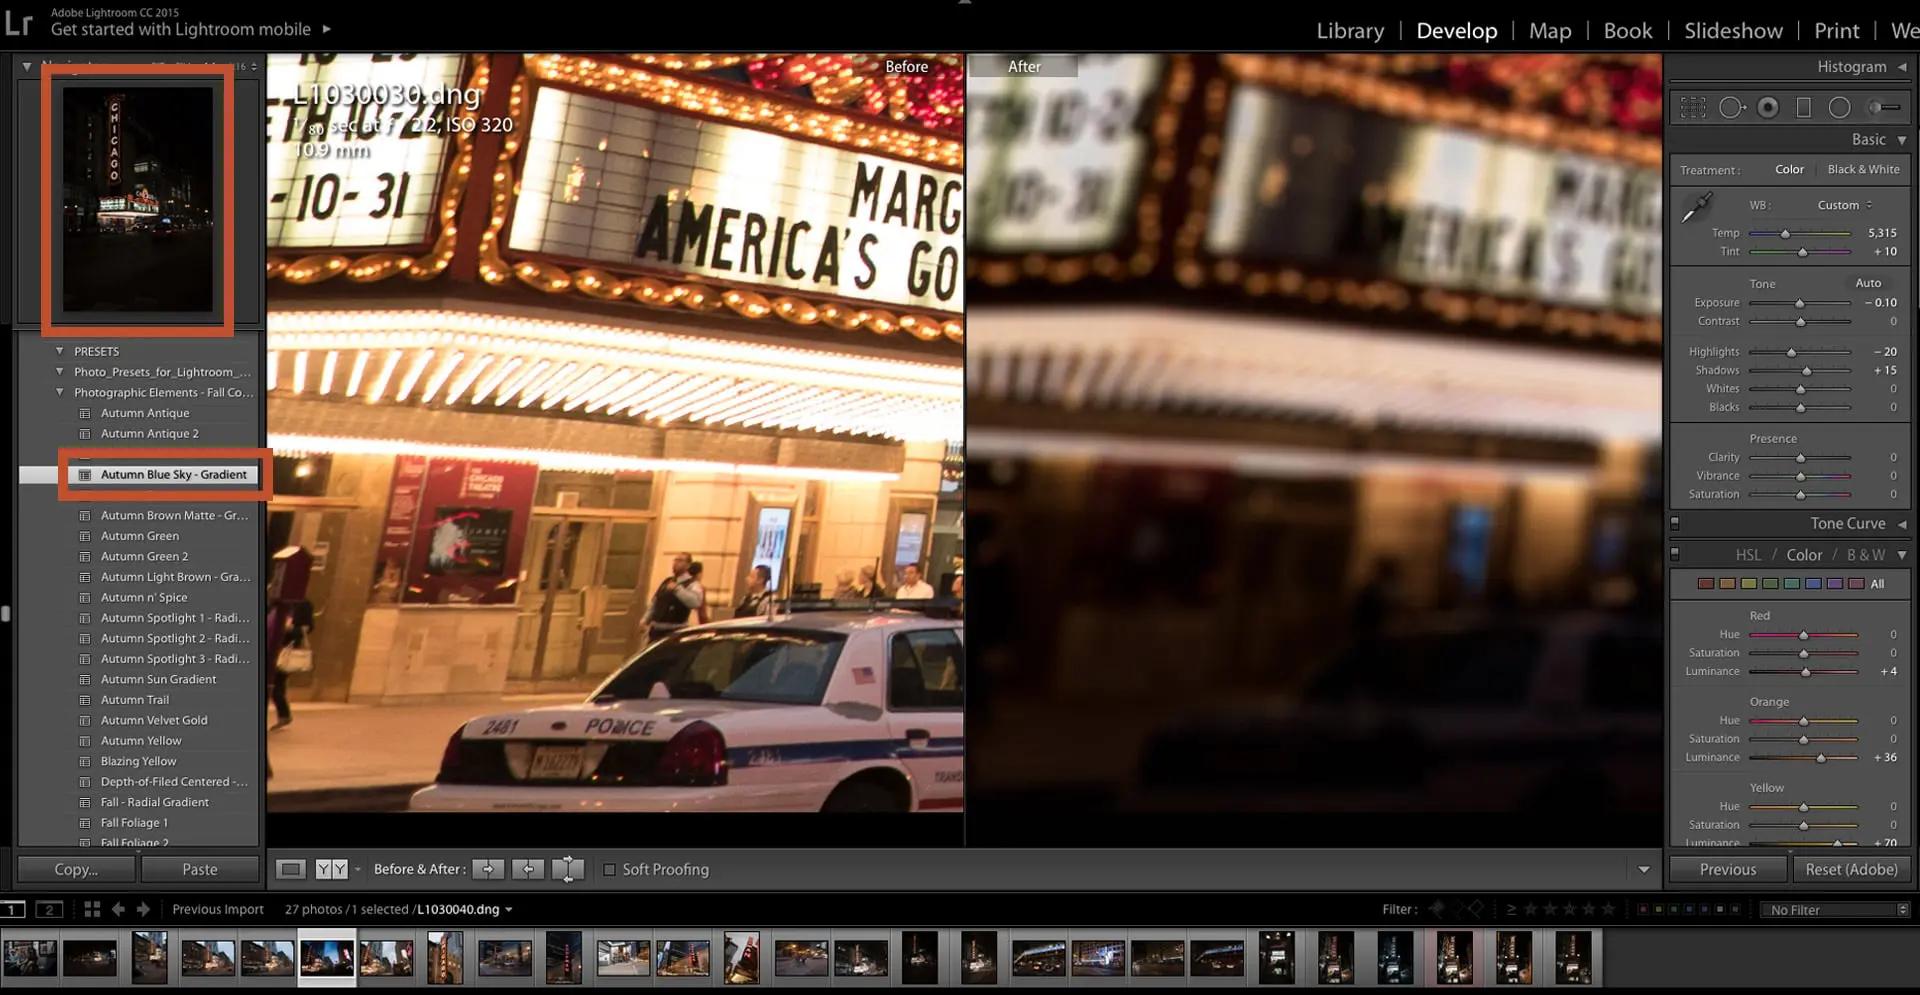
Upon inquiring, with Linda, I realized she was applying the presets on photos that were done at night and in an urban setting.
Of course the presets are garbage for her!
The presets were not developed for this type of photography…
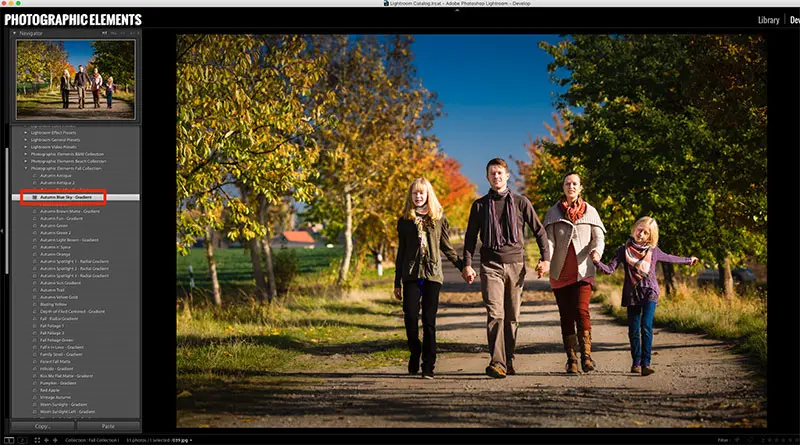
Linda was trying to apply a preset labeled – “Autumn Blue Sky – Gradient”, to this urban landscape.
This Lightroom preset is designed to enhance blue sky’s via a Graduated Filter.
In this example, Linda was trying to use our “Depth-of-Field – Centered” preset.
This preset was designed for outdoor photos and will lower the DOF to bring the focus onto your subjects (and the placement of the Graduated filter is positioned in the “Center” when applied).
The photo she used was shot under artificial lighting in a subway…


1 part user error and 1 part seller error… apparently I didn’t communicate – which has since been fixed with our Lightroom preset guide – that the presets should be used on outdoor photos, shot in the day.
Even though none of the samples were shot in that type of environment, Linda was still trying to use our presets in a different setting.
If a Lightroom preset was designed for a specific type of photo and your using it for the exact opposite, be prepared to be disappointed.
Which brings us to…
Scenario 3
Your photographic style, lighting, location, etc.. is similar to the sample images…
Yet, the Lightroom presets you purchased (or downloaded for free) just isn’t cutting it.
They still kinda suck…
In this case, there could be a myriad of possible variables affecting the outcome.
Is it the fault of the preset or your photo?
Neither.
Remember, a pre-made preset was created for a particular photo.
That photo was shot under a specific environment, with a specific camera calibration and a specific sensor, etc..
Unless your histogram matches that sample image perfectly, you’re not going to get the perfect edit with one click.
Know Thy Panels
Knowing your editing panels and how they affect the outcome will help you (quickly) determine how to tweak for your photo.
After applying a preset, is your skin tones over saturated or just out of whack (green, purple or…)?
If so, do you know where to go to fix them?
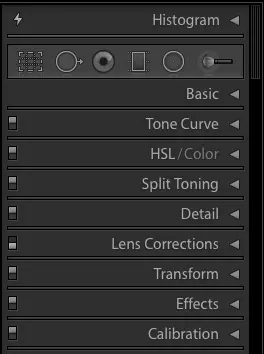
If you’re not sure, turn off a panel and see if it makes a difference.
If not, that panel may not be doing any adjustments.
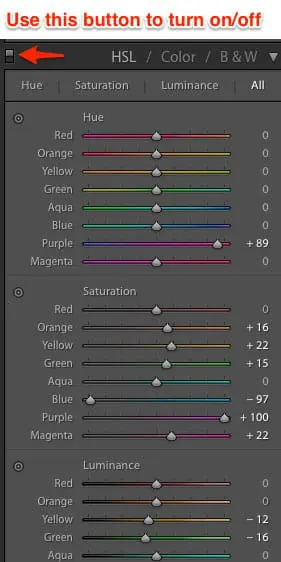
Sometimes it’s obvious, when you open a panel and see all the sliders that were adjusted.
However, in the Tone Curve panel, tweaks can be made on individual Red, Green and Blue channels and you will not see it with the default view.
You’ll have to navigate to each channel to see if an adjustment was made on one of the RGB channels.
Plus, turning on/off specific panels will give you a quick preview of what the edit looks like (before and after).
Then, you can decide if you need to adjust those settings within that panel.
If not, go onto the next panel, and so on.
Presets Are...
Overall, I think Lightroom presets are misunderstood. That creates the frustration, disappointment and the “OMG, these are the worst Lightroom presets ever!” – when using presets from someone else.
Presets were created to help us automate tasks and make our life better.
But, instead, some photographers think of them as the Holy Grail and expect works of art after one click – on every photo – it’s just not possible (which is due to lack of knowledge) .
Expectations...
In the end, if you’re using free, premium or your own pre-made presets, it all comes down to expectations and knowledge.
Expectations can be high if we don’t know the limitations.
Therefore, knowledge of your software is the key to a happy editor.
I understand the lure of getting a pre-made Lightroom preset and thinking it will solve all our problems.
They don’t eat up any of our time if they work perfectly after one click.
But, if you need to click through 50, 100, 200 or more presets to find that perfect look, then you wasted more time then it would take to create the perfect edit from scratch or to do some minor tweaks to work with your particular photo.
But again, it takes time to learn how to do this.
It all depends on how you wish to better spend your time (and money).
You can either gain the knowledge or continue searching for the Holy Grail…
How will you spend your time?
Quick Tip
“If you’ve ever downloaded our free Lightroom presets or purchased our premium presets, we have a Lightroom Preset Guide that gives tips for best results.
Plus, you’ll find more tips on using Lightroom presets in general.”
Now What?
Please share this post with others and make sure to rate (just below this post) it too!
I also value your opinion and would love your feedback.
This post is a work in progress and will be updated with new information (based on your feedback).
Please comment below.
P.S… writing and proper grammar is not my forte. If you find mistakes (which I’m sure there are a few) please kindly email the errors and I’ll fix.
Or, better yet, if you would like to proofread and correct this article (and others on this site) in exchange for my products… let’s get it started!
Send me a PM on Facebook.
Thank you for your time and have an awesome day!


4 Responses
Hi Chris, really interesting article, thank you.
I’ve just completed your online survey about LR and hoping you will send me the link to your 100 free presets.
Many thanks,
Sean
Hi Sean, Thanks for taking the time to fill it out. I sent your presets.
Thanks,
Chris
I agree. Presets are pointless!
Plugins are a different matter.
Many good plugins are out there. Get them!
My Friend ….
That was a ‘Great’ read. Thank you for the insight.