How to shoot in manual mode
Subscribe
It is time to take complete creative control over your camera by learning to shoot in manual mode.
It sounds like a daunting task, doesn’t it?
Where do you start?
Which camera setting should you set first, ISO, Aperture, or Shutter Speed?
Then, once you figure out one setting, how do you decide on the other two to get the proper exposure?
Well, fear not.
Once you’re done with this tutorial, you’ll know precisely how to shoot in full manual mode to achieve your creative vision and get the proper exposure because I will give you step-by-step instructions.
And if you are ready to ditch auto and shoot in full manual mode, let’s do it.
Grab your camera, and let’s put it in manual mode.
Change your dial to the letter M; now you’re in manual mode.
So here we go. Step one, choose your ISO based on your available light.
So remember, try to use the lowest ISO number possible for the brightness of the available light—step two.
Next, you must decide on your creative vision for the photo you want to create.
Do you want to freeze or blur the action?
Do you want a small or large depth of field?
Which one of those is the most important?
Step three: if the depth of field is the most critical element, set your aperture accordingly.
Or if freezing or blurring, the action is more important.
Well, set your shutter speed accordingly—step four.
It’s time to set the third camera setting based on your creative vision to get the proper exposure.
And the secret tool you will use to help you do that is not a secret.
So what is that?
Well, we talked about this tool in a previous tutorial, and it’s called a light meter.
Previously, the light meter wasn’t visible when you worked in aperture and shutter priority modes.
But now that you’re in manual mode, look through your viewfinder, and you’ll see multiple dashed lines that look like this.
So, that is the secret tool to help you determine if you have the correct exposure.
Depending on your camera, you might have a plus sign on the right, or it might be on the left. So here’s how it works.
If the marker is dead center, you can expect your exposure to be good.
If the marker is on the positive side, then your image will be overexposed and underexposed if the marker is on the opposing side.
So the goal, of course, is to have a good exposure, and you need to adjust your camera settings until the marker is in the center.
The challenge is to balance the camera settings based on your creative vision. So what I recommend doing
It starts with the camera setting. That will not affect what you want to achieve creatively.
For example, if a shallow depth of field is the most important, adjust your shutter speed until the marker aligns with the center.
But if you end up with a shutter speed that is too slow, you can increase the ISO instead or a combination of both the shutter speed and iso.
Now that you know how to shoot in Manual Mode, your exposures will be perfect every time.
No, not really, because remember, in previous tutorials, we covered how your camera sees things differently than you based on 18% gray and the different metering modes that alter how the light is well-metered.
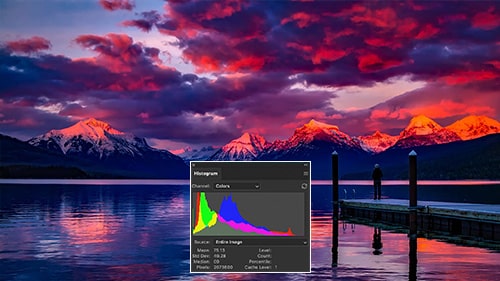
That’s why you must understand the dynamic range of a scene and use the histogram to confirm the existing range of light to ensure proper exposure based on what you’re trying to photograph.
So, if you still need to complete all of the tutorials in this camera masterclass, I recommend going back and watching everything.
That way, you will fully understand your camera.
And then, and only then, will you be able to master your camera and exposures.