What Is Dynamic Range In Photography? Plus, How It Affects Your Photos
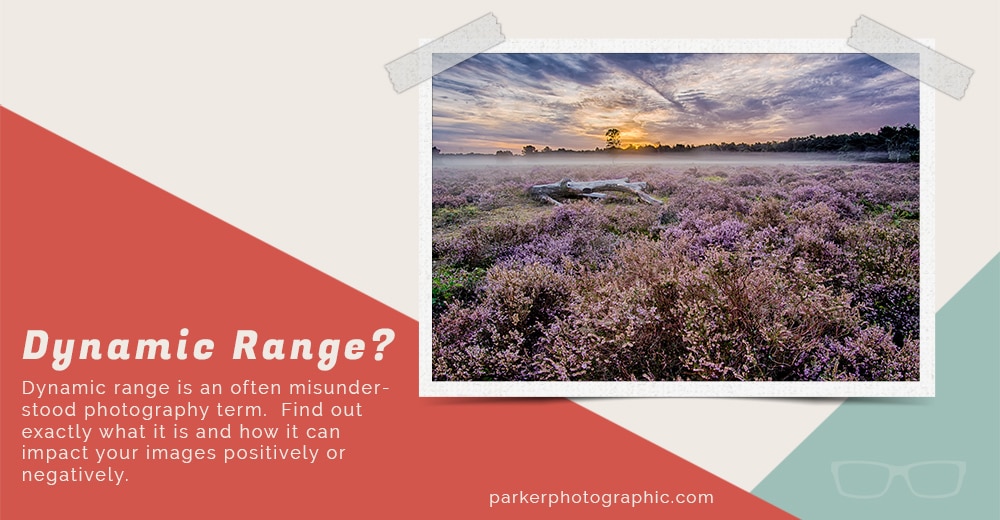
Photo by Joran Quinten
In our digital world, "dynamic range" is essential for understanding how to create exceptional photos.

In essence, digital cameras see your world differently vs your eyes.

Digital cameras have limitations in regards to dynamic range and not being aware of this can cause havoc on your image.

For example, if the sensor in your digital camera has a low dynamic range, it could result in detail not being captured either in the Highlights or Shadows.

Understanding the limitations of your camera’s dynamic range will help you create better images.

Let's start off by discovering what dynamic range in photography is.
Table of Contents
What Is Dynamic Range?
In essence, the dynamic range in photography refers to the measurement between maximum and minimum values of light.
In essence, the dynamic range in photography refers to the measurement between the maximum and minimum values of light, in a scene being photographed. Which is different from tonal range...

...tonal range is the actual amount of light captured by your camera's sensor. Due to the limitations of digital sensors in general (and film), they cannot capture the same amount of dynamic range vs your eyes.
Dynamic range in photography is simply the effort of your sensor to capture all the details from the highlights to the mid-tones to the shadows.

The brighter the scene, the more “range” of highlights to shadows there will be.Therefore, the larger the dynamic range of your sensor, the better chance you’ll have to capture the full range of light (and details).
Understanding Dynamic Range... Deep Dive
To better understand your digital camera's dynamic range limitations, let's break down light into shades of grey.
In our digital world, your recording device, whether it's a digital sensor in your DSLR, smartphone, or a digital file itself, "visualizes" the brightness (luminance) in 1's and 0's.  Zero is pure black, and 255 is pure white for a total of 256 shades of gray.

On the other hand, Mother Nature has an infinite level of "gray" or brightness levels. Your eyes are also not limited to 256 shades of luminance.

It should be noted that the amount of brightness levels your camera captures is its “tonal range.” Tonal range is different vs dynamic range.
Dynamic range is the full amount of brightness levels available to photograph. The tonal range is the actual brightness levels captured in your image.

Imagine your Ferrari has a range of 0 - 255 mph… that’s its dynamic range.

Now, imagine your spouse installs a speed inhibitor and changes the range from 0 - 60... that is the tonal range.
Mother Natures Dynamic Range vs Your Camera
In digital photography, the dynamic range is measured in “stops.” A “stop” refers to a level of luminance that can be captured by a sensor.
Your eyes have around 24 stops of dynamic range. High-end digital cameras are limited to around 14 stops and lower end digital cameras are even worse with ranges of 7 - 12 stops.

What does this really mean, though?

Well, the less dynamic range your camera is capable of capturing means you might end up losing detail in the shadows or the highlights. More or less based on the dynamic range of your camera.

Let’s put this in perspective with some visuals...
This gradient, shows that Mother Nature has an infinite amount of dynamic range… blacks to white.
This one, shows the limitation of your eyes at 24 stops.
This next gradient represents the 14 f-stops of hi-end digital cameras... like a Nikon Z6.
Our final gradient shows the limitations of low-end digital cameras that have a dynamic range of 7 stops... like my first digital camera; Fuji S2 (circ. 20o2).
Did you notice how the highlights and whites are gradually clipped more and more with the smaller dynamic ranges?

This means detail in those tonal ranges are not being captured by your camera!

Those types of exposures are known as “exposing to the left.” This means you’re exposing to capture the detail in the Blacks + Shadows.
But, what if you want to capture all the details in the Highlights and Whites?

Well, you’ll need to “expose to the right.” Then you’ll capture the details in that tonal range.

However, due to the low dynamic range of your camera the details in the Blacks and Shadows are now being clipped!
How To Improve the Dynamic Range Before Editing
You can do several things, prior to shooting, to improve the dynamic range at the time of capture. Let's go over a few options.
Control the Light
This can include adding additional light with artificial light or strobes. Or you can filter the light with a scrim to lower its intensity.
Polarizing Filter
Landscape photographers have less control over the light. A polarizing filter can lower the dynamic range and help darken bright skies.
Wait For the Weather To Change
If the sun is too bright, you could wait for a cloud to cover it. Or come back on an overcast day.

Either way, when the sun is being filtered through clouds, its intensity is lowered. The thicker the clouds, the lower the strength, and the lower the dynamic range.
Shoot From a Different Angle
Directional lighting can be intense too. If so, try shooting at a different angle to reduce the intensity.
Put Your Subject In the Shade
If waiting for the weather to change or coming back another day isn't an option… move to the shade.

This could be the shade from a tree, building, or another large object that will provide the shade needed.

Although this will lower the dynamic range of your subject, you'll need to consider the background's brightness level.

If the sun is filtering through the forest, located behind the subject, it might still be too intense, and you may end up with overexposed areas.
Pro Tip: When shooting in the shade, you'll also have to consider the white balance setting you'll use to balance the foreground and background colors.
How To Judge the Dynamic Range
Remember that gradient with 256 shades of gray?
You can visually see these 256 levels of luminance for every image you take! This visual representation is known as a Histogram.

Basically, a histogram is a graphical representation of the brightness levels of your image. Check out this histogram…
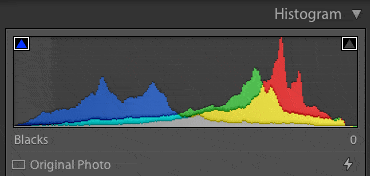
On the left, we have the blacks, followed by the shadows, mid-tones, highlights, and then the whites. Reading the histogram is a skill all photographers should learn.

Here's why… the histogram will show whether your image is exposed correctly or if it needs adjustments.

Once you know how to read a histogram, you can fix any exposure issues in two ways…
One.
Fix it at the time of capture. Take a photo and look at the histogram via the LCD screen of your camera. Is it over or underexposed?

If so, fix it now by reshooting until you get the proper exposure (or at least as close as possible). Or…
Two.
Fix it during post-processing. You will have to spend time fixing it if not done in-camera, but you'll also end up with a lower quality file.

If the image is too over or underexposed "fixing," it could add digital noise, artifacts, and possibly the loss of detail.
How HDR Can Improve the Dynamic Range Through Photography + Editing
The following technique for improving the dynamic range of a photo is done through both photography and editing.

This technique is known as HDR, which is short for High Dynamic Range.
HDR is the art of taking multiple photos of a scene at different exposures. In post-processing, you'll merge those photos together to retain detail in both the shadows and highlights.

This technique can be done with three or more photos. To merge them, you can use editing software like Adobe Camera Raw, Lightroom, or other alternatives to Photoshop.
Why HDR?
You could have the best camera in the world, and it still has a limitation when it comes to dynamic range.

Even editing software can do so much. If the detail wasn't captured in-camera, not even Photoshop could bring it back… at least naturally.

There are ways to remove backgrounds in Photoshop and replace them with "fluffy" clouds that were not visible at the time you took the photo. This, in itself, is time-consuming and doesn't always look natural.

You may want to consider HDR photography since you'll capture the full tonal range of the scene (all the details in the highlights and shadows).

Oh, and software like Lightroom makes it a snap to merge the photos! During merging, you can control the exposures for the highlights and shadows to maximize the texture and details.

If HDR sounds perfect, it's not. It has limitations too.
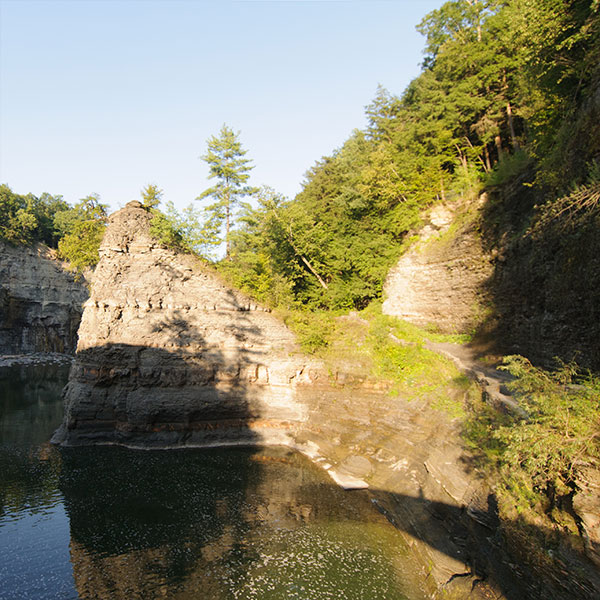
The dynamic range of my Nikon D200 was too small to capture all the tonal ranges of light.

Knowing this, I decided to capture three different exposures; 1 over exposed, 1 underexposed and one in the middle.  The over and under were 2 stops from the middle.
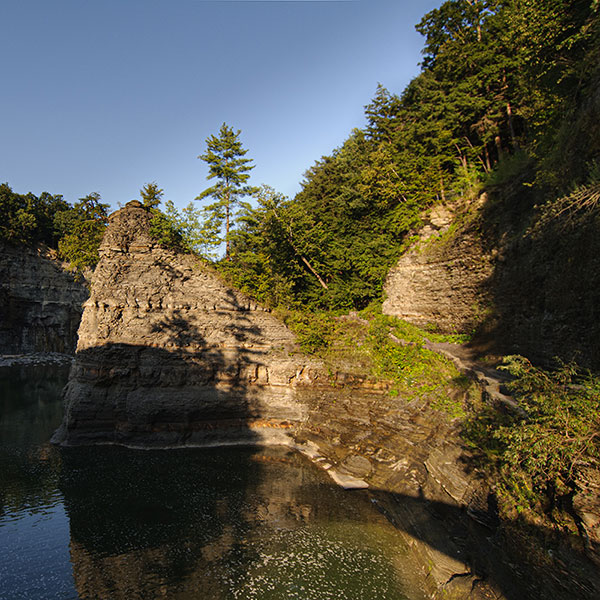
Lightroom made merging the three different exposures easy and seamless. Click to enlarge.
For example, it's challenging to use this technique on moving objects since the object will be in a different position as you take each additional image. This causes what is known as "ghosting."

It's possible to overcome this if the subject isn't moving too fast. Or by using a fast shutter speed and using continuous shooting mode.
Improving Dynamic Range With Editing
You can improve the dynamic range when you shoot in the Raw format. A Raw file contains a lot more information vs. a JPEG.

When shooting in JPEG, your camera has to make creative decisions for you when it compresses the file.
In other words, your camera has to determine how much detail it should retain in the shadows and highlights. Unlike a Raw file, it can't keep it all.  So, the first step of improving the dynamic range is shooting in Raw.

After that, you can use Adobe Lightroom or Camera Raw to tweak the highlight and shadow adjustments to bring back or reveal detail.
Being able to read the histogram will tell you if there's detail hidden in the shadows and highlights.

If you notice that the histogram isn't capturing all the detail at the time of the shoot, you may want to consider the HDR technique.
What Now?
Next, you need to find out what the dynamic range of your camera is. Either check the manual for your camera or Google it. But, what does the number of stops for the dynamic range of your camera mean for you?

Anything less than 10 means you'll have a hard time in high luminance situations. In that case, consider shooting multiple images for a High Dynamic Range (HDR).