Create Exceptional Photos By Using the Exposure Triangle... Guaranteed!
Exceptional photos are created not taken.
If you desire to create exceptional images that make your viewers say “WOW,” you need to master not only light in photography but also exposure… oh, and composition too!
Plus, you need to take your camera mode out of any auto mode and place it into manual mode. That is if you want full creative control.
Manual mode is a scary proposition for new and even more experienced photographers alike. It’s a complex and frequently complicated arrangement of camera settings that can be challenging that includes your aperture, shutter speed, and ISO. I’m not going to lie… at first, it will be frustrating.
No need to fret, though. We all started where you are and have struggled with transitioning to manual. If you stick with it, practice, ask questions and practice some more, you’ll have full creative control before you know it. I promise!
In fact, I’m going to share how you can use the Exposure Triangle to make the transition to manual easier.
Are you ready to take back artistic control from your camera to fulfill your creative vision?
Awesome! Let’s do it…
Table of Contents
What is Exposure & How Does It Affect Your Images?
Let’s take a look at exposure in all its glory before we delve into the nitty-gritty of the Exposure Triangle.
Exposure?
“Exposure is simply how bright or dark your image is.”
A well-balanced exposure is one that has detail in both the highlights and the shadows. Without those details, your image will lack the textures that can help tell “the story” of your image.
Three camera settings are used for capturing the desired exposure. They are the aperture, shutter speed, and ISO.
Each of them works together in providing an exposure that fits your creative vision.
How To Control the Exposure
One of the most challenging concepts for new photographers to master is selecting the three camera settings for a well-balanced exposure.
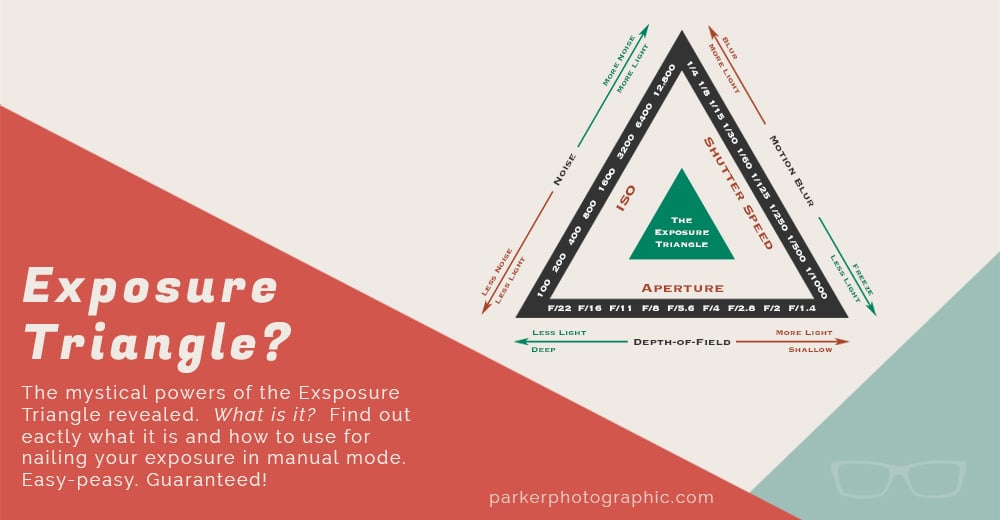
To simplify the use of these camera settings, you can visualize them on an exposure triangle. This shows the relationship between the aperture, shutter speed, and ISO.
The goal of the exposure triangle is to see how adjusting one setting affects one or both others. It makes it easier to understand this relationship by visually examining the camera settings on a, well, Triangle (see next section).
the Exposure Triangle
If you decide to change the aperture after discovering the right exposure settings, you may have to adjust the shutter speed and/or ISO, too, for a pleasing brightness level.
Let’s find out how these camera settings work together and how to use the exposure triangle for a well-balanced image.
3 Camera Settings For Exposure
In essence, the job of the aperture, shutter speed, and ISO is to provide you with the right amount of light to capture a properly exposed image. These settings can supply more or less of it, depending on your choices.
Aperture is the hole inside your lens. You can control the size of this hole to allow more or less light to enter your camera.
If you need or want more, you can adjust the aperture larger to achieve this. If there’s too much light, you can make the aperture smaller to cut down on the amount being captured.
Shutter speed is the duration the light is sent to the camera’s sensor. The length is controlled by a shutter that resides in front of the sensor. The longer it stays open, of course, the more brightness the sensor can record. The faster it closes, the less that can be captured.
ISO is the intensity of the light. Contrary to popular belief, ISO doesn’t control the sensitivity of the sensor. Instead, ISO amplifies the existing light, which provides more for the sensor to record your image with. Therefore, the higher the ISO, the more you’ll have for your image.
In a nutshell, all three camera settings give you the ability to capture more or less brightness.
the Triangle
This is not my idea or creation! In fact, this was created by a pro photographer decades ago before digital photography.
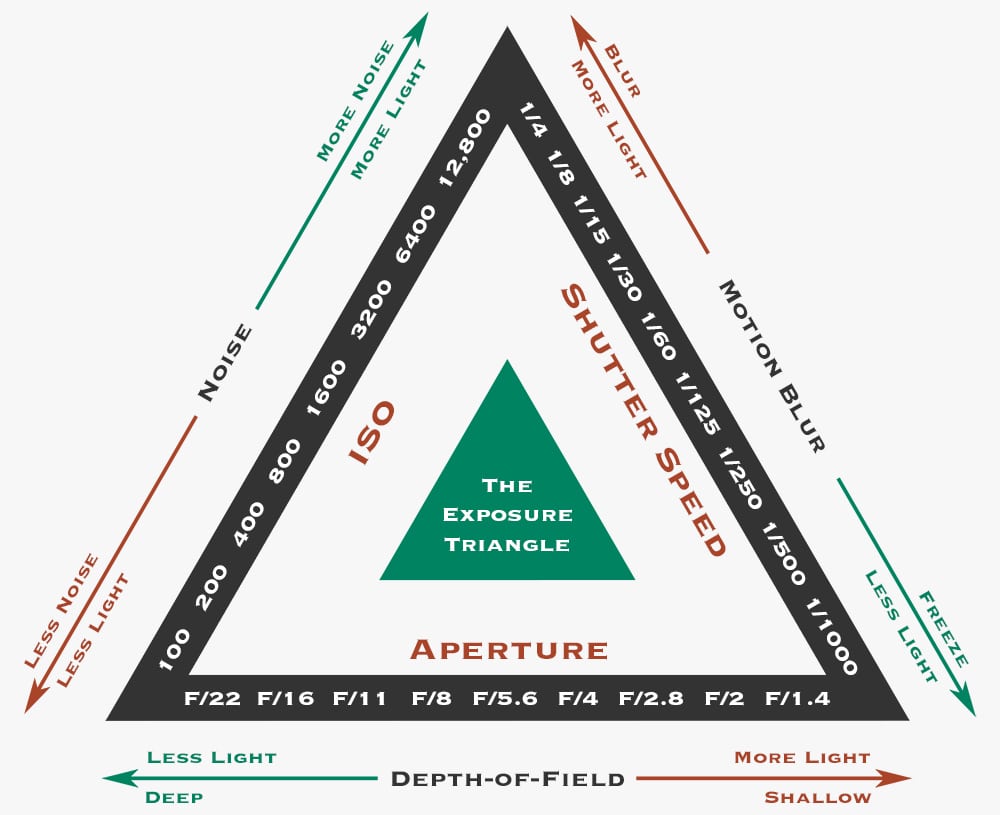
This exposure triangle image can be downloaded for free, and no email address is required. Click on the image to download instantly.
As you can see, the Triangle contains the ISO, shutter speed, and aperture along its sides. I’ve also listed arrows that correspond to more or less light and the outcome of the adjustment, which can be detrimental or creative.
As you can see, each side lists one of the three settings. In addition to those, I’ve included two other essential elements.
On either side of the Triangle, I’ve added “more light” and “less light.” If you adjust your aperture from f/2.8 to f/8, it shows you’ll reduce the volume of light. The same goes for ISO and shutter speed.
Three camera settings have to be in harmony with each other to achieve a well-balanced image. One setting change can alter the exposure, and you’ll end up with an over or underexposed image. Therefore, when you change one, you will need to change one or both of the other two to balance the exposure.
For example, let’s say you’re taking portraits outdoors on a sunny day. For simplicity’s sake, let’s say you decide on the following settings.
- an Aperture of f/2.8
- a Shutter Speed of 1/500th of a second
- an ISO of 800
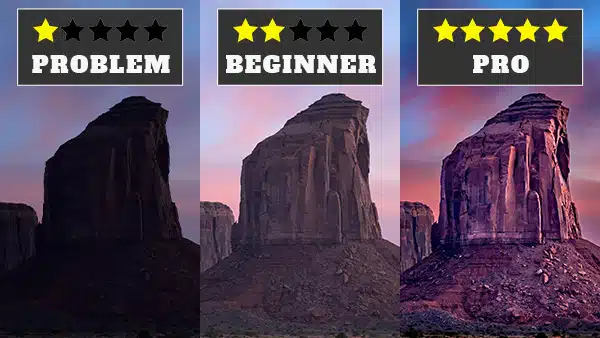
After taking the initial image, you realize it’s overexposed. What are you going to do now?
When you have an overexposed image, that means your camera is receiving too much light. In this scenario, you have three options for reducing it. Retake a look at the Triangle to find the camera settings to reduce it.
So, which settings can be used to lower the volume of light? That’s correct; all three.
If you choose a faster duration of the shutter opening and closing (i.e., the shutter speed) means less light is recorded by the sensor.
A smaller hole or aperture also lets less light reach the sensor.
Finally, a smaller ISO amplifies the intensity of the available light less vs. a higher ISO setting.
As you learn the three settings and the outcomes for each in regards to the amount of light, you can reference the exposure triangle to guide you with your decisions.
Remember, if your photo is overexposed or too bright, you need to reduce the amount of light by adjusting one or more settings.
An underexposed image means you need to increase the amount of light by changing one or more options.
Exposure Settings Deep Dive
You love digital photography. It allows you to capture special memories, express yourself creatively, and even earn a living from it if you so choose. But, to get really good at it, you must have full creative control over your camera…
…one problem is you’re inundated with numbers for each of the camera settings, and you’re intimidated by them. Cue the next challenge. To achieve the exposure you desire you’ll need to measure the existing amount of light and do a little math!?!?
No worries. I’ll make this as simple as possible. First, we’ll look at what I like to refer to as “photographer’s math.” Then, we’ll explore an analogy that will make more sense for us non-math artists.
Measuring Aperture, Shutter Speed, and ISO
To make the “math” for measuring exposure easier, we, as photographers, use what is known as “stops.” One-stop equals a halving or doubling of light. This equation is perfect for shutter speed and ISO measurement.
Shutter Speed: the duration of the shutter speed is measured in whole seconds or fractions of a second. If you’re shooting at 1/125th of a second and you need to decrease the amount of light by 1 stop, you’d use 1/500th of a second, which is twice as fast. If you need 1 stop of more light, the shutter speed would be 1/60th of a second… which is roughly half as fast.
ISO: these numbers are easier to deal with since they’re strictly whole numbers. Going one-stop, from ISO 400 to 800, means you’re doubling the light, and one-stop from 400 to 200 is the opposite… halving the amount of brightness.
So far, the math is pretty easy for the shutter speed and ISO since you’re halving or doubling the amount of brightness. When it comes to a stop for aperture, though, it gets a bit trickier.
Aperture: Apertures do not use whole, even numbers like ISO, and are even more complicated vs. shutter speed. For example, going one stop brighter with f/8 is f/5.6 and not f/4! One stop darker, for f/8, is f/11 and not f/16.
I’ll spare you the complicated math since there’s a better way than breaking out a calculator. Although memorizing the halving and double of the aperture, shutter speed, and ISO settings isn’t necessary, it wouldn’t hurt. Instead, you can utilize the exposure triangle that shows you whether you’re adding more or less brightness based on each setting scale. No math required!
Pro Tip:
Today’s digital cameras make things a little more difficult to adjust settings when ¼ and ½ stop increments are available. And sometimes even smaller increments. At this time, don’t worry about these smaller increments.
First, wrap your head around full stops in regards to doubling and the halving of light. Once you master that, you can then dial-in smaller stop increments for the exact exposure in-camera.
Here is my full guide on stops in photography to fully understand, well, “stops.”
How Your Body Visually Processes Light vs. Your Camera
Let’s look at three analogies to “see” and compare how you react to light vs. a camera.
Aperture vs. Your Eyes
When you walk from a dark room to the outside on a bright sunny day, it takes a second for your eyes to adjust. The pupil in your eye was huge indoors. To cut down on the brightness, your pupil gets smaller. This works just like the aperture in your lens!
Shutter Speed vs. Your Eyelids
Since the shutter blocks the light to a sensor, it can’t record anything until the curtain opens. Just like your eyelids! Close your eyes, and no light enters your brain. Open and voila. The longer your eyes are open, the more light can be captured… similar to the shutter speed.
ISO vs. Sunglasses
If it’s too bright outside, you might put on some sunglasses to lower the “intensity.” If the sun goes behind a dark cloud, the intensity is even lower. So, you’ll remove the sunglasses to intensify the brightness or make it brighter… very similar to ISO!
What Next?
Hopefully, this helps you better understand the relationship between the different exposure settings. There’s a lot to remember, and it’s easy to become overwhelmed with all this information.
Keep an exposure triangle handy (download my triangle image above) to guide you as you learn how to manually adjust your exposure….
…getting the correct exposure, for exceptional photos, is only part of the battle, though.
Here are few more things you need to master for exceptional photos: control the light based on your creative vision, selecting the correct white balance, using compelling compositions for storytelling, and knowing your photography gear.
Keep in mind, your journey as a photographer doesn’t end here. Never stop learning. In fact, after 30 years in the profession, I’m still learning new things.