Step-by-step Lightroom Workflow
for Backing Up Your Photos.
- Post by Parker: 30 Years experience!
- 2 Comments

What’s that sound?
“click, click, click.”
Imagine this, you’re sitting at your computer, and you hear, “click, click, CLICK!”
That’s the sound of your hard drive blowing-up.
It’s happened to me.
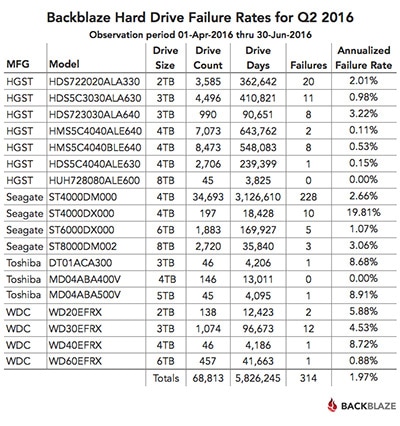
And ten’s thousands of other photographers (proof coming up).
What are you going to do if it happens to you, and you lose all your photos? Well, you’re going to wish you followed the tips in this article.
I get it, though. All we really want to do is jump into Lightroom and start editing. Am I right?
But your photos can’t be replaced. Can they?
So, read on, and I’ll show you exactly how to keep your photos safe: today, tomorrow, forever.
Ready? Let’s do it…
Table of Contents
Lightroom Workflow and Data Management – Then & Now
It wasn’t that long ago when Lightroom, or even digital itself, didn’t exist.
Those of us that were around before digital sent our film out for processing. Some even did their own in-house printing.
Regardless if you sent it out or did your own development, there was a workflow to process and stay organized.
I’d argue, that back then, it was more important than today.
We didn’t have the luxury of “seeing” all our images on a screen in 1 folder or more. All my negatives (and slides) were stored in “filing cabinets.”
If a client called (two years after the session) or if Grandma wanted a print, I’d have to locate that negative among 10’s of thousands of others…
I’d better have a spreadsheet telling me which “cabinet” it was in!
That’s not to say having a workflow or being organized is not essential today. It is indeed.
Since then, we’ve upgraded from filing cabinets to folders on our computer.
The same rules apply;
- Someone will ask you for that one specific photo you shot 2 years ago, and you’ll either find it in seconds.
- or you’ll spend an hour or two (maybe more) locating it.
- is it archived?
- If so, where?
- Which hard drive is it on?
- Or did I burn a CD instead?
A workflow is more than just being organized and finding files.
It’s about the entire process: from importing to organizing, editing, exporting, etc..
In this day-and-age, most photographers do their own editing.
The ability to achieve our creative vision, and do it ourselves, is so much easier than it was back in the day.
With a workflow, you can streamline the process and be more productive.
the Workflow Challenge
When shooting film, I was more cost-conscious and shot a lot less.
If a client hired me to do a portrait session, I’d shoot around 24 or 36 photos (depending on the type of camera and film, you could get between 8 – 36 exposures).
With digital, there’s no film to buy or money to be spent on processing.
I can easily shoot 150-200 photos for the same session!
This can lead to a massive problem without having a workflow in place.
How do you organize those images for easy access later on?
Do you really want to show your client 200 images from a 1-hour photo session?
Then you’ll have to factor in how long it’s going to take to edit 200 images vs. 24?
If you’re a wedding photographer, you may shoot 1,000 images per wedding.
I know some that shoot 2 – 3 times that.
Multiply that times 30-40 weddings per year, and you better have a workflow in place.
Otherwise, you’re going to be spending more time at the computer vs. actually shooting.
Staying organized, editing quickly, and consistently is a challenge with a large number of tools in Lightroom.
We have things like the metadata, ratings, labels, keywords, brushes, crop overlays, and gradient filters.
Plus, there’s also white balance, exposure, dynamic range, split toning, HSL, and camera calibration, just to name a few.
And if that wasn’t enough, within those tools are additional options.
You have sliders for different color channels, different color profiles to choose from, hidden features most photographers don’t know about, and more.
Plus, some tools give you the option to set the adjustments automatically or manually.
It’s enough to make your head spin.
Where do you start?
The best place to start is with your data-management workflow.
Why?
So, you don’t risk losing your photos!
What good is it to edit your photos if your hard drive crashes and destroys your images?
The remainder of this article will go into more detail for creating your Digital Management Workflow.
the Most Important Step
The first step in creating your (overall) Lightroom workflow is the most crucial.
Without it, the rest of the steps in your workflow (getting organized, editing, etc.) will be of no use to you.
Because if you don’t have a data management plan in place, then you run the risk of losing all your photos, presets, actions, templates, work files, documents, and more!
So, what good is it to take the time to create a workflow if you’re not going to protect your files?
Since you’re reading this, I imagine your images (and presets and actions and your sanity, etc..) are essential to you.
Am I right?
So, it only makes sense to do your data management workflow, get it up and running BEFORE you do anything else.
Only when you’ve completed this step should you move on to the next step.
Before we start the process of creating your data management
workflow, we’ll take a look at 3 types of data and a basic backup workflow.
You’ll then be able to use it as a basis for your own.
Risk Analysis
Then, you’ll fill out the risk analysis worksheet to determine where you are.
From that, you’ll then be able to decide on what steps you’ll need to take to complete your Data Management Workflow.
Once you’ve completed your risk analysis, we’ll take a brief look at some storage and software options to streamline the workflow.
I’ve put together a worksheet, checklist, and a Risk Analysis spreadsheet.
Make sure to download (link below), and it will help you organize the information you need to create your data management workflow.
3 Types of Data
Here is an outline of my basic workflow. Use it as a basis for your own Data Management Workflow…
There are 3 main elements to any data management workflow. Each of which should have its own backup version.
Original RAW/JPG files.
There are 3 main elements to any data management workflow. Each of which should have its own backup version.
Working image files
My “working” files are kept on my computer system, and I have several backups.
This includes both on-location and off-location.
Computer system and software
My computer system is “cloned” daily.
This gives me an exact copy of my operating system, all software, and all the (working) files located on it.
Plus, the drive it’s copied to is bootable. In the event, my original drive dies, I can restart my computer within a matter of minutes.
I’ll then have lost any data before the last backup (which is still better than losing everything).
Don’t worry if this is a bit intimidating, and you’re not sure how to set all this up.
We’ll go over everything you’ll need to create your data management workflow.
Let’s get started…
Risk Analysis
Welcome to step 1 of creating your data management workflow.
Here you’ll do a risk analysis and find out where you are at this point, and then, we’ll take this information to build your Data Management Workflow.
To fill out your Risk Analysis, print out the spreadsheet from the worksheet you downloaded (above).
It’s safe to say that someday you’re going to experience hard drive failure or even a full-blown computer meltdown.
Now is the best time to take the steps to quickly and easily get back up and running in a matter of minutes versus possibly days.
Because not only could you lose all your images, but you could also have to re-install all your software.
Then, you’ll also have to add back all your presets, redo all your preference settings, and much more.
There are 2 types of hard drives and computers – those that have failed and those that have not, yet.
Don't forget...
It’s imperative to not only backup your image files but to create a bootable, external hard drive, that will clone your existing operating system.
You’ll learn the software you’ll need to do this in an upcoming section.
So, let’s go back to your worksheet and fill out your Risk Analysis.
Fill out your worksheet
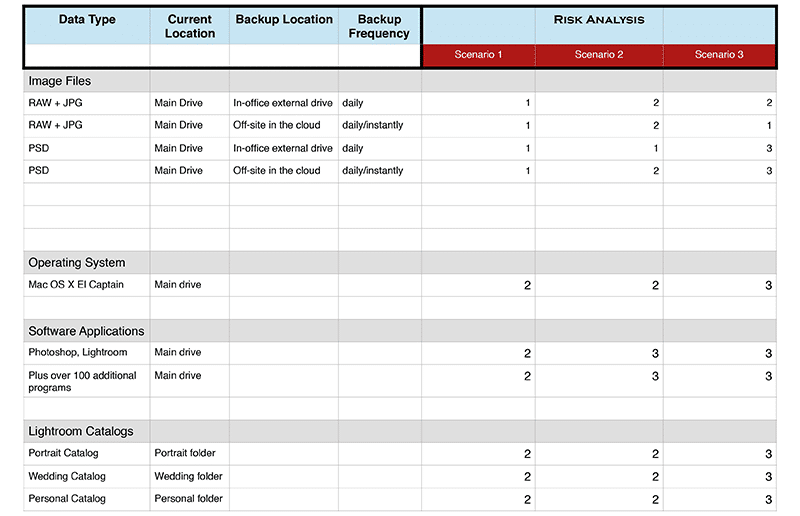
O.k., in your spreadsheet, we have a data type, current location, backup location, backup frequency, and our risk analysis.
For data type, you need to list all your Lightroom catalogs, every hard drive with images, your computer, and software.
Under Current Location is where you’re going to list every item and where it’s physically stored.
So are they on an internal or external drive, and are they on your laptop or your desktop or somewhere else, like the “cloud”?
Next, we have Backup Location, and here you’re going to list where the backup is physically located for each type of data.
Then with Backup Frequency, you’re going to list the last time a backup was made for each data type.
Risk Analysis Scenarios
Then we have our risk analysis. Imagine three different types of catastrophic scenarios for each risk.
Scenario 1
This would be if your computer stops working.
Scenario 2
This would be if your computer and all attached hard drives stop working.
Scenario 3
This would be if all your computers and hards drives are lost to fire, theft, or some other unforeseen catastrophic event.
the Goal
The goal is to decide whether the data would be:
- Easily Recoverable
- Somewhat Recoverable or
- Gone Forever
So “Easily Recoverable” (add a 1 to the column) would be you can recover your data reasonably quickly and easily.
“Somewhat recoverable” (add a 2 to the column) would be, yes, you can recover, but it’s going to take longer and very inconvenient.
And “Gone Forever” (add a 3 to the column) is, well, your data is not recoverable and, therefore, gone forever.
In the scenario columns, you’re going to add a 1, 2, or a 3 for each of the different data types.
Let’s look at an example (below)…
Click image to enlarge.

Now it's your turn
Go ahead and fill out your risk analysis worksheets.
Then we’ll explore some storage and software options for putting your data management workflow in place.
Now that you have everything filled out, any areas where you’ve entered a two or three require your attention.
If your completed form is full of 1’s, then you have a robust data management workflow already in place, and I commend you for having that done already.
But, if you have some twos and threes, then it’s time to do a little research and figure out how you’re going to create your data management workflow.
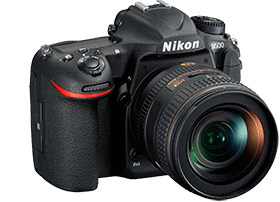
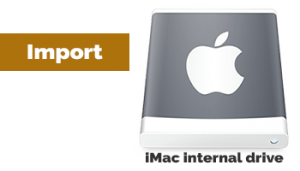
If we take a look at my data management workflow (below), we can see that I import the images to my internal drive.
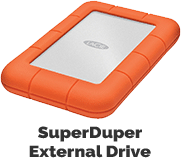
Then I have a system in place to back that up to an external hard drive.
Which is done with a program called SuperDuper and it auto backs up daily.
Plus, I also store photos on additional drives for archiving any non-working files.





My Data Management Workflow
My Data Management consists of backing up both my working files and my operating system.
Both of which get stored on external drives and “in the cloud.”
Once upon a time, before “the cloud,” I also stored my files on CD’s (1 for each client).
I burned 2 copies. 1 for on-site storage and a second for off-site storage (friends house).
If you choose not to go with a “cloud” service, then you’ll need to either utilize CD’s (or other storage devices – like USB drives) to have a second copy and a third copy off-site.
If your drive ever fails, you’ll have backups of all your photos – Kudos!
But, if you don’t have one for your operating system too, then you’ll be spending a lot of time getting all the software back in order.
I have a second external drive dedicated to backing up the operating system and all working files (non-photo too). This drive is bootable!
I’ve had my share of drives die during the busy season (Christmas and/or middle of the wedding season).
Having another bootable drive makes getting up and running a breeze.
Computer Storage

Desktop or Laptop? Internal or External Drives?
Those are the questions.
Each of which will have a different outcome for your productivity.
Let’s take a look at each and then you can decide what is best for you.
Desktop or Laptop?
First, let’s take a look at whether you should use a Desktop or Laptop and the advantage and disadvantages of each.
So, technically a Desktop computer will be faster than a Laptop. In most cases.
Although I own an iMac that is about 3 years old, and Apple’s new Mac Pro’s are faster than it.
So, should I switch to the newest faster computer available?
Not necessarily. Although a computer may be faster than another, it may not really matter.
Lightroom, nowadays, is the bottleneck of your post-processing.
As of this writing, Lightroom cannot take advantage of the real processing power of your computer.
But, Lightroom can take advantage of more RAM.
More RAM?
If your computer is 2-3 years old, I’d recommend adding as much RAM as possible vs. buying a new computer.
When it comes to speed, I don’t think there is much difference between a Desktop and a Laptop.
But, most Desktops can take more RAM than laptops.
You’ll need to do some research on what option is best for you. Just keep in mind that Lightroom requires a minimum of 2GB RAM (Adobe recommends at least 8GB).
Sure, you can use Lightroom with only 2GB of RAM, but at what cost?
At first, everything may be just fine.
Still, as your Catalog grows, Lightroom needs more memory to work at optimal speeds & you may see a slow down in how Lightroom processes your images.
My current setup includes 32 GB of RAM.
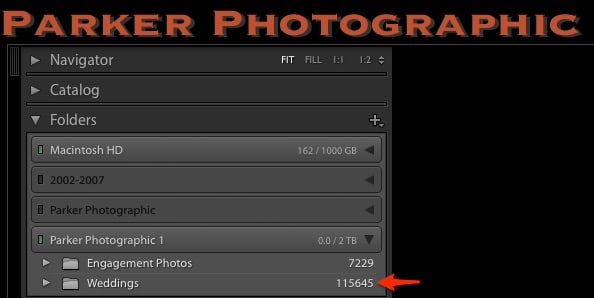
My main working catalog has over 115,000 photos…
I do not experience any major hiccups with that amount of RAM.
Yet, my Mac Pro only has 16GB, and I find it to be sluggish at times, which hinders my productivity.
So, this is just something to consider as you’re creating your workflow.
Color Management?
The other thing to consider is Color Management.
I don’t find laptops suitable for accurate color.
In the right conditions, it may be fine. Though, in most cases, laptop screens were not designed for precise color.
Either way, I would recommend a Desktop over a Laptop.
However, I do still use my laptop while in the field.
I just don’t do any critical color correction, retouching, etc..
It’s mainly just for Data Management.
Internal or external hard drive?
Second, you need to decide on whether or not you’re going to use an Internal Hard Drive, External Hard Drive, or a combination of the two.
Again, in most cases, an Internal Hard Drive will be faster.
The bottleneck for External Hard Drives is the connection to your computer.
The best options are USB 3, Thunderbolt, or even better, a RAID system, each of which gets more expensive.
So, this will all depend on your budget.
Nevertheless, I wouldn’t stress about this too much. Start off with what you can afford and upgrade as your business (or bank account) grows.
That being said, an External Hard Drive can still outperform your Internal drive if your using old technology.
Anything under 7200 RPM and you may be better off with a RAID system or even Thunderbolt.
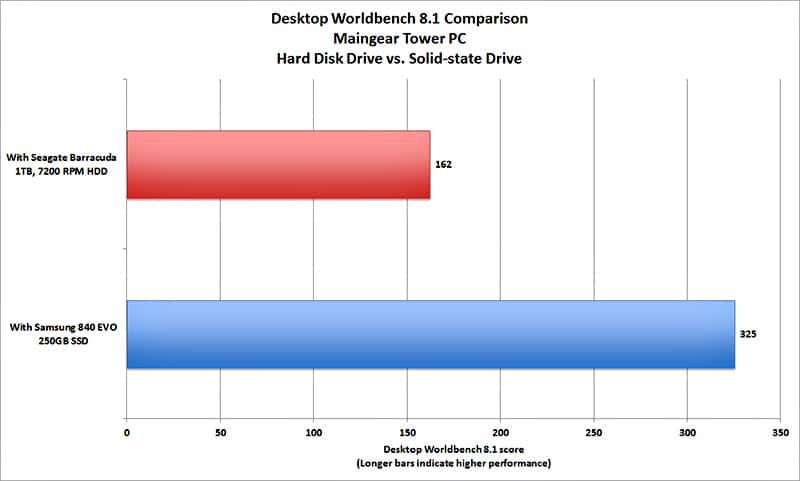
For internal drives, your best, but most expensive option, are SSD drives.
I love my iMac’s Flash Drive, which is similar in speed to SSD drives.
Your hard drive choice will significantly affect your productivity.
We’re not going to go into great detail about all these different technical details, computers and drives.
But, I put together a resource of different options you can explore and do more research on.
Check the Appendix I section for those resources (included in the worksheet you downloaded).
Software
When it comes time to backup your data, you have 2 choices…
- Do it manually
- Let the software do it for you automatically
I prefer step 2 since I tend to forget things if they’re not written down.
Even then, I may not look at my “to-do list” every day.
For on-location backups, my software will back up my entire system daily.
For off-location, backups are done instantaneously.
Both of which are done automatically.
First, let’s take a look at software options for setting up your on-location, backup automation.
For Mac Users

SuperDuper
This software makes it super easy to make backups of your data automatically.
Plus, SuperDuper will create an exact clone of your Mac’s hard drive.
So you’ll have a full backup of all your data, including permissions, user profiles, and private settings.
Having an exact clone allows you to restart your computer, from that cloned drive, in the event the original stops working.
This means you can get back up and running within minutes v.s. hours, days, or weeks (if you need to re-install all your software and find those pesky license keys).

Time Machine
Another excellent piece of software that will make backups of your data super simple.
SuperDuper will set you back about $30. However, Time Machine is built into your operating software!
You’ll just need to attach a dedicated drive.
Once you’ve setup some preference settings, in Time Machine, your computer system will continually archive your data in the background.
What I like about Time Machine vs. SuperDuper is it will keep old versions of your files too.
Which allows you to go back to a previous state (or version) of specific files if needed.
Apple recommends using an external drive that’s much larger, than your computers hard drive, due to the previous versions being saved
For PC Users

StorageCraft
This is the highest-rated backup software by PCmag.
It offers full protection, speed, and reliability.
StorageCraft creates a snapshot of a particular partition on your hard drive, which you can either use to restore the entire system or open in a window on your desktop.

Time Acronis
Acronis is the most user-friendly and offers the most amount of features for backing up your data.
Not only do you have the option of backing up to an external drive, but it also provides a “Cloud” service too.
Which is convenient if you’re looking for an all-in-one solution.
Acronis gives you the option to backup to individual folders, files, or your entire drive.
Plus, for 2017, they introduced mobile backup to PC, Facebook backup, and remote backup management.
Off-Location Storage

Backblaze
When Backblaze first came out, I was one of their early customers.
But, at the time, their app was not all that great.
Since then, Backblaze has improved considerably.
And now, I use it to back up my files.
As of today (January 2020), I have close to 4TB of data uploaded…
How much for all of this?
Well, the cost is reasonable at $6 per month, $60 per year, or $110 for 2 years. Oh, and that comes with unlimited storage too.
Compare that to Adobe’s plans, and you’ll save a bundle!
Signing up with my affiliate link would be much appreciated.
I wouldn’t recommend it if I didn’t use it myself.

Dropbox
Dropbox is a simple, user-friendly cloud storage service. It allows you to access your files from nearly anywhere.
Install on virtually any computer or mobile device. Plus, dozens of other apps support integration with Dropbox too.
This is an excellent service to have while working on your “working” files.
Any files stored in Dropbox are also auto stored on your computer too.
Only one problem.
When you’re done working with your files and you’re ready to archive them (disconnect the external drive), you’ll have to remove them from Dropbox too.
Otherwise, they’ll continually re-download to your main computer (when their app is turned on and have auto-sync setup).
In that case, you’ll need another Cloud service for archival purposes.
Personally, I use Dropbox mainly for file sharing with colleagues, clients, and virtual assistants.
For archival purposes, I use Backblaze.
Update: Dropbox has a new service where you can store your files without needing them on your computer.

Amazon CloudDrive
When Amazon first came out with its CloudDrive service, it was not very user-friendly.
It’s come a long way since I first started using it about 2 years ago.
Nevertheless, it’s app still has a lot of bugs. So why do I use it? Unlimited storage for only $59 (U.S.) per year (I think this changed recently and the reason I may be switching to something else).
To make it workable, I use it in conjunction with another (free) service called Odrive.
The Odrive app allows auto-syncing of your files and much more.
They have both a free and paid service for more features.
Personally, the free service is all I need.
If you’d like to be able to remove the files from your main drive, but still keep them on Amazons CloudDrive, then you’ll want to take a look at their premium features.
Your Lightroom Catalog
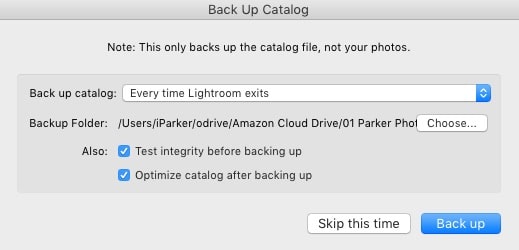
When using Lightroom for the first time, you’ll want to set up how often your Lightroom Catalog is backed-up.
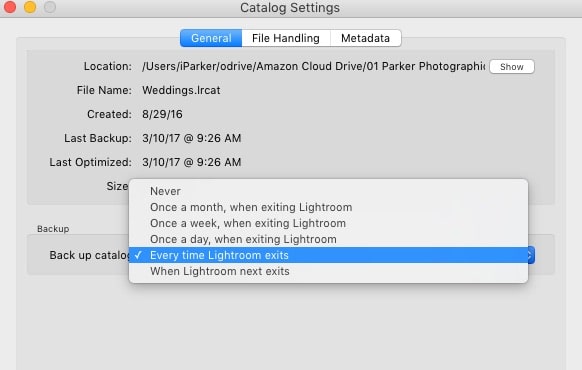
To do so, you’ll need to navigate to the Lightroom Catalog Settings.
Go to your menu, select Lightroom and then click on Catalog Settings.
Make sure the General tab is selected.
Then, at the bottom of the dialogue box, you’ll see a section called; “Backup.”
Click on the drop-down menu, and you’ll find 6 options.
Any option is fine except “Never”!
If you’re using Lightroom daily, then you may want to choose “Once a day” or maybe select “Every time Lightroom exits.”
Lightroom Catalog Settings
Lorem ipsum dolor sit amet, consectetur adipiscing elit. Ut elit tellus, luctus nec ullamcorper mattis, pulvinar dapibus leo.
If you’re not using Lightroom daily, then maybe once per week or once per month will be sufficient for your needs.
Just keep in mind, if you choose a longer time frame and you do lots of edits before the next backup, you risk losing those edits if they are not saved.
Yes, Lightroom catalogs do and may become corrupt.
Personally, in 10 years, this has never happened to me. Knock-on-wood.
However, I still backup my catalog daily. Just in case.
Your Files
One of the biggest misconceptions about backing up your Lightroom catalog is, your image files are not being backed up during this process!
That’s why it’s so important to have a Data Management Workflow in place, in addition to backing up your catalog.
Adobe has provided an option to backup your files during the import process.
Personally, the other options presented to you previously are sufficient for my workflow (and most other photographers).
However, I just want to share with you this option in case you find this works for your workflow.
Once you’re in the Lightroom import dialogue window, navigate to the right panel and locate the inner panel called; “File Handling.”
From here, you can check the box next to; “Make a Second Copy To” and then select the drive for the additional copy.
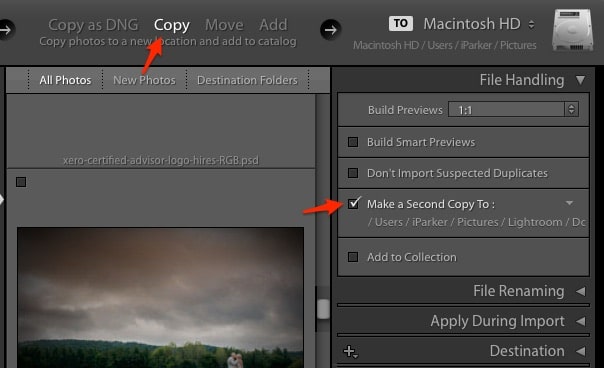
This is an excellent option if you want to import from your camera’s memory card to your main hard drive and copy them to an external drive at the same time.
Add this option to your workflow if you find it streamlines the overall Data Management Workflow for you.
What’s Next?
If you do nothing else today, sign up for one of the “cloud” services.
This way, your files start to be backed up immediately.
Plus, it could take hours or even days to backup all your files to the cloud.
This will depend on your internet speed and how many photos you have.
Then, over the next few days, you can tackle the rest of your Lightroom data management workflow.
Don’t forget to download the free checklists too.
If you have any questions about this part of your Lightroom workflow, please post your question below.







2 Responses
Hi Sorry if this question sounds silly.
Is Backblaze same a cloud drive?
Should I have both Backblaze and a cloud drive(like Amazon CloudDrive)
Backblaze is a cloud drive service. Your photos are uploaded to the “cloud” via Backblaze servers (hard drives).