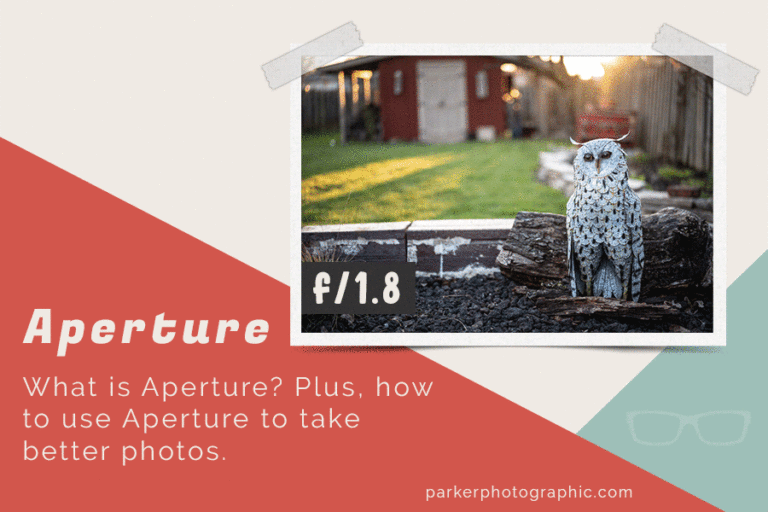
Photography For Beginners Free Course
Introduction
So I have a question:
“Do you want to start creating amazing photos that you’ll be proud of and photos that will be appreciated by family and friends?”
If so, it all starts here, with everything I wish I had known when I started photography 30 years ago.
If you are ready to learn photography so you can start creating fantastic photos, let’s do it.
Now real quick, let’s go over some of the things you’re going to learn in this course as well as the structure of this course.
When it comes to mastering photography, there are four key ingredients you must master to create amazing photos.
Those ingredients are your Camera Equipment, Light, Composition, and Editing.
Everything you’ll discover over the next few hours is something I wish I had known when I started my photography career in 1989.
The structure of this photography course will follow those four key ingredients.
We’re going to start with a quick start guide on photography to help you get started on the right track for creating amazing photos.
This will include my five pro tips for starting your photography journey and what it means to paint with light.
The painting with light video will be your foundation for everything you learn in this free photography course.
So don’t skip it!
Getting to Know Your Camera Gear
The first ingredient for mastering photography is getting to know your camera gear and equipment. Plus, how to use it to control and paint with light.
This will include detailed information about how your camera works, an overview of the type of lenses, and much more.
It’s vital to know how your camera works to get the most out of it and to create the type of images you want.
Make sure you watch all of that before moving on to ingredient two; exploring and harnessing the most important ingredient of them all, light.
You will discover the four characteristics of light and how they shape your subjects, the quality of light, and more.
After that, you’ll be introduced to composition and how it can elevate your photography skills and images to a new level of appreciation.
And then finally, I’ll provide some pro tips on editing your images, like why you don’t need expensive software for editing,
Table of Contents
where your editing should start, and more pro tips to improve your photos.
Now, one more thing, real quick, timestamps for this course are included in the description below.
Plus, since this photography course is so long, I recommend saving it so you can easily find it when you return.
Please comment below if you have questions about anything covered in this free photography course. I’ll be happy to answer them. So if you are ready to get started, let’s do it.
So when it comes to cameras, you can categorize them into four main categories.
This includes Compact Cameras, SLR or DSRL, Mirrorless, and smartphones.
For avid creative photographers, an SLR or DSLR camera is the most popular type. So SLR stands for “single lens reflex,” and the D in DSLR stands for “digital.”
In other words, this is a film camera or an SLR. And this is a digital camera, DSLR.
Before the days of digital cameras, one of my first cameras was the SLR camera.
The “SL” single lens means the camera can be affixed with a single lens. But you can also remove and replace that lens with a different lens. So that’s “SL.”
Now “R” or reflex is inside the camera body and just in front of the film or the digital sensor. So you have this mirror here.
And when you press the shutter release button to create a photo, the mirror moves up and out of the way so the film or sensor can record your image. So that’s reflex in “SLR”. Okay.
When it comes to a mirrorless camera, a mirrorless camera is similar to a DSLR or even an SLR camera in that you can change the lens. However, it does not have a mirror inside the body, hence the name mirrorless.
There are several advantages and disadvantages to a mirrorless camera versus a DSLR.
So a mirrorless camera is usually lighter, more compact, and faster. But it all depends on the make and model that you choose.
Now, another type of camera is the compact camera. So these types of cameras do not offer the option to change the lens.
The lens is fixed; as you can see, they are very small or compact. Plus, they have fewer features and options than DSLR or Mirrorless cameras.
They are mostly considered point-and-shoot cameras since they will do everything for you regarding figuring out the aperture and shutter speed. And all of that other fun stuff.
And they’re not designed for the creative photographer.
So typically, since you don’t have any way to control the camera settings, like with a DSLR, you basically point and shoot your subject, and that’s why it’s called a point-and-shoot camera or a compact camera sometimes as well.
Now, the fourth type of camera is a smartphone. And I remember my first mobile phone in 1999. It had three main options.
I could get the sports news and the weather, and it had a digital Rolodex, and there was no camera to be found on it.
Fast forward to today, and some smartphones, probably all smartphones, are more advanced than my first point-and-shoot camera, which was the Kodak disc camera circulation around 1987 or so.
It’s incredible to me how good these cameras are in our smartphones.
And in fact, when I go on vacation or walk with Echo, I leave my DSLR cameras and all my gear at home and just use this instead.
It’s so much easier and lighter than all this other heavy gear, and I’m more than happy with the memories I capture with it.
But anytime I’m doing portraits, weddings, landscapes, or any other type of paid work. For a lot of personal work, like some of these portraits of my kids here on the wall, I prefer my DSL R or mirrorless camera.
Now, you should be aware of a fifth category of cameras since you’ll likely come across it in your favorite photography publication or social media. If you’re like me, you’ve probably used one back in the days of film.
And they are known as Medium and Large Format cameras.
These cameras are used more by professional photographers that require the highest quality image possible. So think of magazine covers, commercial work, and more.
Most of them use a medium format camera, sometimes larger when needed.
In essence, the digital sensor is much more prominent in a medium format than the sensor in a DSLR camera.
And this provides a better quality image overall. It depends on your final output for the image you’re creating and the sensor size needed, whether DSLR, Mirrorless, Medium Format, or Large Format.
Let’s look at how your camera works because it resembles your eyes. After all, when your eyes are closed, you can’t see what’s in front of you.
It’s not until you open your eyes that the light filters through a lens behind the pupil that provides a clear vision of what’s in front of you.
Then when the vision reaches your brain, it’s stored as a memory.
Your camera also has a lens, and the light will pass through this lens. But before it’s recorded by your camera, as we talked about before, if you have a DSLR camera, it will hit that mirror. So that light is reflected into the viewfinder.
So you can see that image in the viewfinder before you take the photo.
So the mirror is like your eyelids. When it’s down, your camera sensor or film cannot see or record the image. But just behind that mirror is another element of your camera that restricts light from reaching your sensor or film.
This element is known as a shutter, like your eyelids.
When the shutter is closed, no light can reach the sensor again.
It’s only when you press the shutter release button that the mirror pops up, and at the same time, the shutter opens, and then the light is recorded by your camera.
Once the sensor gathers the data, it sends that information through a program in your camera that will begin editing your photo based on your chosen settings. Then it will save that data to a media card.
The media card is like your brain since you have memories. And luckily, media cards are better at storing and replaying data than our brains, or at least mine, anyways.
Let’s start with five quick tips for creating amazing photos to help you get started sooner rather than later.
Tip #5
You can now start using your camera by putting it in program mode or auto mode.
So this mode gives complete control over your camera settings too well your camera.
Your camera will make all the decisions for you. Now, this is an okay starting point.
However, I recommend shooting in Aperture Priority mode instead. Now, to get into that mode, you’re going to turn a dial on your camera here to either A or AV, depending on if you’re using a Nikon or a Canon.
If you’re using a different brand, check your camera manual to figure out how to set it up in Aperture Priority mode.
Since I need to become more familiar with any other brands. I recommend Aperture Priority mode because it gives you creative control over your camera.
In these two images, you can see that one has a blurry background, and the other is sharp.
So how did I do this?
Well, I want you to practice in Aperture Priority mode so you can discover the answer for yourself. And then, later in this course, you’ll take a deep dive into apertures so you know everything you need to know about them.
So I’d like you to take two photos of every subject you photograph.
So the first image, you will set the lens’s aperture to the smallest number.
This could be f/4, f/2.8, or smaller.
After you create the first photo, change the aperture to the largest number of your lens.
This could be 11, 16, or higher. Then take another photo of the subject. Now, I want you to compare those images in your favorite editing software side by side or on the back of your camera.
You should take a look at the background. Notice the “background” when comparing the lowest aperture number with the highest number.
Which one do you prefer and why? Let me know in the comments below.
TIP #4
Now my next tip is to shoot RAW and not JPG.
And the reason is that one will provide more details of your scene than the other.
As you learn to use your camera and master light, you will make mistakes.
Even I still make mistakes after 30 years. And that’s sometimes due to finding yourself in a situation where the light is changing fast, and either your camera can’t keep up, or maybe you just need to get the shot before the opportunity disappears.
And this results in an image that is too dark or bright, like this one. So for this image, since my camera has a feature to capture both RAW and JPEG files, I will show you why RAW is better.
So here are both file formats with the final edit. Which one looks better? Well, the one on the left here is better.
It has more detail, and the colors are more vibrant. And overall, the image is crisper.
On the other one, you can see a lot of detail was lost, and the colors look unnatural.
So RAW files are better than jpeg, so I recommend shooting in RAW.
Tip #3
All right, so tip number three. Sometimes you might end up with a blurry image, and there are a couple of things you can do to reduce this from happening.
One is to use a very fast shutter speed, and you’ll discover more about them later.
First, let’s review how to properly hold your camera and some tips for stabilizing your camera to reduce the chances of getting a blurry focus.
Now, for those who have just taken your camera out of the box to focus on your subject for the first time, you will press the shutter release button down halfway.
Your camera and lens will then begin working together to focus on that subject.
So once it’s focused, you’re going to press that shutter release button all the way down to create your photo.
Now, the key to reducing blurry photos is to stabilize your camera in your hands.
Here’s a photo I took with one hand, which isn’t recommended, and as you can see, the picture could be clearer.
This happened because I couldn’t hold that camera steadily with one hand, resulting in a blurry image.
Here’s that same subject with the tips I will give you right now. And as you can see, it’s no longer blurry.
So the easiest trick is to use a tripod, or you can be the tripod. Here’s how.
So first, you need to correctly grip your camera. Next, you will place your other hand under the body of your camera.
So this will help support the camera and stabilize it. But we still need to finish because this hand can also be used to manually focus the lens and or adjust the zoom of the lens.
So you can zoom in or out using a zoom lens.
Next, I recommend bringing your elbows into your body real tight.
This will add more stabilization. But there’s one problem you’re breathing, which will move your arms in and out.
And if you’re out of shape like I am, your arms will move like a flying bird.
So to further stabilize your camera, focus on your subject, and then as you’re about to take that photo, hold your breath, and then squeeze that shutter release button.
That should help in some situations. And when you don’t have a tripod, there is a camera setting that can ensure you never create a blurry photo again, which is your shutter speed.
And as I mentioned, you’ll learn more about that later in this photography course.
Tip #2
So you used a previous tip to avoid creating blurry photos. But for some reason, when you look through the viewfinder, the images are blurry even after you’ve tried to focus on the subject.
So this happens because, on most digital cameras, a diopter setting or diopter is a setting that works like your glasses.
So your glasses have a specific prescription to help you see things in focus.
But look on the back of your camera here and next to your viewfinder on the side or right behind it. You will see a dial that you can change the prescription of the viewfinder to again help your eyes see things and focus.
Now, this doesn’t affect how sharp your image is. It’s just for previewing your scene in focus inside the viewfinder before you create a photo.
So if you’re having trouble seeing through the viewfinder and things aren’t in focus, adjust that dial until everything becomes much more straightforward.
Tip #1
All right, tip number one is to accelerate your photography learning curve so you can start creating amazing photos sooner rather than later.
One particular tip that can make all the difference is to have your photos reviewed by other like-minded photographers.
Now, I know that sounds scary. But I guarantee you’ll learn from others faster than trying to figure it out independently.
Even I need a fresh set of eyes when editing a photo I’ve created because I might be boxed in and need help seeing what’s missing.
To help you along this photography journey, I’ve created the friendliest private Facebook group, this side of the Milky Way.
This group includes thousands of other photographers I’ve trained. You are welcome to join the group to get feedback on your photos.
Now, I’m in the group almost daily. If I’m not, there’s always another friendly photographer willing to help you.
All right, one of the most asked questions I get from students is What camera should I buy?
And the answer is probably not going to be what you expect.
I don’t recommend buying any camera at this point in your photography journey.
Instead, use whatever camera you own, whether a budget, high-end, or smartphone.
Now, if you have none of these, that’s okay. Just borrow something.
And you don’t need any expensive gear now because there are two things you should master or at least understand before shelling out thousands in equipment.
And those are two of the four key ingredients to creating fabulous images: light and composition. Both of them require no money.
So the sunlight, it’s free, and it’s perfect for understanding how to use light to fulfill your creative vision.
And when it comes to light, there are a few essential elements to know and master, light, the quality of light, the four characteristics of light, how the size of your light source affects your image, and more.
We will cover some of those later in this free photography course. And the other thing is composition, which also doesn’t cost anything.
So think of it this way, if you golf or know someone that golfs, do you, or could they be Tiger Woods or maybe Phil Nicholson?
Well, what if you gave either one of them only one club, let’s say, a nine iron? Could they still beat you?
For the majority of us, yes. And that’s because it’s not the equipment, it’s knowing your equipment and how to use it.
So the same can be said for photography. Light and composition are the tools of the photography trade.
So you need to understand how they can help you create amazing images.
Once you do, it doesn’t matter what camera you have. However, it doesn’t mean that camera gear isn’t essential because higher-end cameras can provide higher-quality images.
But, you need help understanding how to use light in Composition. In that case, it doesn’t matter if you have a $20,000 camera or a hundred dollars camera.
So long story short, use whatever camera you have right now. As you elevate your photographic skills, you can decide whether or not a better camera is justified.
The second most asked question I get from photography beginners is, which lens should I buy?
And my answer is a 50mm lens.
Now, that’s probably different from the lens recommended by the sales clerk at your local camera store.
Usually, they’ll recommend that you get the lens kit since it includes a lens and takes some stress off you from making a decision.
That lens kit usually includes a zoom lens, like an 18 to 55 or 35 to 70.
Now, there’s nothing wrong with that kit lens, or is there?
Well, back in 1989, I, too, picked up that lens kit, and here’s that lens.
Now, if I could go back in time with what I know now, I’d say no thank you to the kit lens and use the money saved to get the 50mm lens instead.
Why is that? Well, this lens here is garbage.
It’s slow, and the photos I take with it are not as sharp as with a 50-millimeter lens. Okay. But your salesperson recommends getting the kit lens and buying one or more additional lenses.
Why is that?
Well, once upon a time, I worked as a sales clerk at my local photography store. Of course, as a sales clerk, I was rewarded by the gross sales.
So that reward was higher commissions and bonuses from third-party lens manufacturers like Sigma Tamron and others.
I made more money selling a Sigma lens versus a Nikon or Canon lens.
In fact, Nikon and Canon gave out zero bonuses, so there was no incentive to push their lenses.
Now, when it comes to kits, the price is usually more than buying the camera body by itself. Sweet. More commissions?
Well, maybe not sweet for you.
Okay, if your sales clerk works on commission, you must consider why they’re pushing a specific lens and/or camera kit.
Now, there are a few reasons why I recommend this lens to photography beginners, for two main reasons.
One, the images will be sharper than a zoom lens. Whether it’s a Nikon-manufactured… Canon, Sigma, or the Kit zoom lens will be much “sharper.” And two, the overall quality of your image will be 10 times better with the 50mm lens versus your kit lens.
And I’ll prove it when we get to that section about lenses. First, let’s find out what I mean by painting with lights since I will use it throughout this photography course (a lot).
Let’s think about what you are doing as a photographer.
You’re creating a photo, right? But how?
Well, the number one ingredient for any photo, regardless of the type of camera, is light.
With it, you can capture a good-quality image if the light is high.
And I’m going to prove it right now. Can you see me? Maybe. But probably better than he did before. Am I right?
And yes, I can adjust my camera so you can see me better.
And to save time, I captured this image of myself with the new camera settings.
And as you can see, the quality is different from what it was with my main light source turned on.
So light is important. Very important. All right. So think of light as your paint, your media card as your canvas, and your camera equipment as your brush.
Now, when it comes to your camera gear, you have a lot of ways to paint with light, control it, and even alter it.
This includes options with your camera body. And one of those options will allow you to alter the color of light, and you’ll discover all of those options in the next section.
Now, when it comes to your lenses, you also have many choices.
So all lenses give you control over how much light to paint with or, in other words, to capture more or less light.
And you’ll learn about those options in this photography course too.
So if you are ready to harness the power of painting with light to fulfill your creative vision, let’s do it.
In the next nine minutes, I will share the secret tools I’ve used for the last 30 years for every photo I’ve created.
And you’ll also be using them for every photo you create in your lifetime.
So this is an introduction to those tools.
And then, later in the course, you’re going to take a deep dive into each of them so you can master them to create amazing images.
So this is the foundation for painting with light. So here we go.
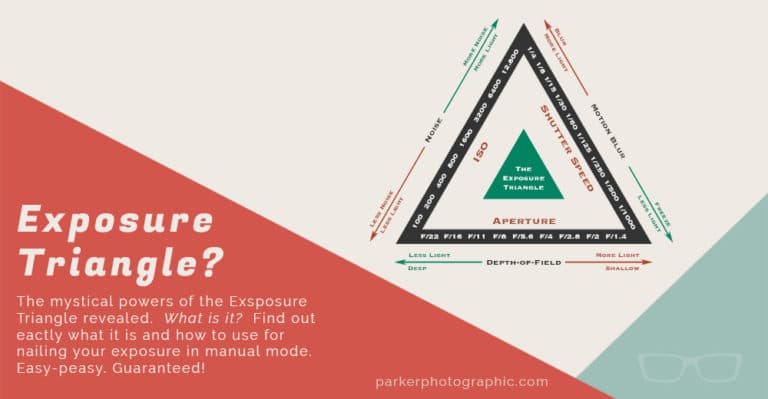
So you must understand three main elements that are the building blocks for everything else you’ll ever learn about photography. And these three elements, when properly aligned, will ensure proper Exposure.
But what is Exposure?
Well, your photo Exposure relates to how bright or dark your image is. If it’s too bright, it’s Overexposed; if it’s too dark, it’s Underexposed.
Now, here’s the properly exposed image.
So, how do you capture an image with the correct Exposure based on your creative vision?
Well, you have to understand, and I mean fully understand, the three elements of your camera that affect your Exposure. Those are your ISO, aperture, and shutter speed.
So those are the secret tools for every creative photo I’ve ever taken.
And once you fully understand them, you can paint with light to create amazing images.
So one of the first camera settings I decide on is ISO. But what is an ISO? And why do I choose the first?
Well, ISO affects the brightness of the light sent to your camera’s sensor for recording.
Now, ISO comes in some standard settings like 200, 400, 800, and 1600, just to name a few. There are a lot more.
But generally, the higher the ISO number, the brighter the light you paint with.
So how does ISO make available light brighter?
First, you must understand an important concept about digital cameras versus film.
Now, unlike film, your digital camera sensor is not sensitive to light. It’s impossible for electronics to be sensitive that way, and I’ll prove it.
So I have some film and some light, and it’s starting to burn, so it’s sensitive. Whew, that stinks.
All right, now we have a camera light, and it’s not sensitive. It’s not burning anyways.
I couldn’t find a sensor I wanted to use for this demonstration.
But the point is that your camera’s sensor will not burn under ordinary light like the sun, a lamp, or a candle.
But because this film is unrolled, it’s exposed to the light, it has been exposed to the light, and it doesn’t matter how much light exposes it because it is sensitive to that light. It’s ruined forever.
However, our digital cameras expose the sensor to the light once we take a photo.
But you can continue taking another photo repeatedly because it’s less light-sensitive than the film.
So I still need to answer the question of how does ISO increase the brightness of the available light?
So here we go. Look at it like this.
When you’re listening to the radio and one of your favorite songs comes on, what do you do?
Yep, you turn up the volume, and it gets louder.
The larger the number on the dial means your music can get even louder.
Something similar happens when you dial the ISO higher in your digital cameras.
The higher you go, the brighter your image becomes. And this is the key.
Your camera’s sensor will make the light brighter by turning up the volume; in other words, it amplifies the light to be brighter and higher.
The ISO, the more it’s boosted, which seems incredible at first. Unlimited light, pretty cool.
Am I right until you realize your photos begin to look grainy?
This grain is also known as digital noise.
See how I did that? Volume noise. They’re like distant cousins.
This image was captured at ISO 100, and I reshot it at ISO 800.
Now notice how it could be cleaner than the first one.
It has some grain or noise, or however you want to look at it.
All right? I then retook that photo at ISO 1600, and it’s even noisier than before.
And then one more time, at ISO 6,400, which is very loud, like my teenage daughter when she thinks she’s home alone.
All right, so the more you dial the ISO, the louder or noisier it gets.
So how does a higher ISO create a noisier photo?
Well, there are two reasons why a photo becomes noisier, and you’ll discover the answer to that with the ISO deep dive later in this course.
All right, next up. My favorite topic is the aperture.
So what is an aperture?
Well, it’s nothing more than a hole in your lens. That’s it. Besides, you can control how big that hole is, which can affect your Exposure, and it has creative powers.
The bigger the hole, the more light is sent to your camera; the smaller the hole, the less light travels to your camera.
Now inside your lens, you can see this hole. And depending on the lens that you have, when you rotate the lens barrel, you can see the size of the hole change.
Now the size of the hole is represented by a number like f/2.8, f/4, f8, or f/16, to name a few.
However, in photography, these numbers are presented as f/2.8, f/4, f/8, and f/16. Things get confusing because a larger number doesn’t mean you have a larger hole. Quite the opposite. So f/2.8 is a larger hole compared to f/16.
How is that possible?
Well, there’s some math involved, and we’ll take a deep dive into apertures, and you’ll learn everything you need to know about them later in the course.
For now, here’s a hint. Look at this number again, and what does it look like?
If you set a fraction, you are correct. We have F divided by 2.8.
So what does the F stand for? Well, again, you’ll find out later on in the course.
As for its creative powers, you have probably already discovered what they are.
When you followed my five pro-tip that you watched previously, you did watch it, right?
If not, check out those timestamps below to discover Apertures’ creative powers.
Or you can wait until we get to the aperture deep dive tutorial.
The third and final element of your Exposure and creativity is shutter speed.
As we discussed, there is a shutter directly in front of your camera sensor or film if you’re old school. And that shutter blocks the light from being recorded.
When you create a photo, the shutter opens, and your sensor can record the light or the photo for you.
How long the shutter stays open is based on the speed you set for the shutter.
So if you decide to open the shutter for five seconds, it will do so for that duration, and then it will close, and your sensor will stop recording.
Now, your shutter speed is like apertures because they’re listed as a fraction.
So some common shutter speeds you’ll use are one, one 60th of a second, 1/125th, 1/250th, and 1/500th, to name a few.
Now, whole numbers are also used to represent the speed of your shutter, and they refer to seconds instead of fractions of a second.
So like one second, five seconds, seven seconds, et cetera.
And, of course, the longer your shutter is open, the more light you paint with, and the shorter the length, the less light you’ll record.
Now your shutter, like your aperture, also has some creative powers.
Now, those powers include either freezing the action or blurring the action.
You can create soft dreamy (like) water using very slow shutter speeds.
And for this image, I used a one-second shutter speed to create that milky effect on the water.
Now, if you’re like my wife, and that’s not something you’re into, you can freeze the action with a fast shutter speed. So here’s the same subject.
But a shutter speed of 1/500th of a second freezes the water in place. Now, how does this happen?
Well, you’ll find out in the next section, so if you’re ready, let’s do it.
Now that you have a good grasp on what Exposure is and the three elements to achieve your desired Exposure, it’s time to take a deep dive into ISO apertures and shutter speeds.
So we’re going to start off with ISO first. Since this is the camera setting, I recommend adjusting it before the other two, with dozens of ISO setting options.
Which one should you use and when? In the next few minutes, I will share some pro tips on which ISO settings to choose under different lighting conditions.
But first, let’s discover how grain is increased with each higher ISO setting, as I promised.
The first is based on the quality of your digital camera and the size of your sensor. In general, the higher the quality camera will result in less noise at higher ISOs.
We will look at a couple of images to compare older and newer technology.
So in 2001, I picked up my first digital camera, this Fuji S2. Here’s an image I shot with it at ISO 800.
You can definitely see a lot of grain in the image. This next photo I took with my Nikon D 500, which I got around 2016 or so.
So that’s about 15 years after my Fuji S2.
Although there’s a lot of grain, there is less than before.
Why is that?
Well, the camera processor in the D 500 is much better at reducing noise versus my Fuji S2. So technology has vastly improved over the years.
This next image I shot with a larger sensor.
In this case, this image was captured with my Nikon Z6, a mirrorless camera, and the sensor is larger than the D 500 and Fujis two. Just like the other images, this was captured at ISO 800.
The amount of grain, once again, is better than the older and smaller sensors in general.
Higher-end cameras or newer technology have better noise reduction capabilities versus lower-end or older digital cameras, and bigger sensors also reduce the amount of digital noise.
The other factor is today’s digital cameras are, well, they’re electronic. When light enters your camera, the sensor records the brightness of the light that reaches it.
This differs from the film days. The film is sensitive to light, as I demonstrated previously. So your electronic camera will amplify the light when you choose a higher ISO setting.
This amplification causes the grain to increase with each higher ISO setting you shoot with.
All right, so another thing you should know is that, unlike aperture and shutter speeds, ISO has no creative options. Instead, it’s only used to increase the brightness of available light.
If you can’t physically add more light with, let’s say, off-camera flash or strobes.
Or you have a creative vision for a photo that requires a specific aperture or shutter speed. In that case, you will add more light by that’s right, amplifying it with a higher ISO number.
And as you hoe, the higher the ISO will result in more noise. My number one recommendation is to always use the lowest ISO setting possible.
Here are some guidelines to get you started since it’s impossible to give exact settings for specific lighting situations since the possibilities are unlimited.
All right. When shooting outdoors on a bright sunny day, you’ll want to use the lowest ISO available on your camera, like 100 or 200.
If it’s “partly cloudy” or completely cloudy, you might have to use ISO 400 to 800, depending on how dark the clouds are and how much sunlight it’s restricting.
Now if you’re going to shoot indoors, you might have to use ISO 800 to 1600 or higher. Again, it all depends on how dark it is inside.
When you’re ready to start taking photos, you may need some clarification about which ISO setting to use. In that case, your camera can automatically set your ISO for you.
And this camera setting is often referred to as well auto ISO. So does your camera have this option?
Well, you’ll have to check your camera manual to find out.
If not, just use one of the guidelines I just mentioned to get you started.
Now, if you do have auto ISO, it will make it easier for you to start taking photos without worrying about which ISO number to use.
Since your camera will automagically choose the ISO for you.
However, it could be better, and sometimes you may have a bad Exposure.
And later in this photography class, you’ll learn about Exposure, metering Exposure, compensation, and more to get the right “Exposure” if your camera doesn’t do so automatically.
Now, if you have auto ISO, refer to your camera manual to learn how to set it up.
And here’s how it works. Depending on your camera, you should be able to set the maximum ISO setting, which will minimize the amount of digital noise based on your choice.
Also, you can set the minimum shutter speed depending on your camera.
Setting the minimum shutter speed will ensure your camera doesn’t choose a speed that will cause blurry images. More on that coming up soon.
Now, if you do not have auto ISO refer to the guidelines provided earlier when you continue with the following tutorials, which will start with the creative side of apertures coming up right now.
All right, we’re going to do a quick recap on apertures, and I’m going to do a demonstration that will show you when you use different apertures, it can alter how your image looks.
Then we will take a deep dive into apertures so you can master everything you need to know about apertures.
All right, something interesting happens when you adjust the aperture from smaller to larger or vice versa.
Now, as you can see with these images, the background goes from in focus to out of focus more and more with each change of the aperture.
Other factors determine how much the background is blurred, like the lens length, the distance between your subject and the background, and more.
You’re going to learn all about those and more after this tutorial.
At the beginning of this class, I mentioned that I recommended starting to shoot an Aperture Priority mode.
And if you didn’t do that, that’s okay because we’re going to go ahead and do that right now.
So let’s go ahead and grab our cameras. And the first thing you want to do is set your camera in Aperture Priority mode.
To do that, you will locate the dial on your camera with the setting for Aperture Priority mode. You can find it by locating either the letter A or AV.
In case you’re wondering, the A stands for Aperture Priority. Now you have full creative control over the aperture. Your camera will automatically choose the shutter speed to get the correct Exposure.
Now, suppose you don’t have auto ISO. In that case, you’ll need to set your ISO according to the guidelines I provided since your camera won’t do it for you when you’re in Aperture Priority mode.
Now, to choose the aperture you want to shoot with, you must turn a dial on your camera to adjust it accordingly.
Let’s grab any two items and set them about six to 12 inches apart.
Now for the first photo, we’re going to set the camera’s aperture to the largest aperture for that lens.
This could be something like f/2.8 or f/4. It’s all going to depend on your specific lens.
Now, this lens, it’s a 50-millimeter lens, and the largest aperture is 1.8. All right, so what we’re going to do is we’re going to focus on the front object, so the zebra in my case, and we’re going to create our first image.
All right, so once you have that image, the next thing to do is to change your aperture to the smallest hole for that lens. And that could be f/11 or f/16. And for this lens, it’s f/16.
So go ahead and set that. Let’s refocus on the front object again and create another photo.
Now that we have both images done let’s compare them side by side. So the image on the left is the one I shot at f/16, and the other is f/1.8.
In both images, you can see that the zebra is in focus, and the elephant is only in focus in the first photo. And at F 1.8, it’s not in focus at all.
So this demonstrates that the larger the aperture, the more the background will be blurred.
And this is also known as well. You’re going to find out in the next tutorial.
We’re now going to take a deep dive into Apertures so you fully understand how they work and how they can alter your final image.
I previously demonstrated that the larger the aperture, the more blurred the background.
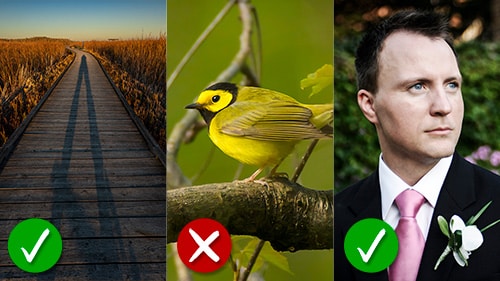
When it comes to the area in focus, this is referred to as the Depth of Field.
So the Depth of Field is the zone within a photo that appears sharp and in focus.
When focusing on your subject, that is considered the point of focus.
Beyond that, how much appears in focus corresponds to the Depth of Field.
So here are two more images and the amount of the Depth of Field, and one is greater than the other.
The first image I captured at f/1.8 is considered to have a small or shallow D.O.F.
The second image was captured at f/16, which is considered to have a large D.O.F. Essentially, a small Depth of Field has lessened focus than a large Depth of Field.
To help you remember this, a small aperture number like 1.8 represents a small Depth of Field, and a large number like 16 means you will have a large Depth of Field.
Now, you may have realized a weird phenomenon: a small aperture number like 1.8 has a very large hole compared to an aperture of 16.
Why is that?
As we discussed earlier, an aperture number in photography is an F-number. As you now know, the numbers are listed like this, f/1.8, f/2, f/2.8, and so on.
Also, not all cameras will include a forward slash with the number when dialing an aperture.
Either way, you’ll know exactly which aperture it is, its size, and how it will affect your D.O.F.
Now, there is a reason why a forward slash is included, and it will explain why f/16 is smaller than f/1.8.
So if you are ready to demystify this phenomenon of how f/1.8 is larger than f/16, let’s first go over what the F and your F number represent. So the letter F stands for focal length.
Each of your lenses has a specific focal length represented in millimeters.
So this lens’s focal length is 50 millimeters, and it has a range of F numbers from 1.8 to 16.
So let’s take the focal length of this lens as 50, and we will replace the letter “F” with it.
Okay, so now we have this math equation 50 forward slash 1.8.
Now, no worries. Math is not a requirement to create awesome photos. Just stick with me for another 15 seconds; this will all make sense.
Okay, if we divide 50 by 1.8, that equals 22.77. Then if we take 50 and divide it by 16, that’s 3.125. So which one is the smaller one? That’s right, 3.125.
Therefore, f/16 is a smaller hole in photography versus an aperture of f/1.8. You might wonder how to use what you’ve just learned to be more creative.
Let’s look at more images to reinforce what you’ve learned.
And then, I have a video demonstrating how different focal lengths and distances can affect your Depth of Field, which I’ll share in just a minute.
Now, for this particular image, I wanted to tell the story of this couple’s wedding day and the location of that wedding day. So I wanted to use a fairly small but large aperture.
I didn’t want to completely blur out the background, so I used an aperture of f/4, so not too big, not too small, and Dad allowed me to keep some of the background and focus.
And if you recognize the letter “D,” you know it’s from Detroit, particularly the Detroit Tigers.
So their wedding day was in that area, and we were near the Detroit Tiger Stadium.
I had completely blurred out the background, that information would’ve been missing, and you would’ve thought this particular image was shot at any major city worldwide.
But by including the “D” and keeping it in focus, we now have a storyline that lets you know exactly where this wedding took place.
Now for this next image, I also shot this at an aperture of f/4. But the distance between our subject and the background is much greater than in the previous image, which creates a much blurrier background because of that distance.
Now, in this image, I shot this at a small aperture of f/11.
You would expect the background and even some of the foreground here to be more in focus than it really is, and that’s due to the lens that I used, which is a macro lens, which will change the amount of Depth of Field based on it being a macro lens versus a normal lens.
So your lenses can also affect the Depth of Field, not just distance and apertures.
For this next image, I shot at an aperture of f/8. So I have the foreground in focus.
The tree lines in the front are somewhat in focus, and each tree behind one another is less and less in focus. So we have a somewhat shallow D.O.F.
But not very shallow because they, again, I wanted to help tell the story of the day and show the types of trees behind them.
I could have completely blurted out, so you couldn’t even recognize those were tree trunks.
But that would’ve eliminated that part of the story.
So make sure you select your apertures based on the story you want to tell.
For this next image, I’d love this image. It’s a classic shot of the guys, the groom, the groomsmen, walking towards the camera, and it’s a very popular type of photo that all my clients want.
But I chose the wrong aperture and had to try and fix it in Photoshop.
My motto is to get it right on camera, and I didn’t in this image. And you can see all the details of the background and cityscape in the background.
We can read what’s going on in the signs, which helps tell the story.
But there needs to be more in focus, and it’s taking away from our main subjects, which are the guys in this case. It’s hard to separate the foreground and the background because they are all in focus.
Let’s look at the image I did in Photoshop, and now that the background is blurred out, you can see that the guys stand out a lot more than they did previously. So here’s the before and after.
On the left side, we can read the signs. On the right side, we can’t, and you can see how the guys on this side on the left side are harder to visualize or see because they’re not standing out as much as the guys on the right.
I probably should have blurred this out to tone it down even more.
But the more I blurt it out, the more unnatural it began to look, which is why I always recommend getting it right and camera so you don’t have to try and fix it afterward.
All right, so here’s the video demonstration that I mentioned previously.
We will take several photos to demonstrate the Depth of Field and how you can control D.O.F. with different factors.
So I’m going to shoot the first two images at 1.4, which is the largest aperture for this lens, and then a second photo at f/16, which is the smallest aperture for this lens.
Then we’ll compare those two images to see how those aperture settings affect the Depth of Field.
So I’m going to go ahead and shoot at f/16 first. I will have her hold out the flower so I can focus on the flower, which will demonstrate the Depth of Field when I focus on the flower versus her.
I’m going to focus on the flower and take the first image.
Now I’m going to change to f/1.4 and take a second image. Let’s compare those images now; the first will be the one shot at f/16. And we can see a large Depth of Field, and many of the elements in the scene are in focus.
Now, let’s compare that to 1.4. We can see that the flower, the stem, and her hand are in focus. But the rest of the scene is not.
So she’s blurry in this image, and the elements in the back, fence, and house in the back are blurrier than the subject. The further the elements from her, the more they blur out.
All right, so remember what we talked about before? A small aperture number will result in a small Depth of Field or less of the image being in focus.
When you have a large aperture number like f/16 or f/22, you will have a larger Depth of Field, and more of the image will be in focus.
Now, I want to demonstrate another way you can control Depth of Field, and I’m going to step back about 15 feet here and take two more images at 1.4 and then another at f/16.
Okay, so I will go ahead and shoot at f/16 first. Okay, I’m going to switch to 1.4 now.
All right, let’s take a look at these images now. And the first one is at f/16, and just like before, we have a large Depth of Field. But check out what happens when you shoot at f/1.4 and are further from the subject.
So this time, she’s in much sharper focus and not as blurry. But the background, even though it’s more in focus, it’s still blurry.
All right?
So distance is another way of controlling your Depth of Field.
So the closer you are to the subject you’re focusing on, the shallower or the smaller the Depth of Field.
Or the less of the image that will be in focus, and the greater the distance between you and your camera and the subject you’re focusing on, the greater the Depth of Field or the larger the Depth of Field, or the more of the image that will be in focus.
Now, another thing that you can do is if you are photographing somebody and you have a busy background like this, and you want to blur out the background.
But you need to get the amount of blur that you want. You can move your subject away from the background, which will blur out that background even more.
So we’re both going to move up here about 30 feet or so, and we’re going to take another photo.
All right, we’re now about 30 to 40 feet further from the position we were in before, and I’m going to shoot at 1.4 again.
Let’s look at this image and compare it to the last one.
As you can see, we have a relatively large Depth of Field. But compare it to the last image.
The background is much more blurred out than it was before.
So again, distance helps affect or control the amount of the image in focus.
Suppose you cannot move your subject away from the background, such as when photographing a tiger at the zoo or on a safari.
In that case, there is another way to control the Depth of Field. What you can do is change your lens from shorter to longer.
So I will change my focal length here from 50 to 200 and shoot another photo to compare that to the image we just took.
All right, so I have my 70 to 200 lens, and I’m going to shoot at the longest length, which is 200. Now, my largest aperture for this lens is 2.8, so I can’t shoot at 1.4.
So technically, it’s a smaller aperture versus the one we shot previously with the shorter focal length. So I’m going to have her hold up that flower again. I’m going to focus on that flower and take another image.
Let’s go ahead and compare this image now to the one we did previously.
So as you can see, the flower, the stem, and her hand are in focus.
But she is no longer in focus like it was with the last image at 1.4, and definitely, the background is more out of focus than it was previously.
So that’s another option for controlling your Depth of Field by using a longer lens.
All right, now that you know the creative aspects of apertures, how it affects the Depth of Field, and how distance affects the Depth of Field, it’s time to take your knowledge and apply it.
Since knowledge is not power, action is, and that’s because the best way to learn photography is to practice what you’ve learned.
Now, adjust your aperture based on the amount of Depth of Field you prefer, and remember to adjust the ISO if you don’t have auto ISO set up.
Now real quick, there’s one more thing you should know: Bokeh.
In photography, we use the term Bokeh to describe the characteristics of how the background looks when blurred out, the Bokeh appears as little circles in the out-of-focus areas, and those circles can have different shapes depending on the type of lens you use.
So let’s look at a couple of images to see what it looks like.
I took this photo at a nearby national park where a demonstration on birds of prey occurred. To capture the image, I used a shallow depth of field to blur out the background activity of people walking by.
The bird’s head, specifically that of the owl, was moving quickly, making it uncertain if I would get the shot I wanted.
So I used an aperture of f/2.8 and a long focal length of 200mm, which helped create a shallower Depth of Field, which helped create these circles in the background.
So that’s the Bokeh, the circles you see in the background.
For this next image, I used a 60mm macro lens and an aperture of f/2.8, and you can see the shape of the Bokeh is different from the previous image.
It has an outline on the outer edge of the circle, and it’s not really a circle. It’s more oblong versus a circle. Depending on the lens and the aperture, you can also get a hexagon shape.
Now for this next image, I didn’t create this image. I actually found this on pexels.com.
But I wanted to show you this image because the Bokeh on it is unique to this particular lens.
And you can see that the Bokeh is more of a bubble-type shape, and its outline creates more of a bubble effect, especially if you look down here in the bottom right of the image.
You can definitely see that bubble-type shape. Now, this particular lens it’s called a Meyer Optik Görlitz or something like that.
It’s actually a lens from the fifties, and you will find older lenses like this will create different types of Bokeh.
So if you want to create something different and unique, look at different lenses from different eras to find something unique.
Now that you know everything you need about apertures, we will take a deeper dive into shutter speeds.
Now that you know how to use apertures creatively, it’s time to take a closer look at shutter speeds since it also provides creative options to see how the shutter speeds can help you achieve your creative vision.
Grab your camera and switch it to Shutter Priority mode.
This setting can be set by changing the dial on your camera to “S.” You now have full creative control over the shutter speed, and your camera will decide on the aperture to achieve the proper Exposure.
Remember, you’ll need to set the ISO manually unless you have auto ISO activated.
So what creative options does the shutter speed provide?
Well, I’m glad you asked.
The two options are to either freeze the action or blur the action.
So for this image, I froze the action of the newly wedged jumping by using a fast shutter speed.
I blurred the action by using a slower shutter speed for this waterfall image, which I captured on a family vacation in Letchworth Park, New York.
So the creative options are achieved by how long your shutter stays open. However, some other factors can affect how much motion blur is created.
For example, the speed of your subject can affect the amount of blur, and so does the distance of your subject from your camera, and you’ll discover why that is in just a moment.
First, I will demonstrate how to freeze and blur the action with my wife’s handy dandy fan.
we’re going to take two photos at two different speeds.
For the first image, I will use a shutter speed of 1/8th of a second, and for the second image, I’ll use 1/8000th of a second.
All right, I will turn the fan on to the slowest setting.
It has three different speed options. But we’ll use the slowest one for now.
So I’m going to set my camera to 1/8th of a second, and I’m going to record the camera’s view so you can see what I see before taking the photo.
Now we have one problem. I’m handholding, and at this shutter speed, it won’t work, and you’ll find out why in the following tutorial.
So I will start over and put my camera on a tripod.
All right, so let’s try this again. Here’s the image I just captured; the camera sees the blades the same as you and I. They’re blurry, right?
I will change my shutter speed to one 8000th of a second and retake the photo to see if we can stop the action. I need to increase my ISO as well.
So let’s see. Wow, ISO 40,000 may be more.
I need to change my aperture as well. I’m going to go down to f/2.
I have good Exposure now. So let’s go ahead and try this again.
Okay, so the camera froze the action this time, and we can see the individual blades.
So anytime you want to freeze the action, use a fast shutter speed.
The only problem is how you know which shutter speed to use and when that and more will be answered soon.
But first, I will take a third image with the fan at the highest or the fastest setting so the blades move even faster.
And I’m going to use the same shutter speed of 1/8000th of a second, which will demonstrate the cause and effect of the speed of your subject in relation to your shutter speed.
So I’m going to turn this up. Whoops, wrong way.
All right, there we go. It’s much louder. Now let’s go ahead and take that shot again.
You now know how the shutter speed can blur or freeze the action.
But how does this happen, and how do you decide which shutter speed to use and when?
We will now take a deep dive into the shutter speeds that will answer those questions and more.
All right, the amount of blur in an image depends on your shutter speed, the subject’s speed, and the subject’s distance to your camera.
Let’s review some images of the fan blades we captured previously.
The first image on the left is the photo captured at 1/8th of a second, and the one on the right is 1/8000th.
This is a classic example of freezing or blurring the action.
Now let’s compare the faster shutter speed with the third image I captured that you have yet to see.
Now you may remember for this image, I had the fan setting set to the slowest speed, and here’s the third image with the faster fan speed, and this time we have some motion blur.
This is due to the blades turning faster this time. So this demonstrates how the speed of your subject can alter whether or not you are freezing or blurring that action with the same shutter speed.
This brings us to that question again about figuring out which shutter speed to use and when and that answer is coming up soon.
Before I share that, let’s look at some more images.
So I volunteered my daughter to assist us at a local park for this demonstration. We took three photos, two at a distance of 10 feet from the camera with a shutter speed of one second and one 1000th of a second.
Then the third image, I captured her 500 feet from the camera in one second.
So this image was at a distance of around 10 feet from the camera and a shutter speed of one, 1000th of a second, which shows we froze the action.
This next image was captured at one second, and we have some motion blur this time.
All right, now let’s see how distance affects whether or not the action is blurred or frozen.
Also, if you’re wondering, I didn’t shoot a fourth image at the faster shutter speed with this distance since it would still freeze the action. But check out what happened with the slower shutter speed and a distance of around 500 feet.
Now, it’s hard to see how much of the action is frozen or blurred because she is much further from the camera than before.
So let’s go ahead and zoom in, and although the action is not frozen, the amount of blurring that occurred is less than when she was only 10 feet from the camera.
So this demonstrates that the distance can play a role in whether or not the Ashton is frozen or blurred or by how much.
So the further your subject is from the camera, the less blurring will occur.
Why is that? Well, let’s jump into Photoshop here and find out. So we have both images here, and they both have guidelines applied to them, representing the opening and closing of the shutter.
The right guideline represents the opening.
The left represents where the shutter closed. So in between those guidelines, she traveled from one to the other as she was being recorded on the sensor.
But as you can see, the amount she traveled in our first image here was greater than the other image, which reduced the amount of motion blur.
So try and think of your subject traveling across a sensor.
The closer they are to your camera, the further they will travel along that sensor. The longer the motion blur will be, the further they are from your camera. They will travel a shorter distance on that sensor, creating less motion blur.
So keep that in mind. The further they are, the less motion blur you’ll have.
All right, now, for the moment you’ve been waiting for, I will share some guidelines on deciding which shutter speed to use and when.
When photographing your kids or people in general sports or even wildlife and you wish to freeze the action, a good starting point is one 500th of a second.
If the action is really fast and you’re close to it, go up to 1/2000th of a second or faster, like 1/4000th of a second.
But sometimes, adding motion blur can help create something unique.
For example, in this image, I used a shutter speed of one 30th of a second to add some motion blur of my daughter riding her bike at that shutter speed.
It should have caused a lot more motion blur on her than what actually occurred, and that was achieved because I took my camera.
I panned and followed her as she went by, creating a motion blur in the background instead of on my daughter.
So panning is a photography technique to create motion blur more on the surroundings than the actual subject because you’re focusing on that particular subject.
When it comes to shooting landscapes, there’s generally little to no action in the scene unless you’re shooting a waterfall or a landscape on a windy day.
Therefore, you can use any shutter speed you desire.
Actually, that’s incorrect because if you remember the first photo I took in the previous tutorial, I tried to handhold the camera with a one-second shutter speed, resulting in a blurry image due to the camera shake.
Using a tripod, I could eliminate the blurriness caused by the camera shaking. One of the things you can do is use a faster shutter speed.
But if you want to blur the action, you’ll need a tripod to avoid camera shake.
So a faster shutter speed is required, the faster the action is, and/or the closer you are to the subject with your camera.
Now, the problem is all of those factors can include infinite possibilities.
So I recommend testing and practicing before the actual day of the shoot, or when you first arrive at the scene, take some test shots to narrow down the shutter speed you want for your creative vision.
All right, here’s another pro tip for deciding on the minimum shutter speed to avoid “camera shake” or blurry photos when you don’t have a tripod.
So based on the lens you’re using, you’re going to take the focal length and double it. If it’s a zoom lens like this, 28 to 70, you will use the longest length.
So, in this case, that would be 140, and then we’re going to convert that to a shutter speed, which would be one, one 40th of a second.
Now, if your camera doesn’t have that shutter speed, round up.
In this case, one 50th of a second is the minimum shutter speed I should use for this lens.
Now for my 70 to 200, the minimum shutter speed would be one 400th of a second.
Remember that this rule can be adjusted based on how well you can hold the camera.
For example, my daughter is smaller in stature than I am. She’s like five foot three and a hundred pounds.
This lens and the camera’s weight will be harder for her to hold still and avoid camera shake, which means she might need a faster shutter speed than one 400th of a second.
She might need 1/1000th of a second.
So you must experiment with all your lenses to find the ideal minimum shutter speed to avoid camera shake.
Another thing you can do when you forget your tripod at home, like I do when I go on vacation, is to use your surroundings to stabilize your camera.
For this waterfall image, I wanted to blur the motion of the water to create a smooth, silky effect. But with no tripod in sight, I had a dreaded camera shake blur.
Luckily, there was a small stone wall in front of me that I placed my camera on, and I got the shot.
Now, if you don’t have the same type of luck, you can try leaning against a wall, bring your elbows in tight, and hold your breath as you squeeze the shutter release button.
So the better you can hold the camera, the better chance of getting the shot. Or better yet, make sure to leave your tripod at home.
All right, now it’s your turn to take this knowledge and practice by shooting in Shutter Priority mode and discover the creative side to shutter speeds.
Now, coming up next is the answer to something you might have already discovered.
That is why does your camera sometimes get the Exposure wrong when shooting in aperture or Shutter Priority mode or even full auto?
Let’s find out so you can continue elevating your photography skills.
What I’m about to share will elevate your photography knowledge to a whole new level.
This information is vital for mastering your camera to create amazing images with your desired Exposure.
This knowledge will also make it easier for you to fulfill your creative vision.
Once you know your camera’s limitations, it has limitations because it’s imperfect, like you and me.
All right? So far, you’ve been shooting in aperture and Shutter Priority modes. But not all of your Exposures have been perfect, have they?
Some are Overexposed, some are Underexposed, and then some.
But not all are exactly what you were hoping for. Why is that?
Well, your camera is a computer that gives you results based on how it’s programmed.
So let’s review how your camera has been programmed, and this will answer why it sometimes gets your Exposure wrong. So the best way to demonstrate this is with some photos.
Let me introduce you to one of our family members, Fuzzy Bunny. I photographed him on a white background to demonstrate how your camera is programmed to see the light.
So this image was shot in Aperture Priority mode, and it’s Underexposed.
Here’s the image with the correct Exposure, and I’ll explain how I achieved that with the auto mode in a moment. First, let’s explore why the camera gave me an Underexposed image in Aperture Priority mode.
Let me point out the obvious.
Your camera has a body. But it doesn’t have a brain like you and I.
Instead, it has a computer ship. Therefore, your camera determines the proper Exposure based on, yes, as I mentioned, how it’s programmed.
So your camera has yet to learn if you’ve photographed a bunny, a tree, or something else.
All it sees is light, and the color of that light and the computer chip in your camera transforms that information that the sensor received into digital data to reveal your image.
So how is your camera programmed to see the proper Exposure in automotive? Well, I’m glad you asked.
So your camera is programmed to assume the brightness level of light is a mid-gray tone depending on your camera.
That’s around 10 to 18% gray.
So think about that for a moment. Some scenes could be dark and moody, and others could be bright and vibrant. But your camera has been programmed to assume that the brightness levels in both situations should be 18% gray.
So when you’re shooting a very bright scene or a subject like Fuzzy Bunny, your camera will overcompensate for this brightness level. In this case, we have a bright white bunny on a bright white background.
All right, try and say that 10 times real fast.
The result is an Underexposed image when your camera compensates for this brightness level and converts it to a mid-gray.
This happens anytime the light is very bright or when the elements in your scene are highly reflective, like snow. The opposite happens when you have a very dark location or dark subject, like with Myrtle, the Turtle.
I photographed her with a Black background, and she, too, is dark and in auto mode. As a result, my camera overcompensates and over-exposes the image.
Now the question is, how do you fix your camera to give you the proper Exposure when using an auto mode like Aperture Priority or Shutter Priority?
Well, you have two options, and they will be revealed next.
We will now dissect a photo to understand how your camera gives you the Exposure it does. Then, you’ll learn the two solutions for getting better Exposure when using an automotive.
Previously, you learned that your camera is programmed to set your Exposure based on a mid-gray of around 10 to 18%.
But the question is, how does your camera see the light or measure it?
Well, since your camera doesn’t have eyes like you and I, your camera uses a Light Meter to see the brightness levels of the available light.
Then the Light Meter measures how bright it is based on how it’s programmed will determine the camera settings it chooses for you.
When your camera gets the Exposure wrong, you have two options: changing the default Light Metering mode or adjusting the Exposure value, also known as Exposure compensation.
So, let’s go over the Metering Modes first.
Three popular types of Metering Modes include Matrix Metering, also known as evaluative mode (if you’re a Canon user).
The other two are Center-Weighted metering and Spot Metering.
Now, depending on your camera, you may have more options.
But for now, let’s go over the basics of those three. Now, you can control how your camera meters the available light based on one of those three Metering Modes.
So the matrix or evaluative metering mode is designed to evaluate all the light you see in your viewfinder of the Metering Modes you have.
This is the most complex, and what it does is it evaluates the light in five different zones.
It then calculates the different light levels in each section to give you the Exposure.
Now, this metering mode works for most instances.
When you start shooting portraits, for example, with the light behind them, you’ll find it doesn’t give a good Exposure, at least for the subject you photograph.
Next, you have this Center-Weighted mode, which evaluates the light more toward the center of the viewfinder and ignores the light outside of it.
The Spot Metering mode is even smaller at around three to 5% of the viewfinder area. It only evaluates the light in that small spot in the center of your viewfinder.
However, some cameras will move the Spot Meter based on where your focus point is.
So if you change the focus point from the center to the right or to the left, the Spot Meter will evaluate the light at that point in your viewfinder and what we’re going to cover focus points in more detail later in this photography class now to see how these different meter modes work.
All right, so for this photo shoot, I am shooting in Aperture Priority mode again and at 2.8. I have Matrix Metering set for the first image, and I will compose her so she’s on the left side.
So we get some of the light from the background in the image as well, so we can compare how the light is metered with the three different Metering Modes.
I’m going to take the first image here.
All right, so this first image is a bit Underexposed. But overall, the Exposure is decent. The skin tones look good, and the background looks good. But I want it to be brighter.
So I will switch to Center-Weighted mode to see if that gives me better Exposure.
All right, this time, the image is Overexposed regarding the skin tones, and that’s because the metering is being applied more towards the center. The light around the image is not being metered at all.
So the background in the back is much darker than the skin tones, which creates an Overexposure of the skin tones.
So this time, I’m going to switch to Spot Metering mode, and because I have the focus point on her face, it will also meter the light in that area.
So her skin tones her hair and maybe a little more around her. Let’s see if we get better Exposure with Spot Metering.
All right, so for this image, we did not get the Exposure I wanted.
The overall image is now Underexposed, and the skin tones are darker, which could be how the light is metered in the area where I focused.
So overall, the matrix mode gave us the best Exposure.
We’re going to head back into the studio and take a closer look at these images to compare them more so I can give you more guidelines on which metering mode to use and when.
So this was the first image we took, and I used the Matrix Metering mode for this particular image. As you can see, it did a really good job of giving me a good Exposure in the camera.
However, the image is around two-thirds stops Underexposed. I base that on the brightness levels of her skin and this area right here, which is really dark, and we’re losing some detail in the hair, and that’s because it’s Underexposed.
I can increase the Exposure compensation to make it brighter at the time of capture, which you’ll learn how to do very soon, or I can try and fix it in post-production.
The problem with that is when you have an Underexposed image like this, you’re going to create new problems when you increase the Exposure in your favorite editing software.
For example, when Underexposed, it can become muddy, the skin can become muddy, and you’ll lose some detail.
The skin color can shift and become unnatural looking. You’ll also introduce digital noise and artifacts, which require your attention and time to be fixed in post-production.
So I recommend starting your editing in camera by getting the Exposure right at the time of capture versus fixing it after the fact.
So when it comes to the Matrix Metering mode and this type of lighting condition, you’ll often find that the Exposure is close to perfect, like for this image.
However, suppose the lighting of the scene is backlit, and we don’t have all these trays or these buildings here. It’s really bright in these two sections up here.
In that case, the Matrix Metering mode will overcompensate for this large amount of brightness levels in those two sections and further underexpose your image.
So remember the matrix mode evaluates the light in five different sections.
Suppose one or more of those sections has a dominant brightness level that is very intense.
In that case, it will overcompensate for that and give you an Exposure that will be more over or Underexposed versus what I have for this image.
That said, the matrix mode is great for lighting situations like this or even when the light is muted on cloudy days.
So here’s the second image we took. I used the Center-Weighted metering mode; this time, the Light Meter was restricted to the center area.
All the light outside of it was ignored because we have a fairly dark area right here that is affecting the Light Meter, and what the camera ends up doing is overcompensating for this dark area right here and giving us an Overexposed image based on how it’s programmed.
So trying to fix the Overexposed skin, you can see it’s a lot brighter than it was before, and trying to fix that in post-production will create new problems that you’ll have to try and fix just like with an Underexposed image. You can end up with color shifts and muddy skin tones.
If Overexposed, you could lose detail, which will be nearly impossible to fix.
Now, regarding using the Center-Weighted metering mode, I’ve never used it and don’t have any recommendations for it personally. I stick with Matrix or Spot Metering.
All right, here’s the third image we took, and I used the Spot Metering mode for this. The Exposure is nearly identical to the matrix mode, even though the metering was restricted to her face here and in some surrounding areas.
And that’s because my camera allows the Spot Meter mode to move with the focus point placed on her face.
Overall though, the main area being analyzed is the skin since it makes up a larger portion of the metered section. This resulted in the camera compensating for those brightness levels and underexposing the skin around two third stops.
Your Spot Metering mode and the other Metering Modes could give you different results versus my camera based on how your camera has been programmed.
You may not have over or underexposing skin issues, or you could end up with the opposite of my results and have Overexposed skin.
So you’re going to need to test out your Metering Modes before shooting to get the desired results.
So it’s time to discover what and how to use the Exposure compensation tool built into your camera, which is coming up right now.
Previously I promised two options for helping your camera get the right Exposure based on your creative vision.
You learned about the first option, which is to change the metering mode.
Now let’s explore the second option; manually adjusting the Exposure when your camera doesn’t give you the desired results, or in other words, compensate for your camera’s mistakes.
This second option is known as Exposure compensation. Although you have to adjust this setting manually when using any auto mode, it is easier than it sounds.
But before we manually adjust your Exposure, you first have to understand a vital component of Exposure in photography. That is, you need to know what a stop is in photography. No, I’m not referring to physically stopping or “stop signs.”
Instead, a stop in photography is the terminology we use to describe what happens to the amount of light reaching your camera for your Exposure based on when you change a camera setting from one to another.
In essence, a stop refers to doubling the amount of light or cutting the amount of light in half.
So switching from ISO 100 to 200 is considered “one-stop.” Going from f/4 to f/2.8 is one stop, and so is going from one second to two seconds.
Let’s say you have a one-second shutter speed and decide to use two seconds.
Instead, doubling the shutter speed from one to two seconds means doubling the amount of light since your shutter is open twice as long. You could say that you’re increasing the light by one stop, which is faster than saying everything I just said.
So if you hear someone say they increased their Exposure by one stop, that means they’ve doubled the amount of light. Or if they say, I’ve stopped by one stop, they cut the light in half.
All right, so if this is still confusing, no worries because it will be at this point in your photography journey. I’m giving you information that is essential for mastering Exposure. In time and practice, this will all make sense.
Now if you’re wondering, what does this have to do with Exposure compensation?
Well, everything. So grab your camera and your camera manual to determine how to compensate for the Exposure given by your camera.
Now, most cameras, at least on the Nikons I’ve owned, have a button on the camera’s body with a plus and minus sign.
So will you press and hold that button, and your digital screen will change and look something like this.
Now, when I rotate the dial to the left, I get a negative number. To the right, I get a positive number.
Each turn increases or decreases the amount of light by roughly one-third. So I have plus 0.3, which is one-third turning. Again, I get seven or two-thirds, which gives me one stop. If I continue, I get 1.3, 1.7, and so on.
And a positive number would increase the amount of light, and a negative number would decrease the amount of light.
So when you’re using an auto mode and discover that your image is still under or Overexposed, you can change the metering mode as I showed you in the previous tutorial.
Then, if you find the image is still under or Overexposed, adjust the Exposure compensation accordingly.
For example, the last images we took outside of my daughter were about two-thirds stops Underexposed.
Adjusting the Exposure by plus 0.7 brightens the image by two third stops.
But how do you know when your image is over or Underexposed in the camera while you’re out and about shooting? And why does it matter if it’s off by a little bit?
When you know the answers, great questions will elevate your photographic skills, and the answer is coming next.
You are now going to take your photographic knowledge to the next level, and this and the next two tutorials that follow since they are the foundation to transitioning from auto modes to Manual Mode.
I guarantee shooting in Manual Mode will be easy if you watch this in the following tutorials.
It all starts with understanding dynamic and Tonal Ranges in photography since they relate to your Exposure.
You’ll soon find out your camera’s limitations to the Dynamic Range and how to overcome them to get the exposure you want.
So Dynamic Range and Tonal Range, what are they? Let’s find out by exploring Dynamic Range first.
Dynamic Range in photography refers to the range in which your camera can successfully capture the brightest and darkest areas of a scene without losing detail in nature.
You can say there’s infinite brightness from Blacks to Whites and grays in-between.
This brightness range can be measured in stops.
We did cover stops in photography previously, so if you need a reminder, go back and watch the previous tutorial.
Okay, so both your camera and your eyes cannot see every level of brightness depending on the intensity of the light in your scene.
When it comes to your eyes, you can see around 24 stops of brightness levels.
High-end cameras range from 10 to 14 stops, and lower-end or older cameras like my Fuji S2 are closer to seven stops.
So this means your camera is not capturing detail in the Shadows’ darkest areas or the Highlights’ brightest areas.
Now, if you expose (for) the Highlights, you’ll capture those details.
But you will need more details in the Shadows.
This is known as exposing to the right, which is better than exposing to the left or the Shadows.
Now, it’s easier in post-production to bring back some Shadows versus Highlights. Now let’s compare Dynamic Range to Tonal Range.
Tonal Range
So the Tonal Range also refers to the brightness levels of a scene.
But it is directly related to the tones captured by your camera.
Here’s another way to think of the dynamic versus the Tonal Range.
Imagine your Ferrari has a range of zero to 255 miles per hour. That’s its Dynamic Range.
Now imagine your spouse “installs” a speed inhibitor and changes the range from zero to 60.
That’s its Tonal Range since it’s been limited to a smaller range.
Now that you know your camera has limitations, here are some solutions to overcome them. Its inability to give you the Exposure you desire.
One of the things you can do is control the light by diffusing it, or you can add more light to the Shadows.
Now, if you are a landscape photographer, it will be easier to control the light in this way.
So you can use a polarizing filter to darken up parts of the scene or the landscape, or you can use a graduated neutral density filter, which will darken up the sky and the scene even more, which will reduce the number of stops in your scene.
Now another thing you can do is what is known as HDR photography, which consists of taking three Exposures, one Underexposed, one Overexposed, each by one stop, and then a third Exposure in between.
Then in post-production, you can merge the three Exposures to get more detail in the Shadows and Highlights.
Other options could be better for your situation. In that case, you must decide what is more important in the scene or easier to deal with in post-production.
Then you’ll have to expose to the left for the Shadows if they’re the most important or exposed to the right, which I recommend.
Now the question is, how do you know what Tonal Range you are capturing?
Now, although your camera doesn’t have a gradient tool, it does have another tool that can show you visually the Tonal Range you’ve captured and whether or not you have the correct Exposure for that scene.
More on that coming up next.
All right, it’s time to elevate your photography knowledge by jumping into a photo to explore the Tonal Range captured in an image and dissect the five zones of the Histogram.
So what is a Histogram?
Stay tuned because you’re about to learn everything you need to know about Histograms to ensure you never end up with an over or Underexposed image.
Now, previously we went over the dynamic and Tonal Range of Exposures.
But how do you know whether or not you have the Exposure you desire?
Well, although you can view the image on the back of your camera with the LCD screen, there are numerous reasons why there are better ways to determine if your image is over or Underexposed.
One, the quality of your LCD screen may not be able to show all the detail captured, or if you’re shooting outside on a bright day, it will be difficult to see your image.
So I recommend learning how to read your Histogram to ensure you capture the proper Exposure for your creative vision.
Otherwise, you’ll spend more time fixing your image and post-production since you didn’t get the exposure right at the time of capture.
Remember, the quality of your image will be very low if the exposure is off by two stops or more.
Trying to fix that will cause many headaches, and it may not be worth keeping the image.
So we’re going to fix that by elevating your Histogram knowledge.
So what exactly is a Histogram?
Well, a Histogram is nothing more than a graphical representation of data using bars of different heights. Those bars represent the different Tonal Ranges or brightness levels captured by your camera.
Let’s say you go on vacation and wish to record the number of images you took each day on a graph.
On day one, you took 50 photos. The following day you took 150, then 100, and on day four, you took 200.
Now imagine your vacation was 256 days long.
Your graph would look like this, and now it’s starting to look like a photos Histogram.
Since in photography, your photo’s Histogram includes 256 bars of data.
But the real question is how do these “bars of information” help you capture the proper Exposure?
The answer will be apparent after you and I dive deeper into the Histogram itself.
So the Histogram represents the pixel data of your image depending on your camera and editing software.
This data can be presented to show information about the colors in your image and or the brightness levels, or in other words, the Tonal Range in your image.
This tutorial will only cover the Tonal Range of a Histogram.
So the Tonal Range goes from 0% or pure Black all the way up to 100% or pure white.
Everything else in between is a shade of gray. So these shades of gray are divided into five zones within your Histogram.
So each zone of your Histogram, of course, represents a different brightness level.
In addition to those zones, there’s also a Black point and a White Point.
All right, we’re now going to take a deep dive into the five zones, the Black and white points, and we’re going to jump into one of my favorite images.
All right. The first bar of your Histogram is number zero and is pure Black.
The last bar is number 255, and it’s pure white. So the first and last bars are known as the Black Point and white point.
They’re your image’s darkest or brightest parts and contain no detail.
So in this image, we have a lot of Blacks on the inside of this cave around here, along this railing and pathway down here and behind me.
Now, as far as the white points, they’re mostly contained within the water and this mini waterfall.
Now next to the Black Point, we have 25 more bars known as the Blacks.
In essence, the Blacks are a lighter shade of pure Black, and unlike the Black Point, contain detail in that Tonal Range.
So for this image, many tones of Black are inside the cave along the edges.
We can’t see them. It’s hard to see right now. We would have to zoom in to see them.
But we do have Blacks along those areas as well as this area behind me as well.
So the Blacks are followed by what is known as the Shadows, which includes 51 bars.
Again, we have some lighter shades of Black or Shadows inside the cave right here.
We also have some on the steps here, and then, of course, in different parts of the image here, here, and down here, those are all Shadows.
Next, you have your Mid-Tones, which include a whopping 102 bars that represent a large portion of mid-gray tones, and these can be found along the path along the steps.
The railing, these rocks back here, those are definitely Mid-Tones, as well as some of the darker greens up here in the leaves and the trees up here, those are all Mid-Tones.
The next zone is known as the Highlights, and it also has 51 bars, which are located along the path here, where it’s much brighter. Those would be Highlights.
We have some in the water. Some bricks on the bridge here would be considered Highlights and brighter leaves.
All of those would be considered Highlights.
So the final zone is known as the Whites, consisting of 25 bars.
So the Whites are a darker shade of pure white, which can be found in the water here, as well as some of these very bright bricks on the bridge.
Now that you know what the bars represent regarding the Tonal Range, the next question is, why does this matter?
Previously, I mentioned that your Histogram represents pixel data or brightness levels. But it’s more than that.
The pixel data itself is the detail or texture in your image.
You have 256 possible bars of texture to capture along the Dynamic Range of the scene you’re photographing.
So imagine what would happen if your Histogram only has 200 bars out of 256.
What would that mean?
That means you did not capture detail or texture in this part of the Dynamic Range.
So I’m about to share a technique that will help you see the Exposure before you create it to ensure you capture all the detail in your scene.
So if you are ready to discover this technique, let’s do it.
Let’s say hello to Myrtle the Turtle again. If you’re wondering about her name, our daughter has wanted a turtle forever. But we settled on a cat instead.
All right, so I photographed Myrtle on a Black background, and as you can see, she, too, is dark.
But she does have some bright Highlights around her fur, and her eyes are brighter than the fur.
Based on the Histogram, we can see the Tonal Range captured, which includes lots of Blacks, Shadows, and some Mid-Tones, and very little to no Highlights or Whites.
So this Histogram is vital to understanding them in regards to whether or not you have the proper Exposure and whether or not you’ve captured all the detail in a scene.
Let’s jump into another photo and explore how to see your Dynamic Range before you capture an image so you can compare the Histogram to what you see.
So this next image I captured on a family vacation in northern Michigan, of all places.
So let’s check out the Histogram for this image.
It looks like a capture detail in all 256 bars over the full Dynamic Range of the scene.
Would you agree that this image is properly exposed? Great.
The only problem is that it was a trick question since this is the Histogram of the final edit.
Now, here’s the Histogram of the image straight out of the camera, and it looks like many of the bars are missing in the Blacks and some in the Shadows.
So this is an indication that the photo is Overexposed, and here’s that same image straight out of the camera with no editing, and it does look Overexposed.
Wouldn’t you agree?
If I had reviewed the Histogram before packing up, I could have retaken the photo to get the correct Exposure.
This would’ve resulted in a higher-quality image and saved me some time editing.
Now it’s time to elevate your photographic skills with the following information.
Are you ready?
Good, because this will separate you from every other photographer on this planet.
So here we go. So only looking at the Histogram by itself isn’t enough.
It is only confirmation of what you see before creating your photo.
So before you click that shutter release button, you first have to visualize your final image.
So what do I mean by that?
Well, you have to see the subject you want to capture. You have to see the light to determine your Exposure, which means you have to see the Dynamic Range or the brightness levels of that light throughout your scene.
For example, in this image, it’s very bright along the horizon, gets darker on the way up, and the sand here is fairly bright.
But the tree itself is darker than the sky and the sand. So we have a Shadow down here of the tree and darker areas within the tree as well.
Therefore, we have some Blacks and Shadows in and around the tree, sand, and sky.
We have some Mid-Tones up here.
Then we have some Highlights here inside the sand, and then we have our Whites along the horizon and then some Whites and Highlights on this end of the image.
So seeing all five zones before you take the photo tells you that if you want to capture detail in the full Dynamic Range of your scene, you will need a Histogram with bars in each Tonal Range.
If not, it looks like this, then you know your image is Overexposed.
But if the Histogram looks like this, you know it’s Underexposed, or is it?
Remember Myrtle the Turtle? She had a Histogram that looked like this one, and here it is again.
But we know, based on the Dynamic Range of that scene, there will be more bars on the left side of the Histogram and little to none on the right side.
That is why it’s important to see the brightness levels of your scene so you know what to look for in your Histogram to ensure you are getting the Exposure needed for your creative vision.
Our next image is another family member, and his name is Fuzzy Bunny.
This time we have a mostly white bunny on an all-white background, and as you can see, Fuzzy has some light gray spots, and his eyes are almost pure Black.
So, picture in your mind what the Histogram should look like. Is this what you had imagined? Awesome, because the bars of the
Histograms this time are heavier on the right side where the Highlights and Whites are, and we have some information or detail in the Mid-Tones and very little to none in the Shadows and blocks.
So remember, the Histogram will confirm what you see before you take the photo, and if the Histogram matches those brightness levels, you should have a properly exposed image.
So far, we’ve explored the Tonal Ranges within a Histogram, and you now know what to look for to confirm you have the right Exposure.
But the Histogram can also warn you if you capture only some of the detail in a scene.
Let’s look at a couple more Histograms that warn you if you have yet to capture all the detail and or exceed the Dynamic Range of your camera since it’s only capable of seven to 14 stops of light.
So this image looks very dark, and it could be Underexposed. According to the Histogram, two warning signals can indicate whether or not the image is Underexposed.
The first is the left side of the Histogram, where there are lots of bars all bunched together.
This could be an indication that the image is Underexposed.
The other is the right side, with a gap between the Highlights and the Whites.
This is another warning that your image could be Underexposed, or this image in particular, and only some of the details were captured.
So here’s the properly exposed image and its Histogram.
Notice how the Histogram no longer has a gap, and the left side isn’t as heavy as before.
This is why it’s important to visually evaluate your scene’s available Dynamic Range before taking the photo, then match it to your Histogram to get the proper Exposure and, just as important, capture all the detail.
All right, so here’s one more image that is Overexposed.
Its Histogram confirms that this time we have a gap on the left side, and the bars are bunched together on the right side. Here’s the properly exposed image, along with its Histogram.
All right, so the one thing we still need to cover that you might be wondering about is the height of the bars.
In our vacation example, the height of the bars changed based on how many photos were taken each day. So the bars in your photos’ Histogram can also change heights based on the number of pixels in a specific ton range.
You’ll see a spike for that specific tunnel range if there’s a predominant brightness level.
In this image, I photographed a couple against a dark wall, and the Histogram shows a huge spike in the Blacks and Shadows.
Those Black and Shadow values are located within the dark green wall, so those bars are very tall since the wall takes up most of the image. As you can see, the bars for the mid-tones Highlights and Whites also have data.
But the bars are much shorter since there are fewer details in those Tonal Ranges, and the small spike to the right represents the details in his shirt and her dress.
All right, I have one more tool to share to help you achieve your creative vision, and you’ll be one step closer to ditching auto modes and shooting in full Manual Mode.
I’m about to share some vital information to help you take full creative control over your camera and help you finally understand the relationship between ISO apertures and shutter speeds.
Then you’ll be ready to ditch auto and shoot and Manual Mode. Guaranteed.
So when it comes to capturing a photo, you have two options.
You can choose one of the four auto modes. Your camera will set the ISO aperture and shutter speed to get a proper Exposure, which you learned in previous tutorials.
Or you can set your camera in Manual Mode and manually set each of the three settings. Why would you want to do that?
If you want full creative control over your camera and wish to set the aperture size and the shutter speed, then you’ll use Manual Mode.
Which you’ll learn in the following tutorial. First, you must understand the relationship between ISO aperture and shutter speed before shooting in Manual Mode.
Once you understand this concept, shooting and Manual Mode will be easier, guaranteed.
In photography, the Exposure triangle explains the relationship between your different camera settings with a visual tool.
So here’s a typical Exposure triangle. On each side, you have one camera setting with information about how each affects your Exposure and whether it freezes or blurs the action, the Depth of Field, and possible digital noise.
So I’ve put together this PDF for you, so make sure to download it so you can use it to follow along and for future reference.
Now, the Exposure triangle aims to help you visually see what happens when you choose or decide to change a camera setting.
At the bottom, we have apertures, and the larger the aperture, the more light you’ll have, and as you move to the left, you decrease the aperture size and end up with less light.
The creative outcomes of your aperture are also listed, so a smaller aperture results in a large Depth of Field, and the larger the aperture becomes, the smaller your Depth of Field.
On the left side is your ISO.
Again, the amount of light and the effect of that light is listed.
So more or less light and less or more digital noise.
Shutter speed also shows more or less light depending on the shutter speed chosen and the creative effect of the speed chosen.
So each of these camera settings has a tight relationship with each other.
In essence, if you change the camera setting of one, you may have to adjust one or both of the other two settings to get the Exposure needed.
For example, let’s say you’re photographing a landscape and decide on ISO 400, a shutter speed of one 500th of a second, and since you want a large Depth of Field, you choose f/11.
After taking the photo, you realize there is too much digital noise, so you change your ISO to 100.
This, in effect, reduces the brightness of the available light in half, twice, or in other words, two stops less light. And the Exposure triangle shows you that 400 to 200 is one stop and 200 to 100 is another.
So two stops less light. To get the correct Exposure, you must change the aperture by two stops by adjusting it to f/5.6. So f/11 to f/ is one stop, and f/8 to f/5.6 is another.
Or you can adjust the shutter speed by two stops with a slower shutter speed of 1/120th of a second.
So 1/500th to 1/250th is one stop, and then 1/125th of a second is another stop, or you can adjust both the shutter and aperture by one stop each.
You can go to f/8 and 1/50th of a second for two full stops.
And the choices you make to your aperture and shutter speed depending on your creative vision for the shot and whether or not you can hold your camera still at a slower shutter speed.
Now that you’ll understand the relationship between your camera settings and how it affects your Exposure, you are ready to shoot in full Manual Mode.
But first, I have to reveal a secret tool that will make it super duper easy to do, guaranteed.
So if you are ready to discover that secret tool to finally ditch auto and elevate your photographic skills so you can shoot in full Manual Mode.
If you’re ready, let’s do it!
It’s time to take full creative control over your camera by learning how to shoot and Manual Mode.
It sounds like a daunting task, doesn’t it?
Where do you start?
Which camera settings should you start with first?
ISO aperture shutter speed.
Then once you figure out one camera Setting, how do you decide on the other two to get the proper Exposure?
Once you’re done with this tutorial, you’ll know exactly how to shoot in full Manual Mode to achieve your creative vision and get the proper Exposure because I will give you step-by-step instructions.
Let’s start by grabbing your camera and putting it in Manual Mode.
To do so, change your dial to the letter M, and now you’re in Manual Mode.
So here we go.
Step one, choose your ISO based on your available light.
Remember, try to use the lowest ISO number possible based on the brightness of the available light.
Step two.
Next, you must decide on your creative vision for the photo you want to create.
Do you want to freeze or blur the action?
Do you want a small or large Depth of Field? Which one of those is the most important?
Step three, if the Depth of Field is the most important element, set your aperture accordingly.
Or if freezing or blurring the action is more important, choose your shutter speed, step four.
Now it’s time to set the third camera setting based on your creative vision to get the proper Exposure. The secret tool you’ll use to help you do this is, well, it’s not really a secret.
So what is it?
Well, we discussed this tool in a previous tutorial, and it’s called a Light Meter.
So look through your viewfinder to locate it, which is displayed with multiple dashed lines, and it looks like this right here.
That’s the secret tool to help you determine if you have the correct Exposure, and depending on your camera, you might have a plus sign on the right or left.
So here’s how it works. You can expect your Exposure to be good if the marker is dead center.
Suppose the marker is on the positive side. In that case, your image will be Overexposed and Underexposed if the marker is negative.
So the goal, of course, is to have good Exposure, and you need to adjust your camera settings until the marker is in the center.
The challenge is to balance the camera settings based on your creative vision.
I recommend starting with the camera setting that will not affect what you want to achieve creatively.
For example, if a shallow Depth of Field is the most important, adjust your shutter speed until the marker aligns with the center.
But if you end up with a shutter speed that is too slow, then you can increase the ISO instead or combine both the shutter speed and ISO.
All right, now that you know how to shoot in Manual Mode, your Exposures will be perfect… EVERY… SINGLE… TIME!
Nope, not really.
Remember, in previous tutorials, we covered how your camera sees things differently than you based on 18% gray. And the different Metering Modes that alter how the light is… well, metered.
That’s why you must understand the Dynamic Range of a scene and use your Histogram to confirm the existing range of light to ensure you have a proper Exposure based on what you’re trying to photograph.
So if you skipped any tutorials, I recommend going back and watching everything to understand your camera fully, and then and only then will you be able to master your camera and Exposures.
We’ve covered all the tools necessary for achieving your desired Exposure.
But we still need to finish mastering your camera gear, and we’ll continue with part two.
Next, this will include additional modes your camera has to help you achieve your creative vision.
Are you ready to continue elevating your photography skills to master photography? Awesome.
The next step to mastering photography is discovering more tools.
Your camera has to help you achieve your creative vision. In this section, you’ll discover additional camera modes we haven’t covered yet, like focus, quality, shooting, and drive modes.
Then we’ll wrap up mastering your camera with White Balance.
In the next section, you’ll continue elevating your knowledge of camera gear with a deep dive into lenses, filters, and accessories.
If you are ready, well, let’s do it.
Focusing modes, what are they, and how do you use them? Great question. Let’s find out.
Real quick, for those of you who have just taken your camera out of the box to focus on your subject for the first time, you’re going to hold down the shutter release button halfway.
Your camera and lens will then work together to focus on your subject.
Once it’s in focus, press the shutter release button all the way down to create the photo. Okay. When it comes to focusing, that was easy.
But focusing can be challenging, and sometimes, as you’ll soon see, it’s impossible to focus.
This is why most digital cameras give you different focus options and different focusing modes.
Which focusing options, you’ll use will depend on your subject and your creative vision.
For the final image, although focusing main function is to give you a sharp image, it can also be used creatively in conjunction with your aperture.
For example, by selectively choosing a point of focus on, you can direct your viewer’s attention to that specific location by focusing just on that area or subject.
For this image, I chose to focus on the flower closest to the camera. Then with an aperture of f/1.8, I could reduce the Depth of Field.
So that flower I focused on is the only one tack sharp.
We will cover the basics of five different types of auto-focus modes. I’ll also share some tips for focusing manually.
So most digital cameras have auto-focus modes, auto flexible center, and continuous or AI servo if you’re a can user. Another one that is fast becoming my favorite is the eye-tracking mode.
Unfortunately, not all digital cameras have this focusing mode.
So let’s start by grabbing not your camera, but your camera manual, so you can follow along and discover what focus modes your camera has and how to set them up.
Before we look at each focus mode, there’s something else vital to focusing, and Dad is the focus point.
So what are the focus points? Well, I’m glad you asked. Let’s take a look.
Now, grab your camera, turn it on, and let’s look through the viewfinder. Now, there’s a lot of information being displayed in your viewfinder.
Am I right? The one thing I want you to focus on, no pun intended, or was there, is the circles or bracket-looking things covering your subject. Those are your focus points.
So depending on your settings, one or more of those points will be used for focusing.
Also, depending on your camera, you could have a few or dozens of focus points.
Growing up, I only had one focusing point on my Nikon 8008s SLR. So we’re spoiled nowadays anyway.
There are several advantages to having multiple focusing points. One is the freedom to manually choose which focus point to use or let your camera’s artificial intelligence auto-track a fast-moving subject.
More on that coming up.
As I mentioned, as you press your shutter release button down, your camera and lens work together to focus on the subject based on the focus point you choose.
Once the subject is in focus, you’ll see a focus indicator as a circle.
Now, most digital cameras will have a built-in safety that will stop you from taking the photo until the focus indicator appears.
So the focus indicator, in most cases, appears as a circle.
So if you can’t take the photo, the camera tells you the subject is not focused.
This could be due to the subject moving too much, or your camera is having difficulty focusing due to the lighting or based on the subject itself.
In that case, if you can’t get in and focus, you’ll have to manually focus on the subject and learn how to do that in just a minute.
All right, let’s quickly review five common auto-focus modes.
The first option is a full auto-focus mode, where your camera will determine what part of the image to focus on.
So let’s say you have a dozen focus points turned on.
Your camera will review your scene and try to locate the main subject.
And when it’s found, it will auto-focus your camera on that subject.
But, like most auto features in your camera, it will sometimes give you the results you are hoping for.
One option to take control over your focus point of choice is to use the flexible focus mode.
This mode is sometimes referred to as multi-point focus mode.
The benefit of this focusing mode is that it allows you to choose a specific focus point within your viewfinder based on your subject’s location.
However, manually setting your focus point can take time and effort.
If your subject is moving, another focusing mode you’ll probably have on your camera is sometimes referred to as a center focusing mode, which I use 90% of the time.
So the focus point used in this mode is the one that is dead center in your viewfinder.
Now, although your subject may not always be in the center, once you are focused on your subject, make sure to keep your shutter release button pressed halfway, and then you can move your camera to recompose the frame based on what you want to capture as far as the composition.
Now, if you find your subject is constantly moving or fast in general, like your kids or wildlife, you’ll want to consider continuous or AI Servo.
This focusing mode has artificial intelligence built in and will be able to find and track your subject, making it easier for you to create the image you desire.
When using this mode, you’ll need to keep your shutter release button pressed halfway down for the focusing mode to continue tracking and focusing on your subject.
Once you capture the image, this focusing mode will stop tracking, and you’ll have to press it down halfway again to start the tracking function.
Now let’s check out how the eye-tracking focusing mode works.
Also, depending on your camera, you may have a different eye-tracking mode for people versus pets. So you’ll have to check out your handy dandy manual to find out what modes are available in your camera.
All right, so if you have this mode, the focus point will locate the eye closest to your camera, and we’ll focus on that eye, which is awesome if you ask me.
Since the eyes are the windows to the soul and the part of your subject that should be “tack sharp.”
The last focus mode I want to share with you is Manual Mode.
Now, why would you want to manually focus your camera?
That’s a great question. Sometimes depending on the lighting and or the subject, your camera may not be able to focus on your subject automatically.
This can occur due to low-contrast lighting or when your camera can’t determine an edge.
Let’s say you photograph a flat surface or the lighting is flat.
Either way, your camera will have difficulty finding any texture to focus on.
For example, I captured this image during a foggy morning.
The light was flat, and the camera couldn’t pick up any textures or an edge to focus on.
In this case, I had to focus manually.
For this image, I also had to use Manual Mode, which is why the camera wouldn’t focus exactly where I wanted it, which were the eyes.
It kept bouncing between the blades of grass and other elements.
So I had to switch to manual focus, which is pretty easy.
You’ll see something like this on your camera: AF is for Autofocus, and M is for Manual.
So switch to manual, and then depending on your lens, you may need to switch that to manual as well.
Now to focus in Manual Mode, you’re going to turn the focus ring on your lens, and this time you don’t have to press the shutter release button down halfway since you’re focusing manually.
As mentioned, look for that focus indicator, so you know the subject is in focus, and then take the photo.
All right, so your camera has several drive modes that power your camera to take one photo at a time or multiple photos at a time.
So we’re now going to look at three main drive modes and two alternative ways to capture a single image.
Our first drive mode is known as single drive mode, and it’s pretty simple.
In this mode, you can take one photo at a time.
When you press the shutter release button, if you want to take another photo, you’ll press that button again.
So this mode can be set with your dial to “S,” depending on your camera. It can be located in one of several different places.
So a good time to check out that camera manual again.
Okay, so the continuous drive mode, on the other hand, can be pretty amazing if you are shooting fast action like sports, wildlife, or any other type of fast action where you don’t want to miss the shot.
The way it works is when you press the shutter release button, your camera will continue to take photos as long as the button is pressed down.
Since not all cameras are created the same, some can take more photos than others.
It also depends on the speed of your media card.
So if you look at your media card on the front, you’ll see its speed. The higher the number, the faster your images can be written to the media card.
So if you plan on shooting in continuous mode, you may want to get the fastest card available for your budget. The number of images could be a few per second or a dozen or more at a time.
Again, it all depends on your camera. Another thing your camera might offer is the ability to choose how many photos are in this mode.
For example, my Nikon D 500 has a continuous low and a continuous high mode, labeled CL and CH. In the low mode, it will take fewer photos per second versus the high mode.
So more flexibility based on what you need.
We also have a self-timer mode, which is considered another drive mode. You’ll use this when you want a selfie or a photo of yourself with someone else.
Someone should be around to take the photo to access the self-timer. You’ll need to dig into your camera’s menu to find it and set it up for your camera.
I have different time intervals to choose from, or I can set the exact time needed.
Plus, I can choose to shoot more than one photo after the allotted time is up.
For example, I could do 10 photos every 10 seconds or every five seconds depending on how I want to set it up.
All right. Another option for capturing an image is to use a remote release button.
So this remote release trigger I picked up around 20 years ago or last century is hardwired directly to my camera. But in the 21st century, some cameras use a wireless remote control.
Either way, in this drive mode, you can remotely trigger the camera to capture your image.
Okay, so our final drive mode is known as mirror lockup, and this drive mode is a little unknown.
Since it’s only sometimes found easily, you may find it tucked away somewhere else within your menu system.
So check your manual to see if you have it and where to set it up.
So this mode is essential for long Exposure photography or when you don’t have a tripod, and you’re using a long Exposure. In this mode, it will help alleviate the camera shake.
It does this by waiting for the mirror to move up and lock into position before it takes your photo.
And this helps eliminate some camera shake because the mirror when it moves up, will tend to vibrate as it moves up and out of the way of your shutter.
All right, we’ve gone over all the different drive modes.
Next up is another Exposure tool to help you get your desired Exposure.
This will make it easier to get the Exposure you want if you need help with all the tools we’ve covered so far.
So if you’re ready for that, let’s do it.
All right, in this tutorial, we will explore an option to help you achieve your desired Exposure. In the previous section, I gave you a lot of tools to nail your Exposure.
However, it was a lot of information, and you have yet to grasp everything presented.
This is why I want to share a tool your camera might have known as auto Exposure, bracketing, or AEB.
So let’s check it out.
Suppose you’re in a complex lighting situation, like the light changing quickly, or you need to decide which camera settings to use well with AEB. In that case, you can quickly take three or more photos depending on your camera with multiple Exposures.
So the first Exposure could be Underexposed, the second could be the ideal Exposure based on your camera’s Light Meter, and the third would be Overexposed.
This is also a great way to capture detail from a scene with a large Dynamic Range, and your camera can only capture 10 stops of light when you need 14 or more.
You can then merge those three photos to include all the details in the Shadows and Highlights, also known as HDR or High Dynamic Range Photography.
The question is, how many stops does your camera offer? Again, you’ll have to check out your camera manual to learn how to set it up, including the different variations or number of stops you can use.
For example, you can alter the Exposure brackets by one or two stops each. So if you have two stops available, your first and third images would be two stops over and under-exposed.
Now, suppose you’re shooting in continuous drive mode to take multiple photos simultaneously and want to shoot with the auto Exposure bracketing mode. In that case, you can do that with most cameras.
So as you press your shutter release button all the way down and continue to hold it, your camera will take three photos at different Exposures.
We’ll continue to create three more photos until your media card can’t keep up, or if you’ve reached your camera’s capabilities to shoot multiple photos at one time.
All right, next up is quality modes. So if you are ready, let’s check out the options to help you achieve your creative vision with quality modes.
Quality modes refer to the file format you choose for your photos.
And previously, I mentioned how I recommend shooting in RAW, and that’s what I also shoot in. Depending on your camera, you may have another option, TIFF files.
I think TIFF files are overrated, and I’ve never used them myself, so I’ll leave that up to you to decide if you want to use them.
So one of the drawbacks to using RAW files is they are much larger than JPEG files.
The price of media cards and hard drives are at a point where prices are very reasonable compared to where they were two decades ago.
So for me, the storage price isn’t a problem, and I have no issues with the larger RAW files, and your situation might be different.
I’d like to give you more information on the differences between RAW and JPEG files so you can decide which file format is best for you.
So previously, you learned how your camera works, and you may remember how I said your camera edits your files before it saves them to your media cards.
So let’s check out this graphic that shows you the steps of your photo being processed in the camera, and we’re going to go over JPG files first.
So you set your camera to JPEG quality mode and take a photo before it’s saved to your media card.
Your camera processes the information it receives from your sensor and other camera settings you chose, like the White Balance, which you will learn about soon.
You can also choose the color space, the bit depth, and more.
So your camera takes that information along with the Exposure data, like the brightness levels of the captured light, and it sends it to your camera’s processor.
So the processor reviews all that information, and to save it as a JPG file, it has to compress that data. In other words, your camera’s saying to you, sorry, the detail in the clouds, you don’t need those.
So I’m going to discard that information or that detail because I can’t fit it into the JPEG file, or I can’t fit that detail in the Shadows into your JPEG file.
So I can’t save that information either.
So you end up with an image that needs to be brighter with less detail than was visible to your eye at the time of capture.
Since you already took the photo, you can’t recover any missing detail when you edit that image. That detail was thrown out when you created the photo and saved it as a JPEG file, which means you have a lower-quality image.
Let’s compare that to how your RAW files are processed this time.
Instead of throwing out that information, all of the data collected is bypassed by your processor since the RAW file isn’t being compressed.
In other words, all the data or the detail in your scene collected by your sensor is saved in the RAW file.
This means even if you open the RAW file in your favorite editing software and notice it’s too bright, chances are good.
You can recover some of that missing detail since it was recorded and saved at capture time.
You just need to know the secrets of reading your Histogram to know that detail is actually there.
If you completed the last section, you should be practicing what you’ve learned to master reading your Histogram, or maybe you have already mastered your Histogram, hopefully.
All right, so next up is an often forgotten camera setting that can make drastic changes to your image based on how you set up this next camera setting.
In photography, White Balance is one of the most overlooked camera settings, and this is a mistake, in my opinion, because the White Balance is another means of expressing yourself creatively and for storytelling.
So at this time, you will discover what the White Balance is, and later in the course, you’ll take a deeper dive into the White Balance since it relates to the color of light.
So what is White Balance?
Well, White Balance in photography is about altering the light source’s color to match the white color you see in person.
So it’s rendered pure white.
Otherwise, the Whites or grays, like the Highlights and Shadows, will have a color cast.
This color cast can be detrimental to your image or be pleasing to the eye and even artistic.
For example, if the Whites in your scene appear yellow or blue, they will be pure white after choosing the correct White Balance in the camera.
Now, although you can do this in post-processing and change the White Balance, it doesn’t always give you the desired result, especially for those that prefer shooting in jpeg.
So choosing your colors or picking the White Balance is part of the equation for creating exceptional photos. The others include light and composition.
All right, there are a few different ways to choose the White Balance in your camera, and we’re going to go over the easiest ways for now.
Later in the course, I’ll share some pro tips for dialing in the exact White Balance for your creative vision, depending on your camera.
You will find a dial that lists some common White Balance options. It should be available via a screen on top or within your system’s main menu if it’s not on a dial.
Either way, you’ll notice several icons that represent the lighting situation you find yourself in.
These White Balance options are known as pre-made White Balance settings.
These settings were created by your camera manufacturer, and they have determined the color of light based on those situations.
Some common White Balance settings are sunlight, cloudy flash, fluorescent shade, and more.
So when you’re outside shooting on a sunny day, you’ll switch the White Balance to sunlight, and your image will be properly balanced based on the pre-made setting.
Now, suppose you’re not happy with the color balance. In that case, you can manually set the color with an option known as the Kelvin temperature, or you can spend more time editing your photo by dealing with it in post-production.
If you want full creative control over your White Balance, check out the White Balance deep dive section.
All right, so that’s it for mastering your camera.
We’re still exploring camera gear, though, since we need to explore lenses, and we’ll do that in the next section.
Lenses Introduction
All right, it’s time to explore another vital element of the first key in creating amazing images, and that is to discover all that lenses have to offer for capturing your creative vision because, without a lens, you wouldn’t be able to harness the light of your scene to capture your photo.
All lenses have one basic feature: funnel light through the lens into your camera’s sensor.
There are many options for choosing a lens, and we can place them into two main categories: prime and zoom lenses.
Within those two categories, various lenses can be further refined into four different topics, three of which are defined based on their field of view. Those are wide-angle telephoto and standard lenses.
The fourth topic is all other types of lenses that can be referred to as specialty lenses. If you are ready to elevate your knowledge of lenses, let’s do it.
All right, prime lenses and zoom lenses. What are they?
Well, a prime lens consists of one fixed focal length, and a zoom lens, on the other hand, allows you to choose from multiple focal lengths.
So zoom lenses sound awesome since you have multiple focal lengths in one lens, making you wonder why you’d want a prime lens.
Am I right? Well, there are some advantages and disadvantages for both.
So let’s review those.
So I have my favorite prime lenses here: the 50 and 85mm. There are several reasons why I love these prime lenses versus the same focal length in a zoom lens, and we’ll cover those in a second.
But first, what do you notice about this 28 70 with this 50-millimeter lens available within the zoom? Well, the prime lens is smaller, and it’s lighter.
But you’re saying I have more focal lengths with this versus this, and you’re correct.
So with the zoom lens, I have dozens of lenses versus one with the 50, yet I prefer this versus this, and here’s why.
So prime lenses are much more affordable than zooms. These prime lenses were, I paid around $200 for the 50, and I think, $800 for the 85.
Now, for the zoom lenses, I paid around $2,000 each, so $4,000 for these two lenses versus 1000 for these two.
Regarding quality or the sharpness of your image, a prime lens will yield a sharper image overall.
Prime lenses will give you a better-quality image compared to a zoom lens. One of the main benefits of a prime lens is that they typically come with very large apertures, which gives you a couple of advantages.
A larger aperture will allow you to collect more light and shoot in low-light situations.
The other advantage of a larger aperture is the ability to blur out your image, which will help your subject pop much more than a smaller aperture, which you learned about earlier in this course.
Now, one of the most significant disadvantages to a prime lens is if you want to change an image’s perspective, crop it tighter, or get more or less of the scene.
In that case, you need to move closer or farther away physically from your subject to change how much of the scene you capture.
When it comes to a zoom lens, the most significant advantage is having those multiple lenses or focal lengths built in, allowing you to zoom in versus moving closer to your subject or zooming out.
Now, when it comes to the aperture for zoom lenses, you’ll find that some lenses will not be able to use the largest aperture throughout the different focal lengths.
For example, this kit lens I bought in 1989 has a focal range of 35 to 70, and the maximum aperture is 3.3 to 4.5.
So what that’s telling us is I can only use F 3.3 at the shortest focal length of 35.
If I want to use the longest focal length of 70, then the largest aperture size I can use is 4.5. So when you’re looking at zoom lenses, that’s one thing you’ll have to keep in mind.
If you want to avoid that limitation, the lens without that restriction will be more expensive.
Another thing about apertures for both primes and zooms is the larger the aperture, the more expensive the lens will be.
For example, this 50mm lens is a 1.8 lens, costing around $200. But a 50mm, f/1.4 lens is $450.
So more than doubles for a one-stop larger aperture.
Let’s dive deeply into focal lengths since they’re an important part of your lenses.
So the focal length of your lens is more than just the length.
The focal length determines the angle of view the lens will capture, and we have three main types of lenses based on their field of view.
Those are wide-angle, standard, and telephoto lenses. Each will increase or decrease the amount of the scene viewed depending on the type.
So let’s go over each of those. Let’s start off with a standard type of lens.
So a standard lens is considered normal, and “normal” refers to what your eyes see, or at least the field of view you see. So a normal or standard lens is around 50mm.
But depending on your camera’s sensor size, the actual focal length could be more or less than 50 millimeters. We’ll talk more about that later in the course.
Now, a 50mm lens is the perfect lens for all levels of photographers, and I highly recommend having one.
Now, a lens with a larger field of view is known as a wide-angle lens, so the amount of the scene you can capture is much greater than a standard lens.
So this type of lens is essential for landscape and even wedding photographers.
So the lens is considered wide-angled when the focal length is around 12 to 24 millimeters and possibly 28.
Now, another type of wide-angle lens is known as super wide angle. These lenses have a focal length of around eight to 12 millimeters.
Now, regarding very long lenses, like my 70 to 200, these are known as telephoto lenses.
They’re like mini telescopes that allow you to capture far-away subjects, resulting in a shallow field of view.
So focal lengths of around 100 to 300 millimeters are considered telephoto lenses.
But if you have, let’s say a 500 or 1000mm lens, they’re referred to as super telephoto lenses, and they’re very expensive.
Suppose you need one of these super telephoto lenses and more money to shell out 10 or $12,000 for one. In that case, you can convert a smaller telephoto lens into a super telephoto with a teleconverter.
So a teleconverter can double the focal length of your lens for a few hundred dollars.
But there are some serious drawbacks to teleconverters, and we’ll cover Teleconverters in depth in the accessories section of this course.
All right, we’re now going to wrap up the last of the four lens topics, specialty lenses, and you’ll discover four popular types coming up next.
All right, we will now cover the four most popular types of specialty lenses.
This means there’s more than just these four; we may cover those in a future tutorial.
So the first type of specialty lens is called a macro lens, which is used for macro photography.
So macro photography is the art of photographing a subject at a one-to-one magnification. In other words, the subject is life-sized in the photo.
But most people use the term macro photography to refer to any photo that is a close-up of teeny tiny subjects or details of a subject.
For example, this image of a millipede was captured with my macro lens. I often used a macro to capture wedding rings as a wedding photographer. I’ve even used it for other subjects as well.
So later in this course, you’ll discover more about macro photography. But first, let’s go over some additional details about macro lenses.
All right, a macro lens allows you to get really, really close to your subjects, which lets you photograph teeny tiny subjects like bugs, the inside of flowers, and anything else that is small.
If you’re wondering, this macro lens is also considered a that’s right, a prime lens since the focal length is fixed at 60 millimeters.
But it’s more of a specialty lens due to its ability to allow you to get really, really close to your subjects, and it’s like a magnifier, and here’s how that’s possible.
All right, so with a prime or even a zoom lens, the minimum focusing distance is much longer than a macro lens.
So my 50mm lens has a minimum focusing distance of around 18 inches, and my 85mm is around 30 inches. My 60mm macro lens has a minimum focusing distance of seven inches.
So again, getting close to your subject allows you to capture smaller subjects.
So macro lenses, like prime lenses, come in different focal lengths, and you can get them from around 15 to 200 millimeters.
Now one thing to remember when using a macro lens versus a prime lens is that the Depth of Field is much shallower in a macro compared to a prime lens for this image.
I used an aperture of f/10, and you would expect everything to be in focus. It would’ve been if I used a non-macro lens.
However, I needed more time to get this perspective since I would’ve been at least a foot further away from the subject.
A delta type of specialty lens is a fish eye lens.
So this type of lens has a very wide angle of view, and they come in focal lengths of around 8 to 17 millimeters.
One of the unique characteristics of fisheye lenses is the front element or the glass on the lens; as you can see, the glass is round. It pops out like an eye, where the lens gets its name.
Another thing you’ll notice with super wide fisheye lenses like an 8mm lens is that the image you take is encompassed in a circle like this photo.
Another characteristic of taking photos with a fish eye lens is that they distort vertical and horizontal lines. The shorter the focal length, the more distortion you see in your photo.
For example, in these images, you can see that the vertical and horizontal lines are distorted.
Now, the thing that I love about fish eye lenses is they cover a great angle of view and can provide another creative option for your photos.
But then again, you do get that distortion, and that’s why this is a specialty lens because the use of it is limited based on what you’re trying to achieve or your creative vision. So a tilt-shift lens is another specialty lens.
But this one has a more practical use versus the fisheye lens and a creative aspect.
So what is a tilt-shift lens? Well, I thought you would never ask.
All right, so a tilt-shift lens allows you to change the P plane of focus, which is beneficial for architectural photography.
But you are not interested in architecture photography, you say, no worries.
I’ll show you how to use this lens creatively in a moment. First, let me show you how it works.
All right, here’s a tilt-shift lens, and the bottom looks quite different compared to all the other lenses we’ve explored.
The main physical characteristics that are separated from other lenses are the knobs, the way it’s curved at the bottom there, and those dashed lines.
So when you tilt the lens on its axis, it looks broken.
So it’s like a miter saw or a table saw where you’re going to change the angle of the blade if needed.
So you’re basically doing the same thing, except instead of a blade, you’re changing the angle of the lens.
This causes the perspective of your scene to change in relation to the focus plane of the lens based on the angle you choose.
Let’s look at some images to see the benefits and creative ways you can use a tilt-shift lens.
All right, we have a photo here on the left that was taken with a non-tilt-shift lens, and on the right, you can see the same building that was shot with a tilt-shift lens this time, take a closer look at both images. What do you see?
So the building captured with the tilt-shift lens is no longer leaning or tilting.
The tilt-shift lens is an awesome lens for architecture because it allows you to easily change the perspective within the camera versus trying to fix it in Photoshop or Lightroom.
So if you desire to become an architectural photographer, then a tilt-shift lens would be the tool of choice for that field.
But let’s say you have no desire to take photos of buildings; no worries.
Check out some of these images that were shot with a tilt-shift lens, and what do you notice?
Well, the Depth of Field seems to be very shallow. However, the Depth of Field was controlled more by the lens’s tilt versus the aperture by itself.
One last thing you should know about tilt-shift lenses is the focal lengths available. Most small or wide angles of view of around 24 to 45 millimeters. You can even get a tilt-shift macro lens with a focal length of around 50 millimeters and larger.
Keep in mind, though, that a wider tilt-shift lens is ideal for architecture, especially when you’re shooting buildings that are close together since you’ll be limited on how far back you can go to get the entire building in your frame. In those cases, a wider lens works best.
Our next specialty lens has a funny name, and it’s called a Lens Baby, and they came out around 15 years ago, and at that time, I picked one up for myself.
So since then, Lens Babies have multiplied, and there are many more options compared to the original to discover the different Lens Baby options, go to Lens Baby.com.
All right, so the real question is, what is a Lens Baby, and what can you do with it?
Well, like I mentioned, here’s my original Lens Baby, and you can see that it looks nothing like any lens we’ve covered so far.
So there’s no focusing ring, no way to control the aperture since it doesn’t have one, consists of only two glass elements, the front and back, and the body is not round like a normal lens and looks more like an accordion.
But don’t let this funny-looking lens fool you. It’s actually quite addicting to see the creative results of using this specialty lens.
If you navigate to their website, you’ll find a gallery of images taken with their specialty lenses.
This will give you a great idea of the creative options when using one of these baby specialty lenses.
Now, the interesting thing about this lens is using it is completely different from what you’re used to with your prime lenses or even zoom lenses.
As I mentioned, there needs to be a way to focus with this lens.
You basically point at your subject, and it will technically focus automatically.
But don’t expect your subject to be “tack sharp,” at least with the original Lens Baby.
Then to control the Depth of Field, you have to press the outside of the lens towards your camera in a way.
This is like the tilt-shift lens since you’re changing the focal plane, which creates a shallower Depth of Field.
But you have control over it by changing the angle of the lens.
So if you want a shallower Depth of Field at the bottom of your image, you will press and hold the top of the lens like this.
Now that we’ve covered the categories and types of lenses let’s dig a little deeper and look at the different parts that make up your lens.
All right, one of the most important elements of a lens that can affect the quality of your final image is the glass inside and outside of your lens.
So the glass has a coating applied to the surface, designed to reduce light Reflections and increase light transmission. They’re also designed to minimize unwanted optical degradation like moray patterns.
So the quality of your image is a direct result of the quality of your lens.
Investing in a higher quality lens will give you better images versus buying another new camera.
For example, have you ever heard of a BL camera?
If not, it’s a high-end film camera developed in the mid 18 hundreds. There have been other film cameras with the same film format or size over the last 150 years.
But a Hasselblad is the cream of the crop, the Lamborghini, or the Ferrari of film cameras, not because of the camera body.
But because of the quality of the lens and the results were stunning versus what I could afford at the time, which was a Mamiya RB67.
Long story short, invest in your glass or lenses, and you will thank me later.
All right, so more glass directs the light inside your lens.
Plus, as you learned before, there’s a hole inside your lens that can control how much light passes through, and it can also affect the Depth of Field, known as the aperture.
Since I’m not willing to take my lens apart to show you what this aperture looks like, let’s check out this image here.
So this mechanism is known as the diaphragm, consisting of multiple blades. When you adjust your aperture, the blades contract or expand to create the size of your hole.
Now let’s look at some other parts of your lens outside.
One is the focus ring, and you’ll turn this manually to focus if you need to, which we discussed previously.
Then, if you’re using a zoom lens, you’ll have this ring here that you can use to change the lens’s focal length, and it should include some numbers here that represent the focal length.
So it will show only some of the focal lengths since there are over 100 options for this lens alone, and instead, it will reveal several focal lengths as a guide.
Now for your prime lenses, this 85 millimeters is in 85, and I know that because on the outside, it’s showing the focal length right here, and as you can see, it says 85 millimeters.
All right, we will now cover name-brand lenses versus third-party lenses next.
All right, so when it comes to buying lenses, you have two main choices for the lens manufacturer.
You can purchase from brand names like Nikon, Canon, Sony, or whatever camera manufacturer you have, or from third-party manufacturers like Tamron Sigma and Tekina, to name a few.
So, do you go with the name brand or off-brand? Well, it all comes down to your quality expectations and your budget.
Brand-name lenses will be of higher quality, more dependable, and guaranteed compatibility.
Lenses from Sigma Tamron and others are going to be more affordable.
But the lens’s sharpness may not be as good as the name-brand equivalent.
As for compatibility, third-party lens creators make lenses for the most popular cameras like Nikon, Canon, and Sony.
Now, another advantage of third-party lenses is that you may find focal lengths unavailable from brand names.
For instance, Sigma has an 18 to 35 zoom lens with a large aperture of 1.8. The cool thing about this lens is that you can use the 1.8 Aperture throughout the Zoom ranges regardless of your zoom range.
As of this recording, that option or that lens choice is unavailable from some brand names like Nikon.
So when buying lenses, you’ll have to do more research to determine which options are best for you.
Covering all the different aspects of lens characteristics is way beyond the scope of this photography class.
But when buying a lens, you have another option, used or new plus. If you’re buying used, do you get a modern or retro lens?
Let’s explore your possibilities, and then you can decide whether or not used is good enough for you.
All right. So the main benefit to buying used is the money you’ll save versus new.
But there’s more to consider when buying used versus new, and that is the age of the used lens.
So older or retro lenses like this lens that I picked up 30 years ago may not have features that have yet to be available in the modern equivalent. This can cause issues with aperture selection and or auto-focusing.
So if we look at this lens, you’ll notice it has an extra number with some numbers on it. So these are the aperture values for this lens.
Unlike its modern equivalent, the apertures are fixed to these numbers. In contrast, the contemporary lens can have more aperture values in between.
Another difference between retro and new is the quality of the image. In general, a newer used lens will provide better quality.
If you can live with some of these disadvantages or the compatibility with features of your camera, an older used lens will typically be less expensive versus a newer, modern used lens.
So this 85mm lens that I picked up last century can be bought today for around $200, and its used modern lens cousin can be found for about $500.
All right, you are now ready to begin exploring and discovering how to harness and master light, which is the second key to creating amazing images.
If you are ready for that, let’s do it.
What is the true meaning of photography?
Well, get ready to have your mind blown with the following fact. The word photography was created from Greek roots.
So “photos” means light, and “graphe” means dRAWing together. So they mean dRAWing with light or, as I’d like to say, painting with light. How cool is that?
Photography is an art form whereby you use light to draw with or paint.
So without light, you cannot capture the scene and won’t be able to create a photograph, and it’s easy to demonstrate.
So grab your camera and your lens cap and put it on.
Now, try and take a photo. Well, you didn’t capture an image, did you? I know, obvious.
But this demonstrates that light is the number one ingredient for creating photos.
Once you fully understand what light is, its qualities, and its characteristics, you can use that knowledge to shape your subjects based on your creative vision.
But I have some bad news.
This is not something you can master overnight or even weeks, months, and possibly years. It’s going to take time and practice.
But when you get to the point where you can control and see the light like never before, you will elevate your level of photography skills.
Well beyond 95% of photographers in the world, if nothing else, this section should be the one that you continue to study and come back to over and over again and do so as long as you need until you can achieve the status of light master.
I recommend saving this photography class to watch again in the near future.
Every lesson in this section is essential to understanding how to become a light master. Each lesson is in a specific order to help you understand light and builds on the next lesson.
So make sure you complete everything. In the premium class, I’ve included free PDF files with additional information about each section to help you continue elevating your light mastery.
Next up is discovering where light comes from.
So if you are ready to start, let’s do it.
All right, we’re now going to take a quick look at some places where light comes from.
We won’t go over every possibility. Otherwise, we would be here all day.
So let’s take a quick look at some of the more common light sources, and then we’ll go from there.
So light can come from two primary places. It can either be natural light or it can be artificial light.
So some natural light we can use to paint with is the sun and even stars.
As for artificial sources of light, we have a lot more options.
So artificial light sources could include speed, lights, strobes, and ambient light, like lamps or fluorescent lights.
Each of those different types of light provides other characteristics as far as intensity, quality, and even the color of light, all of which should be observed before creating your image.
Then, with the knowledge you will gain throughout this section, you will be able to paint with that light based on your creative vision.
Now that we know where light comes from, let’s look at what light is in the next lesson.
Light, what is it? Yes, that’s an obvious question.
But what is it truly?
Hmm. Well, I have to warn you. We’re going to get technical. But don’t worry.
I’ll keep it short, and rest assured, this will help you better understand the characteristics of light. With this knowledge, you can control those characteristics and learn more about them in an upcoming tutorial.
So here we go. Light is part of the electromagnetic spectrum, which ranges from radio waves to gamma rays.
Electromagnetic radiation waves, as the name suggests, are fluctuations of electric and magnetic fields which can transport energy from one location to another. Wow.
All right, that’s some pretty deep stuff right there, wouldn’t you agree?
What exactly does this mean regarding how you can use light for photography?
Light is basically a range of those electromagnetic spectrums that are visible to the human eye. As you learned in previous tutorials, your camera is very similar to your eyes.
Therefore, those range of spectrums is also visible to your camera, which will make a lot more sense as you go throughout the rest of this section.
Now, based on your eyes, there are other ranges you can’t see.
Those light spectrums would be X-rays, ultraviolet rays, radio waves, and others.
All right. Now that you know the technical term of light, let’s take it a bit further to better understand what light is all about.
Okay, you now know that what you can see is based on an electromagnetic spectrum range, and within that range, you can only see a certain amount of that light.
So within that visible light spectrum, there are different wavelengths of light, and based on those different wavelengths, your eyes will transform them into different colors.
Then within those wavelengths, you have different lengths of light, the shortest of which is violet and the longest is red.
Then in between those two colors are the following colors light, orange, yellow, green, blue, and indigo.
Now, when all those colors are combined, we end up with white light like from our sun.
Then when that white light goes through a prism, the different wavelengths bend in different amounts, and different colors appear.
You will then see the full spectrum of colors from longest to shortest, and this range of colors can be seen in nature when you look at a rainbow.
Before we dive deeper into Lightroom itself, I have a question.
What if your eyes were a high-end camera sensor? What would your specs be? Let’s find out.
In previous tutorials, we covered how your eyes are similar to how your camera sees the world.
I’d like to delve into this more to refresh your memory and as a reminder to see the light before you capture it and compare it to what your Histogram is telling you about the light you captured.
So the basic fundamentals of how your eyes and your camera see the light are very similar, and there are some differences. So let’s take a look at both.
All right, so check this out.
Your camera and your eyes are basically made up of the same parts.
To paint with light, you need a lens to allow the light into your camera with the lens on your camera.
The light is filtered through an aperture into the sensor when the shutter opens, which is recorded to your media card or film if you’re shooting old school.
And then your eyes also have a lens, and the light is filtered to the back of your eyes into the retina and then transmitted to your brain, where it’s stored as a memory.
So those are the basic similarities, and let’s look at the differences.
In previous tutorials, you discovered that your camera cannot record exactly what you see. It comes down to the technical limitations of your camera’s technology versus your eyes.
And your eyes are much more complex and can decipher larger ranges of Highlights and Shadow details versus your camera.
And there are differences between one camera manufacturer’s sensor versus another or even within the same lineup based on the specifications of that specific sensor.
In other words, less expensive cameras will have a much more difficult time capturing all the data within the scene versus a higher-end camera.
But even the most expensive cameras still cannot compete with your eyes.
So here’s what happens when viewing a scene with your eyes.
As you look throughout the scene, your eyes can adjust to different brightness levels within that scene.
Then depending on the brightness, the pupils in your eyes, similar to apertures, will begin to get larger or smaller to let in different brightness levels of light.
Then as that light travels from your eyes to your brain, it will begin to decipher all the collected data.
So the data is the details and the Highlights, Mid-Tones, and Shadows.
As we discussed before, your eyes can have 20 stops of light or more, depending on who you ask.
Now, if you compare that to what your camera sees and records, it’s much different.
So when the light is recorded by your camera’s sensor, it’s not deciphering the data or the details that only collect that information.
So the problem is when you have a scene with an extensive range of brightness levels from dark to light, your sensor will only be able to record some of the detail in those different brightness levels.
This is due to your camera only being capable of seeing or recording seven to 14 stops of light.
So your eyes are the top-of-the-line sensors, and your digital camera sensors are from the dark ages.
Although there is some hope with technology advancing at the rate it is, digital cameras may one day exceed what your eyes can see.
So imagine the photographs you’ll be able to capture when that day arrives. Hopefully, it’s pretty close out into the future.
In 2002, I picked up my first digital camera, the Fuji S2. It can only capture seven stops of light.
Fast forward 18 years, and my Nikon Z6 can have 14 stops. Double in less than two decades.
I’ll see or at least be able to capture more than 20 stops in my lifetime.
Until then, make sure to see the different brightness levels of light within a scene and read your Histogram to ensure you’re getting your desired Exposure or the details you need to fulfill your creative vision.
Next up, how to see color.
Why do certain objects have a specific color?
Well, when light hits an object, that object will absorb some wavelengths and simultaneously reflect others.
So to actually see an object, you can only see it when the light is reflected from the object into your eyes. At the same time, the colors you see on the object are from the wavelengths reflected back to your eyes.
For example, here we have a photo of an orange lizard, and it’s absorbing most wavelengths.
But what it’s doing is reflecting back the orange wavelength, and that’s the color you see.
Now, take a closer look at the lizard, and you’ll notice it’s not pure orange. That’s pretty obvious.
But what is that telling us?
Well, although most of the color being reflected back is orange, some mixtures of other wavelengths are reflected back as well, just less intensely than orange, which gives us the different color variations we see.
Next up, discover the three behaviors of light.
When it comes to light, we can categorize it into three types of behaviors. It also has four unique characteristics.
Now, we’ve already talked about some of these behaviors previously.
But we didn’t define them as we will now. So let’s first review the behaviors and cover the characteristics in the following tutorial.
Now, you may be wondering why you would want to know the behaviors of light and how does that actually help you with your photography?
When you learn how to predict light’s behavior, that is essentially the first step towards understanding how to control it.
Remember, everything you’ve learned about light so far builds on the next lesson, and each, in turn, will help you better understand and master light.
So the three types of behaviors are Reflection, absorption, and transmission.
So a Reflection occurs when the light reflects off of a surface. As you learned previously, as light hits the surface, it bounces off of it.
Then the different colored wavelengths that are reflected give the object its color.
The Reflection of light can actually happen in a couple of different ways depending on the surface of that object as well as the texture of the surface.
So we can define these types of Reflections into two categories, Specular, and Diffused Reflections.
So Specular Reflections occur on smooth surfaces like a mirror metal or water, especially when that water is calm.
When light hits a mirror, it bounces off 99.9% of the light, which is why you can see yourself in a mirror.
Other mirror-like surfaces, like the rim of a car or the side of it, will not reflect as much light as a mirror that depends on the surface. If it’s shiny or dull, it will reflect the object more or less, depending on the texture of that surface.
But on some level, all objects reflect light, which is why we can. That’s right, see them.
Let’s take a deep dive into Specular Reflection with a bit-of-a-scientific explanation.
Regarding Reflections, there’s a term called the law of Reflection, which means you can predict what angle the light will bounce back at.
Based on this law of Reflection, when light hits your mirror or another smooth surface like metal or water, it’s not just reflecting the light. It’s actually following a very simple law as follows.
The light will bounce off the surface at the same angle it hit.
So what is Diffused Reflections?
Well, a Diffused Reflection occurs when light strikes an irregular surface or something with a texture. You end up with a Diffused Reflection.
When light hits a textured surface, the light will be scattered in all different directions instead of at the same angle, like with a Specular Reflection. In most cases, objects that do not have a Specular Reflection are then considered Diffused Reflections.
Although most objects have a combination of both a smooth and textured surface, and we can definitely see that in this photo of my daughter, the majority of this image is Diffused Reflections.
But her jewelry would be considered a, that’s right, a Specular Reflection. Not only that. But if you take a closer look at her eyes, they, too, are Specular since her surroundings are reflected in them.
So the type of surface and the amount of texture will determine if it’s Specular or Diffused Reflections.
So here’s a quick pro tip for those who shoot portraits and pets.
The biggest mistakes I see from portrait photographers are eyes that are very dark or almost pure Black eyes.
If you let your portraits properly, the eyes should have a Reflection of the surroundings or at least a catch light. You should be able to decipher between the pupil and the iris since one has color and the other is Black.
The second behavior of light is being absorbed by the object or the surface.
Every object absorbs some wavelengths of light and reflects others.
Anything being reflected, as you know, is the color you see. But when it comes to the light being absorbed, it can alter elements regarding how bright or dark it is.
The available light is evenly spread throughout the scene for this image, yet there’s a large Tonal Range of light values.
The water reflects more light than the rock formations, and the rocks absorb more light, making them darker.
All right, the third behavior of light is the Transmission of Light.
So transmission is when light hits an object’s surface and then passes through it.
For example, when light passes through a window, that is transmission in action.
There’s also another type of transmission called Diffused transmission, which is similar to Diffused Reflections in that the light will be scattered.
But the difference is the light doesn’t scatter until it passes through a surface, and this image Diffused transmission occurs when the sunlight travels through the clouds.
Another thing that can happen with the light transmission is when it passes through an object filled with a color. It will then pass on or transmit that color onto another object; in this image, we have a large canvas tent covering our main subjects.
But it’s not blocking the light entirely.
Some of that light is transmitted through it, and the color of the canvas, which has a yellowish tone, is being cast onto the subjects.
All right, so those are the three behaviors of light. Next, you’ll discover the four characteristics of light.
So far, we’ve covered a lot about the tight equalities of light, and it’s all led us to this point in elevating your mastery of light.
What you’re about to learn will change how you currently see the light, and it all has to do with the four characteristics of light. This includes the quality, intensity, color, and direction of light.
Each of these is essential to understanding how to use light to achieve your creative vision. So let’s start off with the quality of light. In essence, the quality of light determines whether or not the light is soft or hard.
But you’re probably wondering how light can be soft or hard?
Let’s look at two images; this will better illustrate the difference between hard and soft light.
So our first image on the left is considered hard light, and the image on the right is lit with soft light.
You’ll notice that the Highlights are very bright, and the Shadows are very dark in the first image, plus the edges of the Shadows have a hard edge to them.
If you compare that to the other image, you can see that the Highlights are not as bright. The Shadows are not as dark, and the transition from highlight to Shadows is much smoother than the hard light.
Now, the quality of light is pretty good.
That is, until you have to decide the quality of light you may want to use to set the mood of an image or fulfill your creative vision.
For example, when shooting portraits, you should decide ahead of time whether you want hard or soft light, and again, that depends on your goal for the final image.
For example, let’s say you’re photographing a newborn. Should you use soft light or hard light?
Well, think back to images you’ve seen of newborns. What was the quality of light?
I bet that the majority of them were lit with soft light. Why is that? Well, soft light tends to be more flattering for newborns and portraits.
But if the mood you are trying to create represents a strength or you want to create something mysterious, then a hard light would work better.
So the question is, how do you create soft or hard light?
Well, one way is based on the size of your light source, and in general, the larger the light source, the softer the light will be, and the distance of the light to your subject can also change it from rigid to soft.
The second characteristic of light is intensity, and light sources can have different intensities.
This can include very bright to dim and everything in between.
One of the most intense types of light sources is direct sunlight. On a sunny day, on the other end of the spectrum, you have stars that appear very dim.
Light bulbs are somewhere in the middle, depending on their power. But there’s a catch.
The closer you are to a light source, the more intense it will be.
For example, if you’re reading a book next to a lamp, the light will be fairly bright.
But if you move 100 feet away from that lamp, it won’t be as bright or as intense.
So the intensity of the light source depends on how close you are to it, and we have a new handy dandy law that helps us better understand how this works.
So let me introduce you to the inverse square law.
This law states that the brightness of the light on your subject will be less intense the farther you move away from the light source.
In fact, the light on your subject will appear twice as dim as the distance moved away from the light source.
No worries. You don’t have to be a math wizard to utilize this law of light. Instead, all you need to remember is the distance and the brightness are not linear.
In other words, as you move away from a light source, it will quickly become less bright. The reason for this is the light becomes less intense because it’s spreading out over a larger area the further it goes away from your subject.
Another way to change the intensity of light is by diffusing the light. This can be achieved by placing something that is transparent or will allow something to transmit light through it, thereby diffusing that light as it passes through.
And remember, when light transmits through something, it becomes a scattered light. The result is a softer light. A common type of diffuser for photographers and even cinematographers is what is known as a softbox or umbrella.
All right, so the third characteristic of light is the direction of the light; this is another important consideration when creating the type of image you want. In essence, the direction of light can basically come from any direction.
But in photography, you’ll find four basic lighting terms to describe the direction of lighting used. This includes side lighting and overhead, back, and front lighting.
These four basic directions of light can dramatically change the appearance of the subject in your photograph, and this is because the direction of the light will determine where the Highlights, Shadows, and Mid-Tones will be in your image.
When lighting your subject or scene, you have at least one main source of light, which will generally fall into one of those four categories.
However, you are not limited to just one light all the time, which can be due to having lights reflecting off of different objects within the scene.
Or you can add additional lights to the scene and then add them so that they come in different directions.
Now this brings us to some other terms you will hear as a photographer when we’re discussing multiple sources of light for your particular scene or your subject, and those terms are key fill and ambient light.
So if you take an image outside direct sunlight, the net light source will come from overhead.
The sunlight is then considered not only to be the main light. But it’s also referred to as key light.
This type of lighting is unflattering because it can cause deep Shadows in people’s eyes.
What you can do in that situation is use another light source, which will be known as the fill light.
This type of light will come from a direction either from the side or in front of the subject. Doing this will add light into those Shadow areas created by the overhead light, creating a more pleasing portrait. And it’s even possible to have a third type of light that already exists in the scene, like a lamppost.
Or if you’re shooting inside, there may be lamps in the background.
And this creates what is known as ambient light. All right, so the fourth characteristic of light is color.
Now, as you may remember from any previous lesson, we talked briefly about the technicals of light and how different wavelengths create light colors.
And what we’re going to do now is we’re going to go over how different sources of light will emit different colors of light.
What it basically comes down to is different light sources will produce different colors of light, and the general range of colors goes from red to white to blue.
And in photography terms, this “color of light” is measured on a temperature scale.
And one of the terms you’re going to hear in photography when it comes to the temperature of light is the Kelvin temperature.
So the Kelvin temperature is basically the scale on which different light sources are placed within that scale based on the colors they emit.
So red will be very warm, and on the opposite end of the scale, you’ll have blue, which would be considered cool.
Now, a sunrise, for example, will emit a very warm color of light and yellow to orange to red.
Tungsten lighting will also emit a warm color in the yellow to orange range.
Now, you could even get a different color from the sun. When you have direct sunlight, it’s not as warm as sunrise or sunset.
And direct sunlight in the mid-afternoon will be closer to yellow to white.
In addition, the light from the sun will change again on an overcast day. When that light transmits through the clouds, it becomes softer, cooler, or bluer.
Then you’re also going to notice, depending on the scene, you could have a range of cool to warm temperatures in that same scene.
For example, you could have direct sunlight emitting yellow and blue light in your scene. And you’re going to notice these blue cooler temperatures in the Shadows.
The next time you go outside, look at everything around you and try and view the different colors of light within the area you’re viewing.
You may not have noticed it before because your eyes automatically adjust to these colors. We just accept it as it is.
But make an effort to view those different colors in the different areas of a particular scene, and you look for those colors.
You will notice the variety of blues and yellows throughout a scene.
And here’s the thing, knowing and seeing this light is important when it comes to your photography, and that’s because the color of light can affect the mood of your photos.
And there’s a specific camera setting that allows you to adjust the light color based on your creative vision.
That camera setting is known as the White Balance.
And you may remember we did cover the White Balance previously.
To learn more about the White Balance and the Kelvin temperature, check out the corresponding sections in the premium chorus to elevate your mastery of light.
All right, it’s time to look at the third key to creating exceptional images: composition.
But what exactly is composition?
Well, composition is the placement or arrangement of visual elements in a work of art distinct from the subject.
It can also be thought of as the organization of the elements of art.
According to the principles of art, in its simplest terms, composition means putting it together.
So what exactly are we putting together?
Well, different elements within the scene make up a particular image.
And these different elements could include lines like the horizon of a sunset or steps leading somewhere, shapes like statues or works of art color throughout an image, or a main color scheme.
Compositional techniques are known as the Rule of Thirds or Rule of Space, to name a couple of photography rules. Other elements could also make up your image.
This could include people or other subjects you may photograph; even light can play as a compositional element.
How you put all of these elements together in your image will determine if you can hold the viewer’s interest in the photo.
So when someone looks at your photo, does it grab their interest and make them say, wow, that’s an amazing photo! And they continue looking at it, studying it even, and possibly sharing it via social media, which is the goal of any image you create, isn’t it?
To create something so amazing that people are in awe of your artwork.
The composition can hold the viewer’s attention by arranging the elements to create a mood or a story.
On the other hand, if you get the composition wrong, you’d lose your viewer’s interest, and your photo becomes just another average photo among the billions created every year.
So here’s a poorly composed photo I did for an engagement session, and for this image, I used a technique known as the Rule of Thirds. I placed a couple in the right third of the frame, and you’ll learn more about the Rule of Thirds later in this photography course.
Now, although I used a so-called rule in photography, I still need to create a better composition, and that’s due to having too many elements competing for your attention.
So our primary subjects to the couple are in the foreground. But there’s a lot of stuff in the background competing for your attention.
We have the Detroit Tigers logo, the ballpark’s name, a bat coming out of the future groom’s head, and much more. It’s a total myth.
Based on what you’ve learned so far in this photography course, what could I have done better for this composition?
The main thing would’ve been to blur out the background more with a larger aperture to create more separation between the foreground and the background. Other things could have been done as well.
But we’ll get into that another day. When it comes to composition, it’s ideal to have the main element as the focal point of your image.
Then you can use other composition techniques to direct your viewer around the image and back to the main focal point.
When it comes to composition techniques and rules, there are over 30 of them. Each of them can help you create amazing images.
What I’d like to do now is share the more popular techniques and my favorite.
We’re going to start off with a quick overview of each technique. Then I’ll share over 25 images and the composition techniques I used for each image.
One of the most popular compositional rules that photography beginners should know is the Rule of Thirds. Remember, when I say rule, it isn’t a hard rule.
It’s more of a guideline or rule of thumb. The Rule of Third suggests that an image should be imagined as divided into nine equal parts.
Those parts are created from two equally spaced horizontal lines and two equally spaced vertical lines. Then we have four points where the lines intersect.
So this rule suggests that by placing your main element along with one of these grid lines, or better yet intersecting at one of the main four points, you’ll create a stronger, more meaningful composition that will grab your viewer’s attention by drawing their eyes to the main element of your artwork.
You could also use the grid lines to divide your scene into thirds, which means you can use one of these three horizontal rows to place your main elements. This works really well for landscape images.
Or, instead of using one of the horizontal rows, you can use one of the three vertical columns to place your main subject in, which works well for numerous subjects. I use this a lot for the portrait photography work that I do.
I will share some more images that follow the Rule of Thirds later.
First, let’s look at another composition technique known as Leading Lines.
This is another easy technique to use to direct your viewers’ attention to the main element, and that is because you’ll find lines everywhere in your scene. So lines come in all different types, shapes, and sizes.
Let’s review some characteristics of these lines, and we’ll look at multiple images later.
So lines can come in three different angles, horizontal, vertical, or diagonal.
They can also be long, short, or anywhere in between, and they don’t have to be straight.
They can even have curves to them, and they don’t have to physically be there. A line can actually be implied.
But all lines have something very similar and common: lines will guide your viewers on where to look within your photo, and that’s because your eyes will naturally follow lines based on their direction.
You can use lines to get your viewer to focus on the main subject and other elements in a scene. The following compositional technique is one of my favorites, known as framing.
In essence, a frame is something visual that surrounds your subjects, like a picture frame. A frame doesn’t have to be anything specific.
You can use any elements in your scene to frame your main subject.
As you know, light is the second key to creating exceptional images.
But light can do much more than just illuminate your scene. It can also be a compositional element all by itself.
When it comes to your light source, you have infinite options, from the stars to the moon studio, strobes, a lamp in your home, and much more.
Also, the source of your light doesn’t have to be part of the image itself to affect the composition, and this is due to something you’ve learned previously, which is the characteristics of light, which are intensity, quality, direction, and the color of light.
So the characteristics of light can shape your main subject and affect the composition.
But you can also include the source of light or a secondary light as part of the composition, and I’ll share images of both coming up real soon.
First, let’s review another composition technique; this one is less known than the others.
However, it can play a vital role in telling a story about your subjects, using expressions as part of your composition.
Now, depending on your subject, it can be challenging to get the expression you desire to tell the story or capture that person’s true essence.
Let’s jump into Lightroom now, and I will share some photos showing how I’ve used these compositional rules and techniques.
This first image of our daughter could be stronger regarding some of the composition techniques we’ve discussed.
But the expression is the main compositional technique used by capturing her mood at this point in time during the photo shoot later on in the photo shoot. About 20 minutes later, she had had enough and was done.
So expressions are a great way to tell a story based on the subjects you photograph.
I captured this next image with a Mamiya RB67 about 18 or 19 years ago. Although I have the Rule of Thirds being applied here with the couple in the center, it could be a stronger composition based on the Rule of Thirds.
Instead, these leaning lines on this wall bring us into the image and direct us directly to the couple.
So I believe the Leading Lines in this image are the strongest composition technique used in this particular image.
Our next image is not a strong composition, not using the Rule of Thirds.
Instead, another great expression tells us the story of this young man’s day. I’ve included enough elements in the image to help tell the story. If you know exactly what he’s doing now, let me know in the comments below.
This next image could be better. It’s out of focus, and that’s because I captured this image at night, as you can see, at a very slow shutter speed of under one second.
So I was handholding this, and it created “camera shake.”
But I include this image because I want to talk about the composition of this image and how it relates to where you may be going on your vacations or images that you capture in general.
So as you can see, we have a railing in the front.
We have some Leading Lines directing us throughout the image, and they’re curving these Leading Lines from inside the top and bottom of the rails.
So if your eye comes down here, it may pick up one of these curves and come back in through the image at different points.
So it’s allowing you to travel across the image from one side to the other, top and down behind it.
You can see there’s a lot of lights going on. It’s hard to see what it is. But this is Niagara Falls.
You’ve seen thousands of images from Niagara Falls in your lifetime, and they all look the same.
But this image is different from anything else you’ve ever seen.
I decided to shoot through the railing, use the railing as a frame, and use the Leading Lines to direct us throughout the image.
And I wanted to include Niagara Falls as a secondary element to what’s happening in the foreground.
But we still know it’s Niagara Falls, at least now that I’ve told you, or if you’ve been here before, you know this is Niagara Falls.
Now this is on the Canadian side, not the American side.
So you’ve seen millions of photos of this location and probably others, like many locations at Yosemite Park, the Grand Canyon, the Eiffel Tower, et cetera.
So all of these hotspots for tourists receive millions of photos taken every year at these locations, and they all look the same.
My point is to find something different to stand out from the crowd.
Think of a new composition technique you can apply to your images to capture that location. But to show it in a different light, try a different angle and perspective. That way, your images don’t look like everybody else’s.
All right, next image here, we have the couple on the right side of the Rule of Thirds, and we have some Leading Lines on this bridge that take us throughout the image and back again towards the couple.
In the following image, I’m using the Rule of Thirds.
Again, her feet are in this quadrant right down here on this point, and another compositional technique is also used, which is contrast.
So her dress here in the sand contrasts with the skin of her feet and the color of her toenails.
So our eyes tend to come towards her feet because they’re different from the large areas of contrast between the dress and the sand.
Now the whiteness of the dress itself also grabs our eye’s attention.
So we come up here, and we look around up here.
But because of the contrast, we come back down to this area over here, ruler thirds again, we have the couple in the left quadrant, and the Corvette is taking up two-thirds of that quadrant.
This image could be better; the background should have been blurred out even more.
I shot at f/4 at 28mm, so I should have used a larger F-stop, like f/1.8 or even f/1.4, with a 50-millimeter lens. I just didn’t have the option to shoot at this angle with a larger focal length because I couldn’t back up anymore.
Other than that, I like the composition, and of course, I could have blurred out this background and Photoshop. But I still need to do that.
But I do like how the couple is on the left side, and then the Corvette has some Leading Lines here, bringing us back towards the couple, same couple, same car.
Rule of Thirds again, they’re up at the top, and we have a leading line from here towards the couple, and then for this next image, we have the Rule of Thirds again. But we also have some Leading Lines in a few different places.
The main one is this set of bricks creating this column. So we have a leading line bringing us back down towards the couple.
We also have some Shadows here, so if our eyes navigate away, we can see that these Shadows have a diagonal line bringing us back to the column here. Then this one brings us back here. I’m framing the couple between two windows.
So there are a few different compositional techniques and this leading line. In this next one, we have what is known as a juxtaposition.
That’s also a composition technique that we still need to discuss.
So basically, if you grew up in the seventies and watched sesame straight, you may remember one of the lyrics was “One of these things belong, one of these things don’t,” so that’s juxtaposition.
So we have this large building, architecture, and a couple. So that’s the juxtaposition.
So we have a lot of different things going on in here as far as composition. We have our Rule of Thirds. We also have Leading Lines returning towards the couple on this railing here.
Some patterns in here that have some Leading Lines coming back to them as well. But they’re being blocked by these columns.
But these large tall columns here are coming back down to the railing.
So, if you come over here and look over here, your eye gravitates back down towards this railing and then back towards the couple.
And then, we have implied Leading Lines with the direction our couple seeks.
So naturally, you’re going to be thinking to yourself subconsciously, what are they looking at?
Well, let me see. There’s really nothing going on over here. It’s a lot of open space. You see the architecture, and those Leading Lines bring you back.
This next image of the groom getting ready for the wedding ceremony was captured inside this doorframe.
So I’m using framing to frame the groom.
We have some Leading Lines inside of here that also lead us back to the groom and some on the outside.
But the main composition technique is the framing of the groom.
I’m using framing again in this doorway for this bride getting ready.
This is a back of a chair. It had a hole in it, and I decided to use that to frame the bride.
So again, wedding photographers, there’s a ton of them, thousands in my area, so I have to do something different to stand out, so my images don’t look like everybody else’s.
So try and find different angles and perspectives again and use different composition techniques to make your work stand out. Rule of Thirds for this bride here, and I’m using the Leading Lines here of the bricks to direct us back toward the bride.
Again, the background, I didn’t do a very good job blurring that out. Again, I should have been at f/4 at 40mm, I should have done 200 millimeters at 2.8, and that would’ve helped blur out the background.
Sometimes you just have to get the shot because you don’t have much time, especially when shooting weddings. Rule of Thirds again
For this image, we have a lot of Leading Lines in these buildings here, bringing us back to the couple.
Leading Lines again, same couple.
So the buildings top to bottom are the Leading Lines bringing us back down.
We have a leading line here, and I’m also using light as a compositional technique to help balance this image and create these rays of light coming from the sun diagonally to the right, which is another leading line right here.
Now, in this next image, I’m using light as part of the composition and color as part of the composition.
But it’s being done poorly in this particular image because we have this red door in the background, and it’s competing for our attention with this couple right here, which is the main subject.
So there are better uses of color in the composition.
So I could tone this down or desaturate this door in Photoshop to lessen that color from competing for our attention. There are a lot of Leading Lines here in the bricks to bring us back to the main couple.
It’s just that color of the door is distracting my daughter.
Again, we’re using rural thirds and have Leading Lines on the right side directing us back towards her.
Again, I’m using light as the main compositional element for this image. But some other things are going on in here as well.
We have a doorframe. So I am using framing as part of the composition technique.
But because of this light source right here, it’s so bright.
That’s the first area our eyes navigate to because of the brightness.
Then you begin to navigate around that light to see what’s going on and then notice that this bride’s made here and this one holding the light are both looking down.
So it’s telling a story of what’s happening at this moment.
What are they looking for? Well, if you want to know, let me know in the comments below.
Now, behind them, there are two more stories.
We have the bride and another bridesmaid or her mother right here. Then behind them, we have two more bridesmaids doing something else.
Now, these four people in this image detract from the main story, which is right here.
So again, a large aperture of f/1.4 would’ve been better to blur out these people here so they weren’t part of the story. But again, you have to get the shot with what you have available.
I would blur everybody out in the background in Photoshop to make this a stronger composition.
I’m using action for this image as part of the composition and texture.
Most bride dresses do not have this amount of texture, so I cropped in tight to focus on the dress itself and not the bride. With the dress, we can see there’s a lot of texture.
She’s doing something. The leading Lines of her arms bring us into that action.
Again, I’m using several different composition techniques for this image.
I’m using framing from this piece of furniture to frame the dress. Then I’m using this artwork here to balance out the image because it’s heavy on the right side, and I’m using the Rule of Thirds as well.
So this frame here is balancing the side. With it, it would be lighter and more balanced.
I’m also using light as part of the composition, which we can see in the Reflection right here, which helps tell the story of the day based on that light source and the color of light.
We also have some light coming over here, which is a different color than this light source.
This would be the window light, which is bluer, versus the yellow coming on this side of the dress.
I’m using Leading Lines and implied Leading Lines for this next image.
So we can see the groom is gazing off in this direction. What is he looking at? Still trying to figure it out.
So the bench brings us back to the main subject, and again,
I’m again using the Rule of Thirds next image, Rule of Thirds. I’m also utilizing the Leading Lines of the hills and the trees here to bring us back to the couple, this one Leading Lines and Framing, as well as the Rule of Thirds.
So I’m using this bush in the foreground with the back one to frame them in this area.
One of my favorite images of this wedding reception included images of the bride and groom and family members along this close line.
And I position myself to create a leading line from the couple into the rest of the image.
But I wanted to blur out these images so that the main focus was on the couple here. Using color brings us into this image, and then we can see the implied leading line of the groom looking off.
But the color grabs our attention, and then the lines of that artwork bring us back to the groom. In this image, again, I’m trying to create something different during the ceremony. I’m framing the guests within this piece of work artwork here. I am still determining what it was.
But I had an opening or a little window right here that I peeked through to capture the guests during the ceremony to help tell the story and to frame them as the main subjects.
Once again, I’m using the framing of this doorway here to frame the wedding dress and the inside of the bride’s room where she was getting ready.
The one thing I would like to change is this window right here.
It’s very bright, and it’s competing with the dress, and it’s a distraction.
So you’re looking back and forth between the two, trying to figure out what to look at.
So if I were to do this over again, I would close these drapes and try and darken up this window here.
The focus would be more on the dress and the other things on the inside.
All right, so again, I’m using the Leading Lines of the guitar here to get to the main action at the top. The one thing I do not like is the back of these chairs here. This was at the ceremony.
I could have captured this from a different angle or perspective to crop out the back of these chairs.
I could use the crop tool to crop in tighter. But I only sometimes get everything in there that I wanted when I captured it initially.
So be aware of your surroundings, the foreground, and the background, and try and crop out anything in the camera before you take the photo.
That way, you don’t have to worry about fixing it later.
Now in this next image, I like this image. But I don’t like this image. What I don’t like about it is this large post right here. It’s dominating the image.
So I had to do something in Photoshop to help bring out this couple a bit more.
So I used color to try and focus more on the couple versus the surroundings.
So if I were to reshoot this, I would try and shoot it at an angle where this post was not in the image.
But I do have the framing of the couple as part of the composition, along with the leaning lines and the colors of their jeans.
Quick shot of a bug. Our garden has Leading Lines for this image, and the Rule of Thirds is headed right in the middle. There is only a strong composition other than the Leading Lines.
Again, I’m using expressions to create something new and different for this engagement session. And their expressions give you an idea of their personalities.
So when photographing, people try to capture their true essence by capturing expressions that tell us who they are or their personalities.
And then this next image of the same couples, a little bit more somber, traditional, classic, however you want to say it.
So what I did is I used the surroundings to frame them on the left side, which is the row of thirds. I framed them between this railing down here and this railing up here, and then if your eyes gravitate away from them, this leading line of the railing will bring you back to the couple.
If you gravitate to this side, the top of the railing or down here will bring you back based on this leading line back towards the couple.
For this image, we have juxtaposition going on.
Again, we have a large building taking up most of the image. Then the Leading Lines bring us back towards the couple over here, and I’m utilizing the Rule of Thirds.
For this next image, I’m using two main composition techniques.
Which ones I’m using?
Well, if you said framing, you would be correct, and I’m also using color as part of the composition. Now for this next image, it’s really, really busy.
A lot is going on here. But I do like this image because it’s different.
Again, you’ve seen photos of couples millions of times. But how many photos have you seen where the couple is posed in this way?
Probably not very many. So what could I have done better?
Well, the background here is really busy. We have a lot going on. The lights dominate the top portion.
We have a number down here, so I could have blurred out the background and used a shallow Depth of Field of 2.8 or 1.4.
But again, I wasn’t in a position, or I couldn’t use a larger focal length or a shallower Depth of Field based on what I was trying to capture at the time, which was the two numbers here, plus the lights in the background.
So as you can see, I shot this 14mm and f/5, so it’s a very large Depth of Field, so I would have to fix this in Photoshop.
Other than that, I like how the couple is framed between these two lights here, and then we have the 50-yard line here as a leading line bringing us to the main subject here, which is the couple.
Again, I’m using framing to frame the couple in the doorway. Then during the editing process, I applied color as part of the composition, and then in this next image, I’m using framing and Leading Lines.
And for this one, I’m using framing plus color. So two different colors are being utilized to grab our attention.
The first is the same color tone I applied here: a beige, rustic, retro type of feel or tone.
And then, we have the color of his tie, which contrasts with everything else in the image and grabs the viewer’s attention because of that contrast.
And it’s fine that we’re focusing on that tie because it brings us toward the main subject, which is the couple, and the framing inside of this doorway also helps.
This next image is the same building that I shot here. I just cropped in tighter this time and again. I placed each into the columns here to frame them inside there.
And then, I had them look in opposite directions to create implied lines.
And those implied lines intersect with each other and keep us focused on the couple Leading Lines and framing again, as well as that color tone that I applied previously for this next image.
I’m using color and texture as part of the composition techniques.
But color trumps texture because it’s so much brighter and different and contrasts with the textures and the image that our eyes naturally navigate to this area first because of that color.
This next image is one of my favorite images I captured on a family vacation in New York.
We were walking through this tunnel here. I stopped to capture this image so I could use the edging of the tunnel here to frame this side of the park.
And there were people on the stairs on the bridge, and I think my kids were on the railing, so I had to remove all of them to get this final image.
In this image, I’m using a macro lens, so a lot of it is out of focus. But I’m using color as a main composition technique to bring us into this image.
I’m utilizing Leading Lines and the Rule of Thirds for this image.
They’re both right here on this point.
For this image, I’m using framing again to frame the couple within the image.
Again, I’m using three different types of techniques.
We have framing, Leading Lines, and color, so a lot is going on. But because of each of the different composition techniques, our eyes always gravitate back toward the couple in this image.
For this one, I’m using the Leading Lines of the background here and framing the girl’s legs between her fiance’s legs right here.
This next image is probably different from what you’re used to seeing of couples.
On their wedding day, we were shooting downtown Detroit and there was a lot of construction going on, so I decided to frame them inside of the top of this cone right here.
Now, in the background, we have this big, bright red and yellow sign.
It tells a story about the location. But it’s detracting from the overall image.
Our eyes tend to look right here first. But then this sign is pulling us into the side of the image.
I don’t like the sign in this image. The same couple again, and I’m utilizing color and framing better in this image than in the previous image and the same location.
And I’m utilizing this construction to frame them inside of these different poles right here and between these two colors.
So we have a frame within a frame as well as Leading Lines, bringing us back towards the couple, a nice leading line leading into the couple, and the Rule of Thirds using expressions again to tell the couple’s personality.
No, she is not a bridezilla. They’re just a fun-loving couple that wanted to do something different and fun, a boring photo.
I’m utilizing the Rule of Thirds, though, and I blurt out the background to help this part or this subject stand out.
Another one of my favorite images. I’m utilizing Leading Lines and the Rule of Thirds to place the tree on the right side, and the Leading Lines of these hills and the foreground in the background lead us back to the tree.
The color of the sky contrasts with the tree, which also helps with the image’s composition. Again, Rule of Thirds.
This time I’m placing the gecko in the middle. Another Rule of Thirds’ image.
The head of the Millie is directly on this point, a landscape photo with the Rule of Thirds. I placed the shoreline here directly in the center.
And then for this last image, again, a lot going on, not a whole lot you can do when you’re about five rows back, 10 rows back, whatever it was at the time, and you can’t really get a great photo or a perfect shot.
So what do you do?
Well, you do what you can with what you have, and there’s some luck involved as well.
So we have two different stories going on here.
We have the main lead singer right here and our guitarist over here.
So the lead singer is in focus. But we also have another story going on over here with the guitarist.
He’s not as “sharp” as the lead singer, and the guitarist is framed between these hands.
All these lights up here have lots of colors, and they’re all directing our attention back down toward the band itself, which helps with the composition of this particular image.
So overall, this was a pretty lucky shot, I would say, to get these people in front of me to lift their hands at the right moment to frame the musician right here.
So utilize composition to tell a story, direct your viewers to the main subject, and create a stronger, better image based on placing the scene’s elements in a specific order based on what you want them to see.
Alright, editing is the fourth key to creating amazing images, and editing is an art form.
We could easily spend hours, days, weeks, or even months talking about editing. You still might not have mastered it based on your creative vision, not to mention all the different editing software options.
And numerous editing tools will take months to master.
Here are some tips on what software to use and why.
And then, you’ll have to explore my premium photography masterclass to learn more about editing and research other artists to find out how to edit your images with your software of choice.
But first, before we do a quick review of some software, let me show you how editing can transform ordinary images into extraordinary ones.
For this image.
It’s a boring location and subject. But by replacing the sky and changing the colors to match a sunset, we have a much more exciting image.
That being said, is this image still a photograph? In a way, it is. But it’s more of a composite than an original photograph since I’ve used another image to transform it.
Now for this image, there’s been no editing done yet, so this is straight out of the camera.
Now, here’s a classic traditional type of editing style. But I wanted to mute the colors and create a more retro feel, which is my preferred editing style.
This is still a photograph, even though the editing style does not include the natural colors.
When I captured this image, I understood that not everyone would like my editing style, which I’m okay with since I’m happy with it.
That being said, only some people will like your editing style too.
So how you edit your image will be based on your creative preference.
The problem is, at this point, you may need to learn your preferred style, or if you do, you may not know how to create it or even which software to use.
So the first step is deciding on what software to use, which can be difficult in and of itself.
Since you have many choices, you must spend time learning the software.
Regardless of your choice, I’d recommend trying out two or three applications for a week or two to get a feel for how the software operates, the tools available, and which one you’re comfortable with.
And whether or not you want to shell out any money for your editing software is something else to consider.
Let’s check out a couple of options to get you started.
Now, when it comes to software, you have a lot of choices, a lot more than I had 30 years ago or even 15 to 20 years ago.
And at that time, Photoshop was the dominant software, and it still is today.
Getting Photoshop at a decent price is much more affordable than it was in the nick then. I had a shell out of around $800 or so for a single license, which didn’t include updates, which were a couple hundred dollars more for each update.
Now, compare that today when you can get Photoshop for one Starbucks coffee for $10 per month, plus the photography plan includes Photoshop and Lightroom for that same $10. So basically, $5 each.
Now, the main advantage to Adobe Software is they’re updated three to four times per year, and they have many more time-saving features versus software that you can get for free, plus much more.
Another cool feature about Photoshop and Lightroom is that you can use them on your iPad and iPhone for free, which is a great way to try them out before you pay for the monthly subscription.
You can download a free seven-day trial using either one on your laptop or a desktop.
Now, when it comes to which one you should try first, I’d recommend Lightroom over Photoshop.
So Photoshop, even though it has many more tools and features, will take much longer to master than Lightroom.
So editing your RAW files and Lightroom is pretty simple once you get the hang of using it.
But there are two different versions of Lightroom.
There’s the desktop or the classic version, and then there’s the mobile version, which you can use on a laptop or desktop.
Which one you use depends on the features you need to learn more about Photoshop, and let your own check out their playlists in the description below. Now, if you’re more interested in freeware, you can get a clone of Photoshop for free.
And there is also a free alternative for Lightro, which I’ve included a link to in the description below.
Now, one of the most popular free alternatives to Photoshop is known as gimp, which stands for GNU Image Manipulation Program.
And Gimp includes many of the same tools and features as Photoshop. However, you will only find some time-saving artificial intelligent tools to make your job easier, like the Select Subject tool. Which will instantly earn a selection of your subject for you automagically.
Make sure to get my photography masterclass which includes over 30 hours of content.
Plus, check out some of my free photography and editing tutorials here on my channel via the links and the description below.