5 Simple Camera Hacks To Get Off AUTO Mode Forever
Subscribe
Do you have a digital camera that’s always in auto mode? If so, you’re not alone.
It’s exactly where I started 30 years ago, and so have thousands of my photography students, and that’s why they almost always create average photos they’re not proud of, but it doesn’t have to be that way.
My name is Chris Parker, and I’m a pro photographer and instructor.
In this short video tutorial, I’ll share five simple photography hacks to help you get off automatic mode and help you create amazing images that will impress family and friends.
This is a significant promise, and if you’re struggling with the technicals of your digital camera, you’re probably skeptical, and I totally understand.
When I started photography in 1989, I struggled with the technicals, too, until someone showed me how to overcome auto mode and get off it once and for all.
So, I know exactly how you feel, and that’s why I’ve recorded these five simple hacks for photography beginners like yourself to help you create images like the pros.
How and when to use ISO
ISO is a handy camera setting that will allow you to increase the brightness of the available light.
So, let’s go over what ISO is all about, how you can change the brightness of a scene, and how it affects your image.
So ISO is a scale carried over from the film days when you had a range from ISO 100 to ISO 3,200, and in the film days, the film was sensitive to light, and a higher ISO allowed you to shoot in low light situations like sunset or indoors.
The concept is similar with your digital camera.
However, your digital camera isn’t sensitive to light, so instead, your camera has to amplify the “light” to make it brighter, so the available light becomes brighter the higher the ISO you choose.
Think of ISO like a light dimmer switch.
The more you move the switch higher, the more light you’ll get.
This is how shooting under challenging lighting conditions, 24 hours a day, is possible, but there is a significant side effect to using higher ISOs.
Let’s create a couple of images, and I’ll show you the problem it makes.
Right now, I’m in program mode, and you can also get in that mode by selecting the letter “P” on the dial or the menu on top of your camera or in the menu in the back, depending on your camera.
The ISO is set to the default of 100. Now, depending on your camera, the default ISO might be 200. So, let’s go ahead and try it out.
As you can see, there’s some motion blur of the people walking about.
If that wasn’t your creative intention and instead, you want to freeze the action so everyone is in sharp focus, you can fix this by increasing the ISO.
So, most digital cameras have an ISO button either on top or the back of your camera, and then you can use one of the dials to change the ISO.
I’m going to increase the ISO to 4,000 and create another photo.
The higher ISO froze the action, and everything is now acceptably sharp.
You might think that ISO is a fantastic camera setting that will allow you to shoot any time of the day.
Well, it is.
However, there’s a significant drawback to high ISOs like 1600 and higher.
In general, the higher the iso, the more digital noise that your camera will create.
So when your digital camera amplifies the light, the result is digital noise, and the more it “amplifies,” the more noise that is created, resulting in a lower-quality image, as you can see.
I’ve compiled this ISO cheat sheet showing which ISO settings to use under different lighting conditions.
You can print it or save it to your smartphone for your next photo shoot, and you’ll find a link to download it in the description below.
We have four more photography hacks and a bonus at the end. If you like this tutorial so far, please hit the like button.
How to use Apertures for blurry backgrounds
Have you ever wanted to create portraits with a blurred background like you’ve seen from pro photographers?
Well, you can instantly get that pro look by using aperture priority mode, allowing you to choose how much background blur you want in your photos.
Once you set your aperture based on the amount of blur you’d like, your camera will pretty much do everything else.
So think of it like a semi-automatic mode that helps create a soft, elegant background and makes your subject stand out.
Aperture priority is a game-changing approach to how you’ll photograph people, wildlife, or any other subjects forever.
In the last 30-plus years as a pro portrait and wedding photographer, choosing the correct aperture for my creative vision was always my first choice.
So, when you start using aperture priority, it will also help you create professional-looking images.
To use this camera mode, grab your camera, and I’d like you to switch your camera mode over to “A” if you’re shooting Nikon or most other cameras or Av for Canon users.
Next, you’ll need a friend or convince one of your kids or maybe one of your siblings or anyone else for a test shot. If you’re using a zoom lens, zoom in for best results.
If you’re using a prime lens, like a 50mm, move closer to them until you fill most of the frame.
Alright, before we change our aperture, it might help to know what an Aperture is.
So, an aperture is a small circular hole inside your lens that opens and closes based on the aperture number you choose.
In photography, apertures are called F stops or F numbers like f/2.8, f/four, f/5.6, et cetera.
When it comes to the amount of background blur, a large aperture opening will create more blur than a small one.
To maximize the blur in the background, you’ll want to use the lowest F-stop number on your lens.
Or if you’re using a newer digital camera, the f/number will be displayed on the digital screen.
For the lens I’m using, it’s 1.8. Yours might be different.
It could be f/2.8, f/four, or possibly f/5.6. Regardless of what your number is, go ahead and change your aperture to the smallest number.
So, my daughter is ready, so let’s go ahead and create a photo.
Notice how soft and creamy the background blur is behind her.
That is the result of using a small aperture number.
You’ll get a similar result when using aperture priority mode with a small aperture number.
As you adjust your aperture, did you notice that you have a lot of Apertures to choose from and that your lens may go as high as f/11, f/16, and possibly f/22?
Well, later, you’ll learn how to use those higher aperture numbers.
The Apertures to use for two or more people
First, let’s review an ideal aperture when creating images of a couple or large groups, like family photos.
For these types of images, you’ll want to use at least f/four for two people and f/eight for larger groups.
In the previous tip, I showed you how to photograph your subject with a blurry background.
And this time, since you’re using a larger aperture number, your background may not be blurry.
However, it’s more important for group shots to have everyone in focus versus a blurry background.
Otherwise, someone is going only to be happy if they’re clear.
To ensure everyone is focused, ensure you’re in Aperture Priority mode.
Change your aperture to F/four for two people, 5.6 for three to five people, or F/eight for larger groups.
And let’s go ahead and create our first photo.
All right, so for this first image, both of them are in focus, and now let’s move them into a different position so that he’s behind her.
And because of that change in position, it’s possible that he will not be in focus this time, or at least in complete Focus.
So, let’s try it out again and see what happens.
Alright, so at this time, he’s a little out of focus, and you can see a bit of blurriness along the edges.
Try 5.6 and F eight for larger groups if this happens to you.
I’m switching to 5.6, and let’s go ahead and re-shoot.
Alright, so this time, they’re both in perfect focus.
The Aperture to use for landscape photos
Have you ever created a photo of a stunning landscape only to discover later that a significant portion of the image was out of focus?
Well, the solution to ensure everything from the foreground to the background is in focus requires using the correct aperture.
Previously, you took portraits with a blurry background using the smallest aperture number on your lens.
This time, we will use a higher number for landscapes.
The biggest aperture number for this lens is f/16, which I will use for this first image.
I’m stewing aperture priority mode, and I’ve set the aperture to f/16.
So, let’s go ahead and create an image.
Alright, so as you can see, the foreground and everything else that stretches out as far as the eye can see are all in focus.
I will change the aperture to 1.8, and let’s go ahead and create another image for comparison.
This time, check out the blurry foreground elements for stunning landscapes.
Use a high aperture number like F 11 or F 16 with everything in focus.
Download this free aperture cheat sheet via the link below for more tips on which aperture to use and when.
How to use Shutter Speeds creatively
Have you ever seen travel brochures or magazine photos of waterfalls where the water is silky smooth?
Or how about images where every single drop of water is visible?
You can achieve these creative images by switching to shutter priority and choosing the appropriate shutter speed.
So, your shutter speed is simply how long it takes for the shutter to open and close to create your image.
The speed of the shutter either freezes the action or blurs it.
A fast shutter speed can freeze most action like one five hundredths of a second or faster.
A slow shutter speed of one second or slower will blur most action.
So, the shutter priority mode is another camera mode that allows you to fulfill your creative vision.
If you’re shooting with Canon, adjust your dial to TV to activate shutter priority.
And if you’re shooting Nikon or any other camera, you’ll set your camera to “S.”
For this first image, I will use a shutter speed of one second to show you how to blur the action.
Also, when using a slow shutter speed, it’s best to use a tripod or a hard surface to place your camera on.
That way, you’re not introducing any additional blur due to camera shake.
Alright, so one more thing you should know before taking your first photo is to set your ISO to the lowest ISO possible, which is either ISO 100 or 200, depending on your camera.
This will allow the camera to choose a slower shutter speed.
Now, if you are shooting in the middle of the day like I am right now, it’s going to be a little bit harder to get an actual slow shutter speed, which is why, for this technique, it’s best to shoot earlier in the day or later in the day when the sun isn’t as bright.
But if you are shooting outdoors on a bright sunny day like this, you can use an ND filter to use a slower shutter speed.
To learn more about ND filters, leave a comment below. Shooting on a cloudy day will also allow you to use a slow shutter speed.
Alright, so let’s go ahead and create our first image and blur the action.
Now, to minimize camera shake, what we’re going to do is we’re going to squeeze the shutter release button and not touch the camera while it’s recording the image.
Otherwise, we’ll introduce a camera shake.
Alright, the water has some motion blur to it.
But let’s say you want to freeze the action. Maybe you are photographing your kids or grandkids running around and want them to be clear.
You can then increase your shutter speed to one to five hundredths a second to freeze the action.
So I’m going to go ahead and set this to one five hundredths of a second, and I’m going to go ahead and recreate the photo.
As you can see, the action is frozen.
We can now see those individual droplets and bubbles in the water.
Alright, here’s another cheat sheet for which shutter speed to use and when, depending on your creative vision for the shot.
This is also available to download via the link in the description.
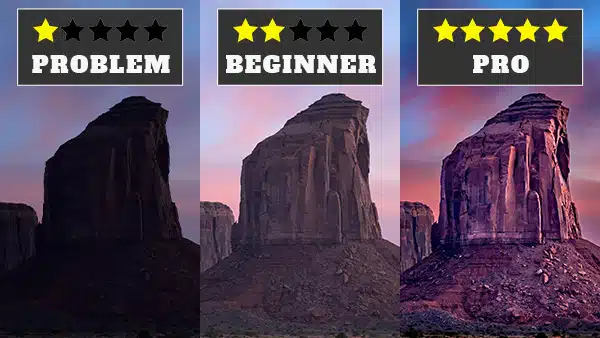
How to fix over or underexposed images
Have you noticed that sometimes your images come out too bright or too dark when using aperture or shutter priority?
So, what can you do to control the brightness of your photos when that happens?
Well, you can use a feature in your digital camera called exposure compensation that allows you to override the computer in your camera that determines how bright or dark your image is.
You can also use exposure compensation creatively to create brighter and more vibrant images, or you can make them darker to create a moody feeling.
Now, I’d like to match the environment and create a dark and moody image for this image I want to make.
So, we will start with the exposure compensation at zero, and I’m using aperture priority at F 16 with an ISO of 100.
Overall, the image brightness is pretty good, but it’s not created the mood and feeling I want.
So, let’s try making the image darker with exposure compensation.
Now, to access exposure compensation on most camera models, you must find the button with the plus and minus symbols.
This could either be on top or the back of your camera, and you’re going to press that button to activate it, and you’ll be presented with a scale that goes from plus three to zero to minus three.
Now, depending on your camera, these numbers might be reversed.
Either way, a positive number will make your image brighter, and a negative number will make it darker.
So, let’s change the default of zero to minus one and retake the photo.
Okay, so the image is darker and moodier than before.
And with a bit of editing magic, we can create a dark and moody feeling.
As you’ve seen, you can get amazing creative images with aperture or shutter priority.
Remember, it’s not the gear but the person behind the camera that creates the image. And if you know how to use your equipment, you’ll get exceptional results.
If not, even the most expensive gear won’t help you create photos you’ll be proud of.
Although I didn’t hold anything back in this video, I can share only so much in a short video.
This is why I’ve created a free, friendly online photography community where you can learn more about creating amazing images.
Click the link in the description below to join, and I look forward to seeing you on the inside.