Which Camera Meter Mode Should You Use?
Subscribe
In the last tutorial I mentioned, you have two solutions for getting better exposure when using any of the auto modes.
You’ll discover those solutions right here, right now.
We will jump into a photo to dissect it to understand how your camera gives you the exposure it does.
Previously, you’d learned that your camera is programmed to set your exposures using a mid-gray of around 10 to 18% gray.
Your camera has a built-in light meter.
The light that enters the camera is measured by that light meter and, based on how it’s programmed, determines the camera settings it chooses for you.
Now, when your camera gets the exposure wrong, you have two options: changing the default light metering mode or adjusting the exposure compensation.
Let’s explore the metering modes first.
The three most popular types of metering modes include matrix metering, also known as evaluative mode if you’re a Canon user, center-weighted metering, and spot metering.
Now, depending on your camera, you may have more options.
For now, let’s go over the basics of the three mentioned. You can control how your camera meters the available light based on one of those three metering modes.
The matrix or evaluate metering mode is designed to assess all the light you see in your viewfinder of the metering modes you have.
This is the most complex, and what it does is it evaluates the light in five different zones and then calculates the different light levels in each section to give you exposure.
This metering mode works for most instances.
When You start shooting portraits, for example, with the light behind them, you’ll find it doesn’t give a good exposure, especially when that light is really bright in the back and at least the exposure isn’t that good for your subject.
You’ll find they may end up being underexposed, and I’ll demonstrate that and the other metering modes in a moment.
Let’s first go over the other two types.
Next, you have the center-weighted mode, which evaluates the light more toward the center of the viewfinder and ignores the light outside of it.
The spot metering mode is even smaller at around three to 5% of the viewfinder area, and it only evaluates the light in that tiny spot in the center of your viewfinder.
However, some cameras will move the spot meter based on where your focus point is.
So if you focus to the left or the right, the spot meter will evaluate the light at that point in your viewfinder.
So we’re going to head out to a local park so I can demonstrate how the different metering modes work, and then we’ll come back into the studio to take a deep dive into each one of those images to understand better how these metering modes work.
So let’s head out.
All right, so for this photo shoot, I am shooting an aperture priority mode again, and I’m shooting at 2.8, and I have matrix metering set for the first image, and I’m going to compose her so she’s on the left side.
We also get some of the light from the background in the image to compare how the light is metered with the three different metering modes.
I’m going to take the first image here.
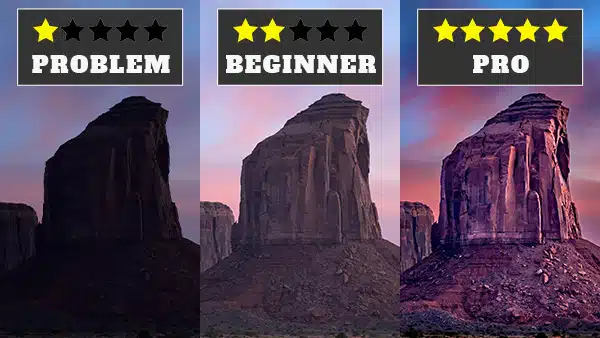
All right, so this first image is a bit underexposed, but overall, the exposure is pretty good.
The skin tones and background look good, but I want it to be brighter.
So what I’m gonna do is I’m gonna switch to center-weighted mode to see if that gives me a better exposure.
All right, so this time the image is overexposed in regards to the skin tones, and that’s because the metering is being applied more towards the center and the light around the image is not being metered at all.
So, the background in the back is much darker than the skin tones, which creates an overexposure of the skin tones.
So this time, I will switch to spot metering mode, and because I have the focus point on her face, it will also meter the light in that area.
So her skin tones her hair and a little more around her. Let’s see if we get better exposure with spot metering.
Alright, so for this image, we did not get the exposure I wanted.
The overall image is now underexposed and the skin tones are darker, and that could be the way the light is being metered in the area where I focused.
So overall, the matrix mode gave us the best exposure.
We will head back into the studio and take a closer look at these images to compare them a bit more so I can give you more guidelines on which metering mode to use and when.
So, this was the first image we took, and I used the matrix metering mode for this particular image.
As you can see, it did an excellent job of giving me good exposure in camera.
However, I do find that the image is around two-thirds stops underexposed, and I base that on the brightness levels of her skin and this area right here, which is really dark and we’re losing some detail in the hair, and that’s because it’s underexposed.
I can increase the exposure compensation to make it brighter during capture, which you’ll learn how to do very soon, or I can try to fix it in post-production.
The problem is that when you have an underexposed image like this, you will create new issues when you increase the exposure in your favorite editing software.
For example, when underexposed, it can become muddy, the skin can become muddy, and you’ll lose some detail.
The skin color can shift and become unnatural looking.
You’ll also introduce digital noise and artifacts, all of which now require your attention and time to be fixed in post-production.
So, start your editing and camera by getting the exposure right at the time of capture versus fixing it after the fact.
So when it comes to the matrix metering mode and this type of lighting condition, you’ll often find that the exposure is close to perfect, like for this image.
However, the scene’s lighting is backlit, and we don’t have all these trees or these buildings here and it’s really bright in these two sections up here.
In that case, the matrix metering mode will overcompensate for this enormous brightness level in those two sections and further underexpose your image.
So remember the matrix mode evaluates the light in five different sections, and if one or more of those sections has a dominant brightness level that is very intense, it’s going to overcompensate for that and will give you an exposure that will be more over or underexposed versus what I have for this image.
That said, the matrix mode is excellent for lighting situations like this or even when the light is muted on cloudy days.
So here’s the second image we took. I used the center-weighted metering mode and this time, the light meter was restricted to the center area, and all the light outside was ignored.
And because we have a reasonably dark area right here that is affecting the light meter, the camera ends up overcompensating for this dark area right here and gives us an overexposed image based on how it’s programmed.
So trying to fix the overexposed skin, you can see it’s a lot brighter than before, and trying to fix that in post-production will create new problems that you’ll have to try and fix.
And just like with an underexposed image, you can end up with color shifts and muddy skin tones, and if too overexposed, you could lose detail that will be nearly impossible to fix.
Now, regarding using the center-weighted metering mode, I’ve never used it and don’t have any personal recommendations for it. I stick with matrix or spot metering.
All right, so here’s the third image we took.
I used the spot metering mode for this, and the exposure is nearly identical to the matrix mode, even though the metering was restricted to her face and some surrounding areas.
That’s because my camera allows the spot-meter mode to move with the focus point, which was placed on her face.
Overall, though, the main area being analyzed is the skin since it makes up a larger portion of the section being metered, and this resulted in the camera compensating for those brightness levels and under-exposing the skin around two-thirds stops.
Now when it comes to shooting portraits, I always use spot metering since I want to expose for the skin.
However, I prefer the skin to be a bit brighter and will use the exposure compensation tool in the camera to increase the exposure accordingly.
So your spot metering mode and the other modes could give you different results based on how your camera has been programmed, and you may not have issues with over or under-exposing the skin, or you could end up with the opposite of my results and have overexposed skin.
So, you will need to test out your metering modes before a specific event to get the results you want.
Then, you’ll know what other adjustments to make to get the exposure right during capture.
And that is where your second option comes into play: utilizing the exposure compensation tool built into your camera.
To discover how to use exposure compensation and continue elevating your photography skills, click here.