Subscribe
Table of Contents
How To Use the Photoshop Subject Select Tool... step-by-step instructions!
Photoshop recently released a new selection tool to make our “selection” process easier. It’s called the Select Subject.
This new selection tool is being touted as a 1-click selection tool. It almost sounds too good to be true.
So, is the Select Subject tool as good as it sounds? Almost.
In this tutorial, you’ll learn how to use the new Select Subject tool, how it works, and its limitations.
Yes, it does have limitations.
To use the tool, you’ll need to make sure your version of Photoshop is up-to-date.
You’ll need at least version 19.1 or higher.
Before starting, update Photoshop if needed. Otherwise, you’ll not be able to use the new Select Subject tool.
Getting Started
To use the tool, you’ll need to either select your Magic Wand Tool or the Quick Selection Tool.
The keyboard shortcut is “W,” and whichever tool you last used will be chosen.
Once selected, you’ll find the new Select Subject tool in the tools option bar (at the top).
It’s designated and activated by a button labeled: Select Subject.
Quick Tip
Here’s how the Select Subject tool works.
- The Select Subject tool has built-in Artificial Intelligence. It is used to determine where your subject(s) are within the photo. One of the ways it does this is by analyzing the contrast of the image. Then it will determine the subject(s) based on that contrast.
- The other way it finds your subject is based on sharpness. The sharpness of the elements within the photo will help Photoshop find your subject(s). Photoshop can “see” that the background is blurred out vs. the foreground. Based on this, Photoshop will then select the “subject” that is in focus.
Sounds great in theory.
But does it actually work? Let’s find out…
Project 1
Grab an image, your Magic Wand Tool (or the Quick Select tool) and click the button; “Select Subject.”
It doesn’t take long for Photoshop to analyze your photo and make the selection.
Chances are good that Photoshop found your subject and selected it.
Pretty cool, am I right?
Upon further inspection, you may notice that the selection isn’t perfect. It rarely is.
Either the selection didn’t correctly find the edges of your subject and/or the edges need to be refined.
Once selected, you may find the edges have a hard edge (pixelated).
In this case, it’s best to refine the edge with the Select & Mask option.
To make the edge selection more realistic, you’ll have to feather the edges.


Click image to enlarge.
It’s hard to see, in the above image, that the selection included the white background… between the watch face and band.
If I wanted to cut-out the watch, I’d have to remove part of the selection (of the white background).
Image 1
My first image is not very complex. We have a watch on a white background.
Pretty easy to select the watch with our Magic Wand Tool.
When using the Select Subject tool, with a photo like this, it will make the selection just as well as with the Magic Wand Tool.
But, chances are it will do so much more quickly.
The other thing is the Select Subject tool is not perfect.
If we take a closer look, we can see that part of the white background was selected too.
If you’re trying to remove the watch from the white background, you’ll need to remove it from part of the selection.
This can be done with the Magic Wand tool.
To remove from the selection, grab the Magic Wand tool, hold down your Alt/Option key, and click in the area that needs to be removed from the selection.
Again, relatively easy with a non-complex background.
Although the Select Subject made the selection in 1-click, it’s not a 1-click-and-done selection tool.
You’ll still need to refine the selection edge and/or add/remove from the selection as needed.
Let’s check out how the Select Subject tool works with a more complex background and foreground.
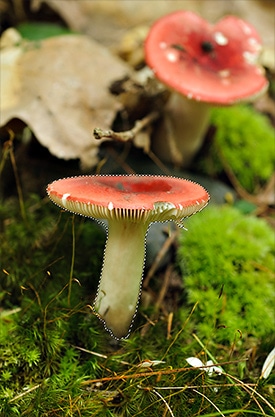
Image 2
Our next image consists of 2 mushrooms and a detailed background.
Is the Select Subject tool going to select both mushrooms, the one in the foreground, or the one in the background?
Let’s find out…
Once the Select Subject tool is activated, it does it’s thing and…
…it selected the mushroom that was most in focus. How cool is that? I love it!
This time, the Select Subject tool determined the mushroom that was in focus was the “subject” and made the selection accordingly.
Let’s see what happens when we have multiple subjects in focus.

Click image to enlarge.
Like previous images, the selection isn’t perfect (hard to see in this sample image).
The hair and other places were not correctly selected along the edge.
I’ll have to go in and add/remove from the selection.
Image 3
Our third and final image is a bit more complicated.
This time we have 2 subjects that are in focus.
Plus, the wall they are leaning on is in focus too.
Hmmm, wonder what Photoshop is going to select this time.
Well, low-and-behold, the Select Subject tool selects precisely what I was hoping for… both the kids!
Even though the wall is in focus too, it’s not as sharp as the 2 kids, and Photoshop determines it’s not part of the “subject.”
The new Select Subject tool is pretty smart.
Wouldn’t you agree?
But, just like in previous examples, the selection isn’t perfect.
I’ll need to go in and refine the selection and add/remove from it. Then, I’ll need to feather the edges.
The Select Subject tool is not a 1-click and done selection tool.
However, it’s very intelligent and provides a rapid selection as a starting point.
I bet you’ll be using the Select Subject tool more so vs. the other selection tools.
In fact, I highly recommend using it as a starting point.
Like this article and/or video tutorial?
If so, please leave a comment below.