How To Use the Photoshop Histogram To Prevent Over Editing | Step by Step Tutorial
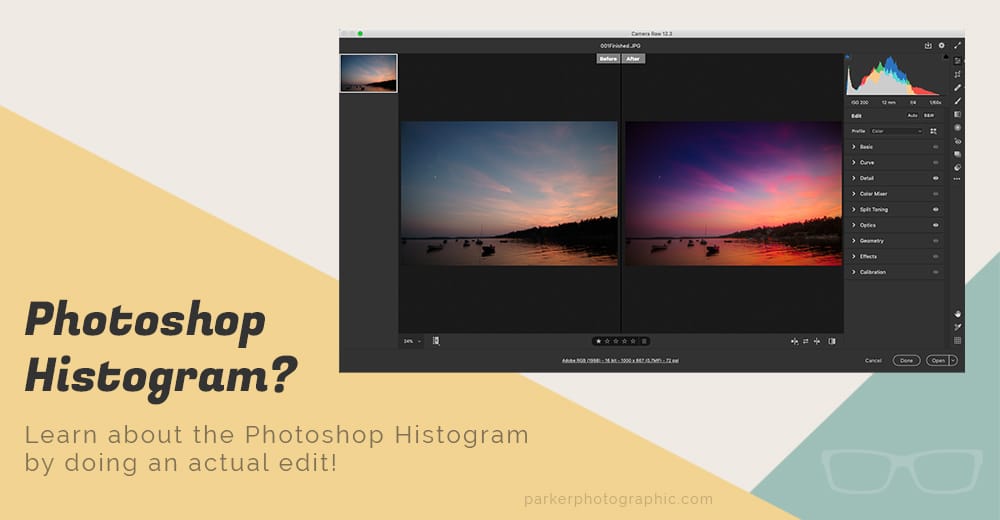
Have you ever wondered if you're over-editing?

Or maybe you would like to discover a tool that will prevent you from over-editing?

Or would you like to find hidden details in a photo not visible in the original file?

The Histogram is an often overlooked tool that can help you improve your editing by not over-editing. It will show the hidden detail, improve your editing speed + accuracy, and more.

In this Photoshop histogram tutorial, you'll explore everything you need to know about this magical tool. Including but not limited to, reading a histogram, how to use it to avoid over editing, and all its hidden secrets are revealed.

Whether you edit directly in Adobe Photoshop or Adobe Camera Raw, you can use the Histogram's power to fulfill your creative vision.

If you're ready to master the Histogram by doing an actual edit, let's get started…
Table of Contents
How To Access the Histogram In PS & In Adobe Camera Raw
Depending on the file format you shoot in will determine your editing workflow.

For example, suppose you shoot in Raw. You'll need to access the Adobe Camera Raw plugin to process those files before opening in PS. Although ACR is not limited to just Raw files.

In fact, you can open JPEG and TIFF files in ACR too!

Either way, both Adobe Photoshop and ACR include a histogram for your editing pleasure. Let's look at how to access the histogram panel for each.
Adobe Camera Raw Histogram
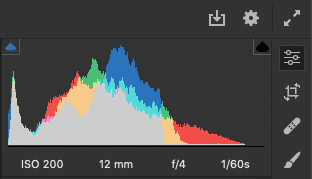
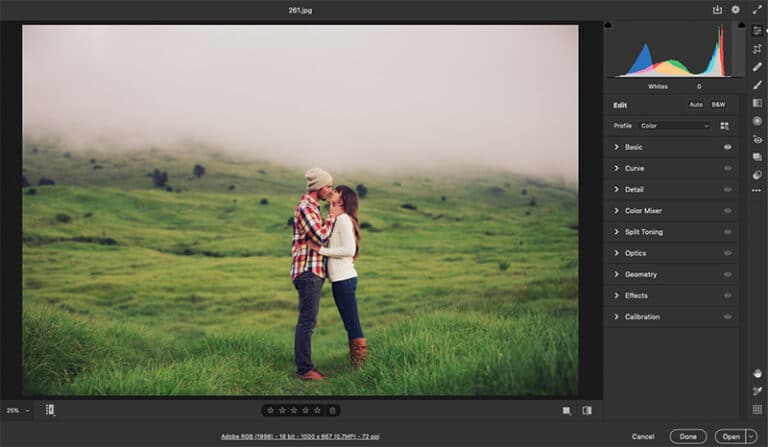
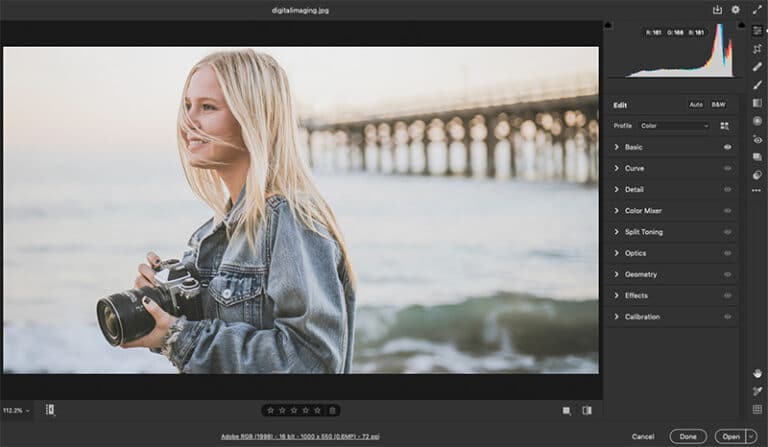
The histogram panel in ACR is visible, in the top right, once the interface is loaded with your photo (s). Unlike in Lightroom, the Histogram in ACR can not be hidden.

Other than that, the Histogram works precisely the same in Lightroom and Photoshop + ACR.
Photoshop Histogram
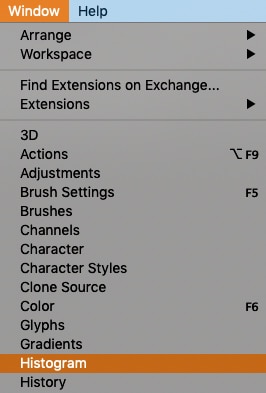
In Photoshop, the Histogram is not instantly visible. Instead, you need to activate the histogram window by going to Window > Histogram. This will provide a new floating panel showing the Histogram of the photo.

You can also dock the histogram panel to the left or right side of the interface. Drag to the right or left until it displays a vertical blue line and let go.

The panel will now auto collapse when not in use. Click on the histogram icon to reveal the panel or drag away from the side to detach.
What Is the Histogram?
If you ever wondered if you over-edited an image, the Histogram can tell you.

It can also tell you what's wrong with your photo before editing and what needs to be fixed. The art of reading a histogram starts with basic fundamental knowledge.
the Histogram...
A histogram is a graphical representation of your photo. It consists of all the detail in each color channel and the luminosity (brightness) of the image.

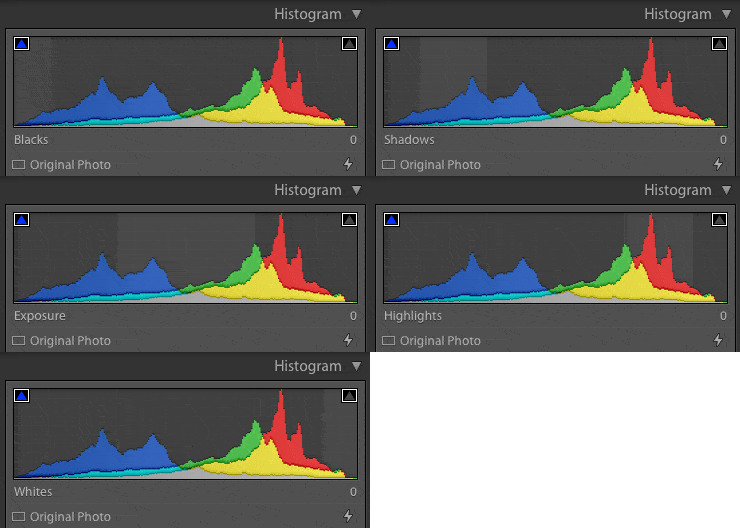
The Histogram is made up of 256 different channels from zero to 255. Each bar represents data in the tonal range of your image from the blacks, shadows, exposure, highlights, and white points.
As you hover over the Histogram, from left to right, the section it represents will light up and display the section's name.
Reading The Histogram
The peaks and valleys that make up the Histogram give you information about your photo and how it needs to be fixed… if at all.

If you see a gap on the left, right, or both sides, then you didn't capture the full tonal range of the scene.

Or the lighting was flat and didn’t provide a complete range of tones from Blacks to Whites.

The peaks also offer information on whether details were captured or not.
Two Ways To Determine If the Image Is Over Edited
Within the Histogram, there are two ways to see if the image is losing details as you edit.

Let's discover what they are so you can avoid over-editing.
Clipping Mask
In the top right and left of the Histogram, you'll find two clipping mask icons.

By default, they are turned off. Click on both to activate the clipping mask tools.

After activating, you may already see the blue and or red overlay masks on your image even if you haven't started the edit.

A blue overlay is telling you that the blacks and or shadows are losing detail. A red overlay shows where the highlights and or white points are clipped.
Note: this option is only available in ACR and not directly in the Photoshop histogram.
When the overlay masks are visible, this means you over-edited the image. Or if you haven't started editing yet, you didn't nail the exposure in-camera.

Suppose the overlays appear as you're editing. You know that adjustment was too much and can pull back until the overlay disappears. If the overlays are there before editing, then you know what you need to fix.
Peaks, Valleys, & Gaps, Oh My!
An ideal histogram (in most cases) has detail from the far left to the far right.

Any gaps indicate detail is missing in those areas. Unless the lighting was flat or low-key (intensity), and your creative vision required this type of light. Stretching the histogram to fill the gap expands the tonal range and increases contrast.

But, it can cause additional headaches that will require fixing too, especially when the gap seeps into the highlights and or shadows.

For example, if there's a significant gap, additional digital noise and or digital artifacts will be added to the image.
This will end up lowering the quality of the image. This is another reason why it's essential to nail the exposure in-camera (as close as possible).

The following image shows a gap in the Histogram on the right and left side. It’s mostly in the White points, a little in the Highlights, and a little in the Black points.

To fix it, you'll need to stretch the Histogram until it fills the gap. Make sure the histogram data touches the left or right edge of the box.

If you go past the side, you begin losing detail and end up over-editing the image.
Click to enlarge. On the right side of the histogram, you’ll notice a gap where it’s highlighted. The real question is, do you fill the gap or not?

The answer is not that simple.

To find out whether you should or not, check out this guide on the tonal range.
Peaks can be a warning signal too. If a peak of data reaches the top of the Histogram and has a flat top (see image below), then that part of the image has lost detail—the bigger the flat top, the more damage that has been done to the tonal range.
These peaks indicate that the tonal range exceeded your camera, i.e., the dynamic range.

Or the exposure wasn't correctly set at the time of capture. During editing, these peaks can exceed the top if you over-edit, and that's your warning to pull back.
Click to enlarge. The peak in the Highlights shows that data has been clipped. Or the detail has been lost.

This can occur at the time of capture and results in parts of the image ending up overexposed. It can also happen during editing if you over-edit.
Editing Challenge...
Step by Step Instructions
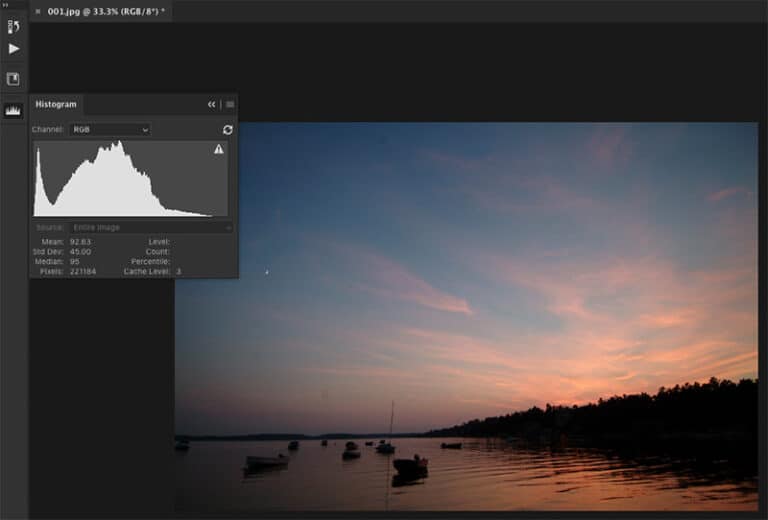
This particular image was taken about 20 years ago with my first digital camera, the Fuji S2.

The quality of the file is low compared to most modern digital cameras today.

However, this image demonstrates perfectly how reading the Histogram can reveal hidden detail and improve an image.
Step 1
Step 2
Open the image in Photoshop and open the histogram panel.

Unlike the Histogram in ACR, we do not have clipping masks to warn us of over-editing. Instead, we'll use the peaks to determine when to stop an adjustment.
Step 3
This image has a gap on the right side of the tonal range, and it's contained within the white point.

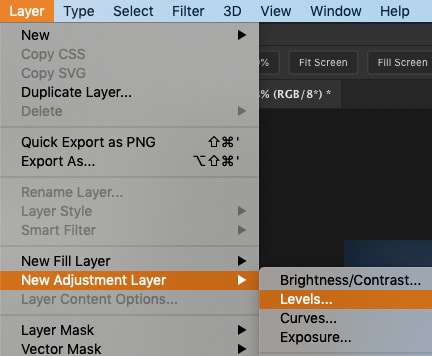
To fill the gap, we'll use the Photoshop Levels tool. To work non-destructively, we're going to apply an adjustment layer.

Go to: Layer > New Adjustment Layer > Levels

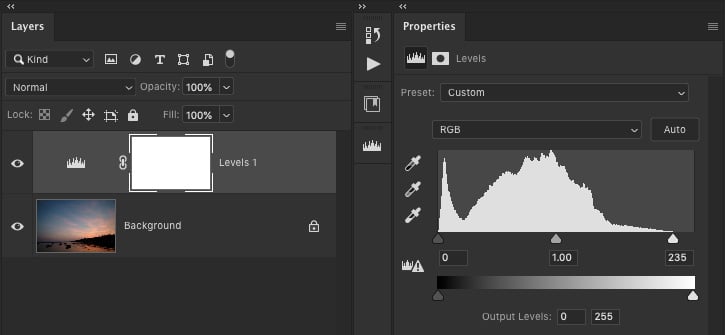
Now that the levels adjustment panel is visible, let's fill the gap by clicking on the triangle icon to the right and drag to the left. Drag until it reaches the first set of data within the Histogram. I've set mine to 235.
Next, read the Histogram. What is it telling you?

Well, there are no peaks exceeding the top. This means there is detail in the entire tonal range of the image.

Although, if you look at the trees, it's hard to see any detail. But, the Histogram is telling us there is more detail than just a black blob of nothing.

To reveal this detail, grab the center icon and drag it to the left. This increases the exposure of this part of the tonal range.

The further to the left you go, the more houses you'll see! Don't go too far, though.

Doing so will create more digital noise and digital artifacts. I've set mine to 1.52.
These two edits have lowered the contrast. You could increase the contrast by adjusting the black point (left side).

However, doing so will begin to clip detail in the shadows.

So, you'll have to explore other tools to boost contrast. My favorite is the tone curve.

That alone will not be enough, though.

For this particular image, you'll have to target the edit by using a layer mask.

Using a layer mask will maintain the detail in the shadows while boosting the contrast with the tone curve.
Step 4
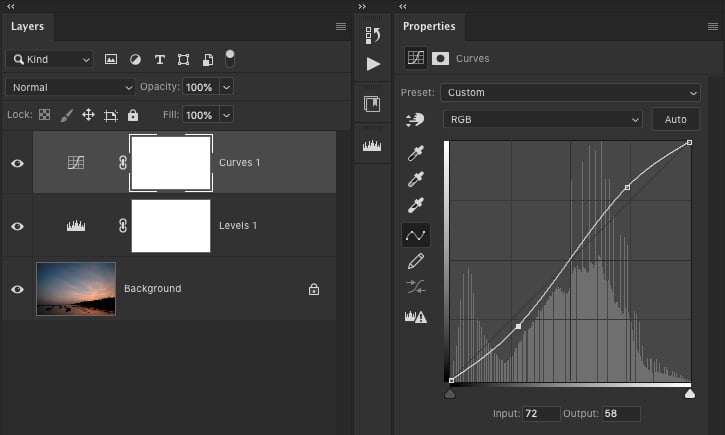
Add a Tone Curve adjustment layer by going to Layer > New Adjustment Layer > Curves

Once the Curves panel is visible, you can begin boosting contrast.

My favorite method for adding contrast is applying what is known as an "S" curve.

Achieve this by dragging the diagonal line from the top right, up, and the bottom left, down.
This creates the "S" shape and increases the contrast in the highlights and shadows. The more you "curve" the diagonal line, the more contrast is added.

For this particular image, I added more contrast in the highlights vs. the shadows. This is due to the loss of detail in the shadows as you increase the curve. Check out what my Tone Curve adjustment looks like compared to yours.
Step 5
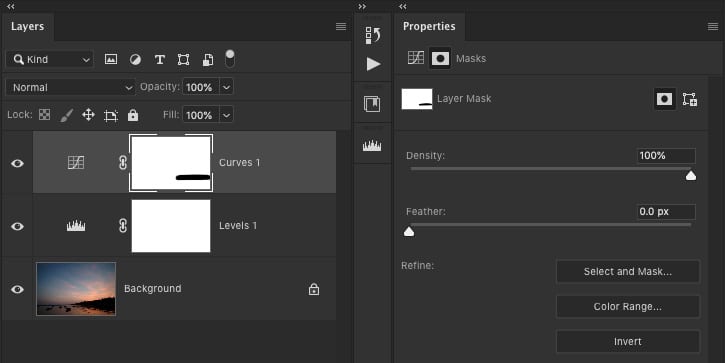
For this part of the edit, the final step is to use the layer mask to remove the edit precisely where we don't want it.

For example, we want to show the houses in the trees, and the tone curve adjustment hides them.

Click on the layer mask to activate that part of the Layer and grab your brush tool.

Adjust the brush size to be a little smaller than the shadow area of the trees—Right-click on the image to access the brush-size tool.
Or use the keyboard shortcuts to adjust the size.

The left bracket ( [ ) will make the brush smaller, and the right bracket ( ] ) makes it larger.

Next, make sure the foreground color is set to black and paint over the trees.

As you do, the details (the houses) will begin to appear again!
Houston We Have a Problem!
Due to the quality of the file, improper exposure at the time of capture, and the edits we applied, we have a serious problem.
Zoom into the houses, and what do you see?

Lots of digital noise and artifacts! These dreaded pixels were not there before the edit. This is why I always recommend editing in-camera first.

If you nail the exposure and capture the full tonal range of the scene, you won’t need to take drastic edits like this to fix it.

Now, we need to apply digital noise reduction to try and remove it. But, that could cause additional problems.

Like, making the image too soft if over-done. If it’s too soft, you can try to apply some sharpening to fix it. But, that brings back more digital noise and or artifacts... round-and-round we go!

Also, check out the Histogram now that you’ve completed the initial edits. It looks a lot different vs. the original. Several peaks are exceeding the top and a lot of gaps between the individual bars.

The Histogram is telling us that we exceeded the tonal range of the file by trying to fix it, and we created a lower quality image.

Was it the fault of the photographer (me) or the camera gear? Both, I could have done a better job with the exposure.

But, I was on vacation and grabbed this shot after having a couple of drinks… of whiskey, I mean water. (haha).

Keep in mind that this edit is not my final edit. There's a lot more I'd do to this image to make it better; boost the saturation, vibrance, add a vignette, and more.

Below is my final (creative) edit. It’s a bit sci-fi. But, it’s right in line with my style. At least at the time I did the edit almost 20 years ago!
the Editing Challenge
Apply what you learned to the image provided... and create an edit based on your creative vision.

Once completed, post your edit in our private Facebook group to share and or to ask questions.
What Now?
You may want to check out my Photoshop for beginners guide if you're new to editing with Photoshop.

Or my Adobe Camera Raw tutorial if you wish to learn more about this free plugin included with your Creative Cloud subscription.

To learn more about capturing the proper exposure in camera, check out these complete photography guides:


